---
title: "Sopact Sense User Manual"
author: "Madhukar Prabhakara"
url: "https://docs.sopact.com/2/sense-ai"
---
# What is Sopact Sense
Sopact Sense is a remarkably lightweight, all-purpose data collection tool designed to help organizations tackle a wide array of problems. It’s not just another survey or forms product. While you can do everything you’d expect from a survey tool, Sopact Sense is obsessively designed to help you collect ==clean data== and ==analyze and build designer reports== in ways you’ve never done before.
Traditional data collection creates fragmentation, data lives in silos, records don’t match, and duplicates pile up because there’s ==no consistent unique ID== management. Sopact Sense fixes this at the source through three unique built-in features that ensure every contact and data point has a unique ID, keeping data clean, connected, and AI-ready across the entire lifecycle.
>**Contacts** - Just like a CRM, Sopact Sense features a light weight Contacts object that helps you create a group of unique people. For example, you may have a cohort of people you are collecting data from and you could have a dedicated contacts object to store their information
>**Relationships** - You can establish relationship between contacts and forms. This is not the same as sending the group of people a survey. With relationships, you can link a contact objects to multiple forms, for example, may be you do an intake and and exit survey. When you establish relationship, we help keep track of the group of people uniquely on the forms which helps eliminate duplicity in data and helps you track the same people in intake and exit, making it ridiculously simple to compare the cohort across forms
>**Intelligent Cell** - Sopact Sense features an extremely powerful qualitative data analytics feature that lets you analyze open-ended responses from the survey and also contents of PDF attachments keeping the contact relationship intact. Imagine collecting PDF attachments and open-ended responses and have them analyzed, based on predefined AI rules, instantly, as the responses come in. Saves you hundreds of hours of manual work and super useful when when implementing evaluations or assessments where data needs to be filtered based on response.
#### Some use cases that you can build with Sopact Sense
- Implement funders portfolio management that helps funders collect data from same companies repeatedly i.e. application, due diligence, success, and exit.
- Implement proprietary evaluation methodology that requires you to analyze qualitative data, and implement scoring techniques.
- Collect end-to-end (application to success) workforce data in one single system instead of scattered data in multiple systems. Track each trainee across their entire lifecycle with ease.
- Implement light weight CRM of curated contacts. Collect follow on data keeping the tight relationships.
#### Feature already built into Sopact Sense
- Contact Objects creation
- Forms creation
- Relationships (Between contacts and forms)
- Skip logic
- Advanced validation of form data
- Save progress
- Completion alert
- Customize branding through logos
- Qualitative data analytics (Open-ended responses and pdf attachments)
- Intelligent Cell to extract and score from qualitative data
- Download data in CSV/Excel format
- Embeddable Contacts and Forms
- Connect your favorite BI tools (Tableau, PowerBI, Google Looker) to analyze data in realtime
- Seamlessly run campaigns to send surveys while our system ensures clean data collection
We cannot wait to see what you build with Sopact Sense!
5 steps quick Implementation
#### Step 1: Create Contacts
This is the beginning of 5 steps quick implementation guide of the Sopact Sense platform. You'll learn in ==5 steps== how easy it is to start collecting clean data, void of duplicates and typos and you will also understand how easy it is to collect data from the same people or have the data corrected by the same people.
> Imagine you are running a program for young girls to train them on technology skills so that they can have an opportunity at getting a job in the tech industry and improve their quality of life.
With this context, lets get started.
You need some way to register/enroll these girls into your program. This is what Contacts are for.
>You will learn in Step 3, how foundational Contacts are to collect clean data.
All the static information that you would typically collect as part of the information goes into it.
Let us say that we need the following information for every girl we enroll:
- Name
- Email
- Date of birth
- State
- How confident do you feel about your technology skills?
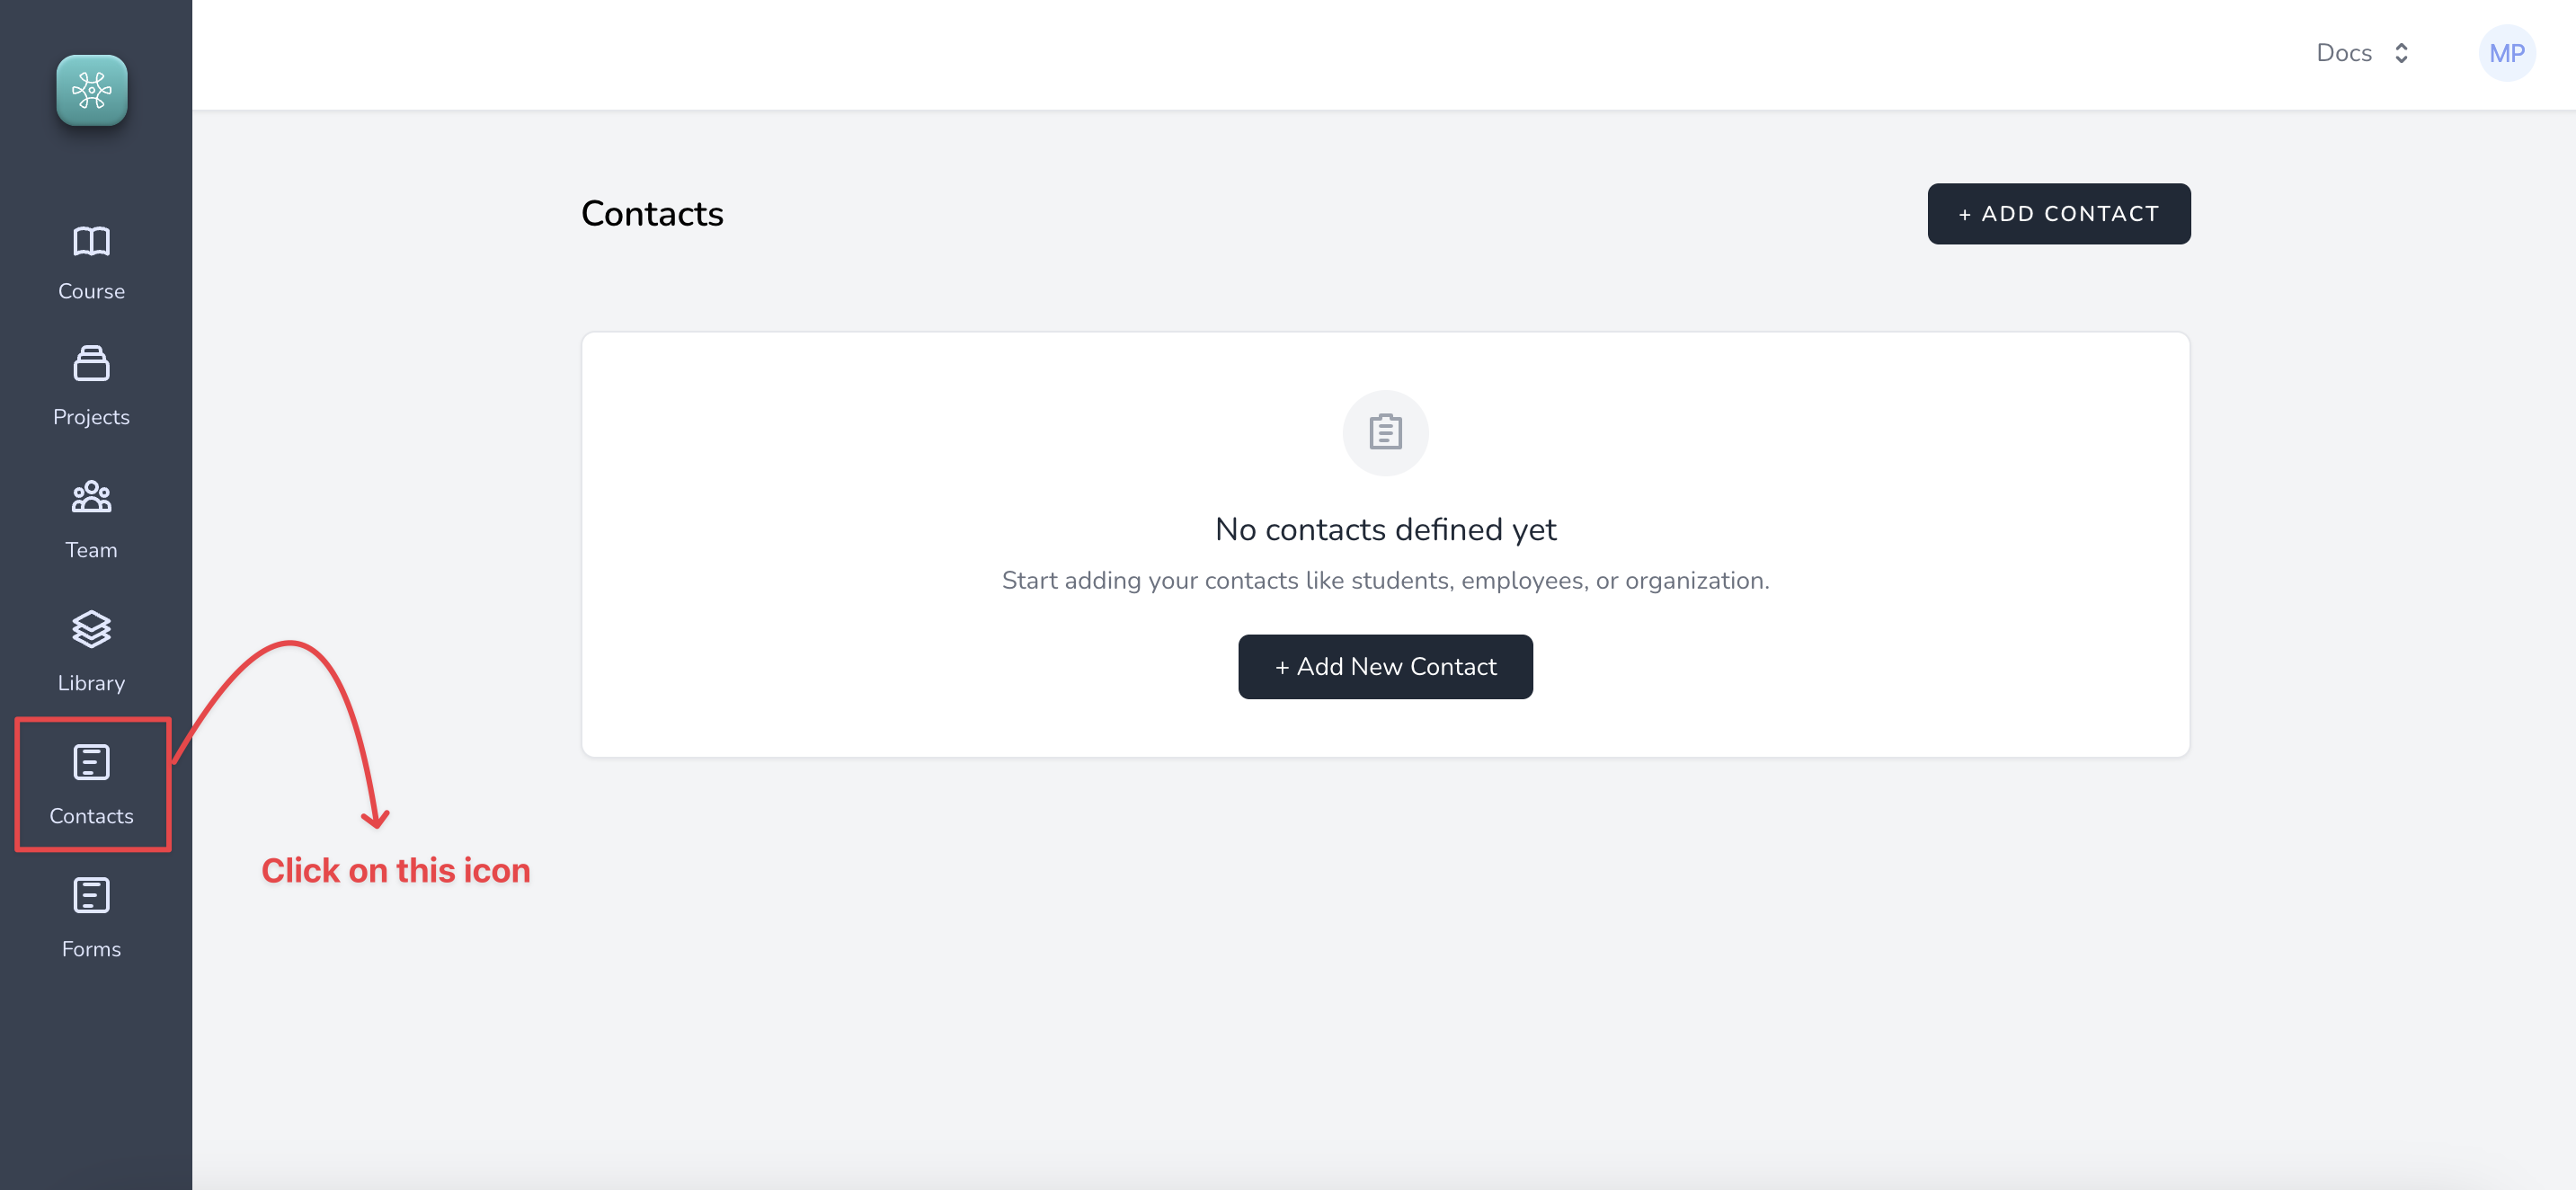
##### 1. On your Sopact Sense account, Click on Contacts and add a new Contact object called "Girls"
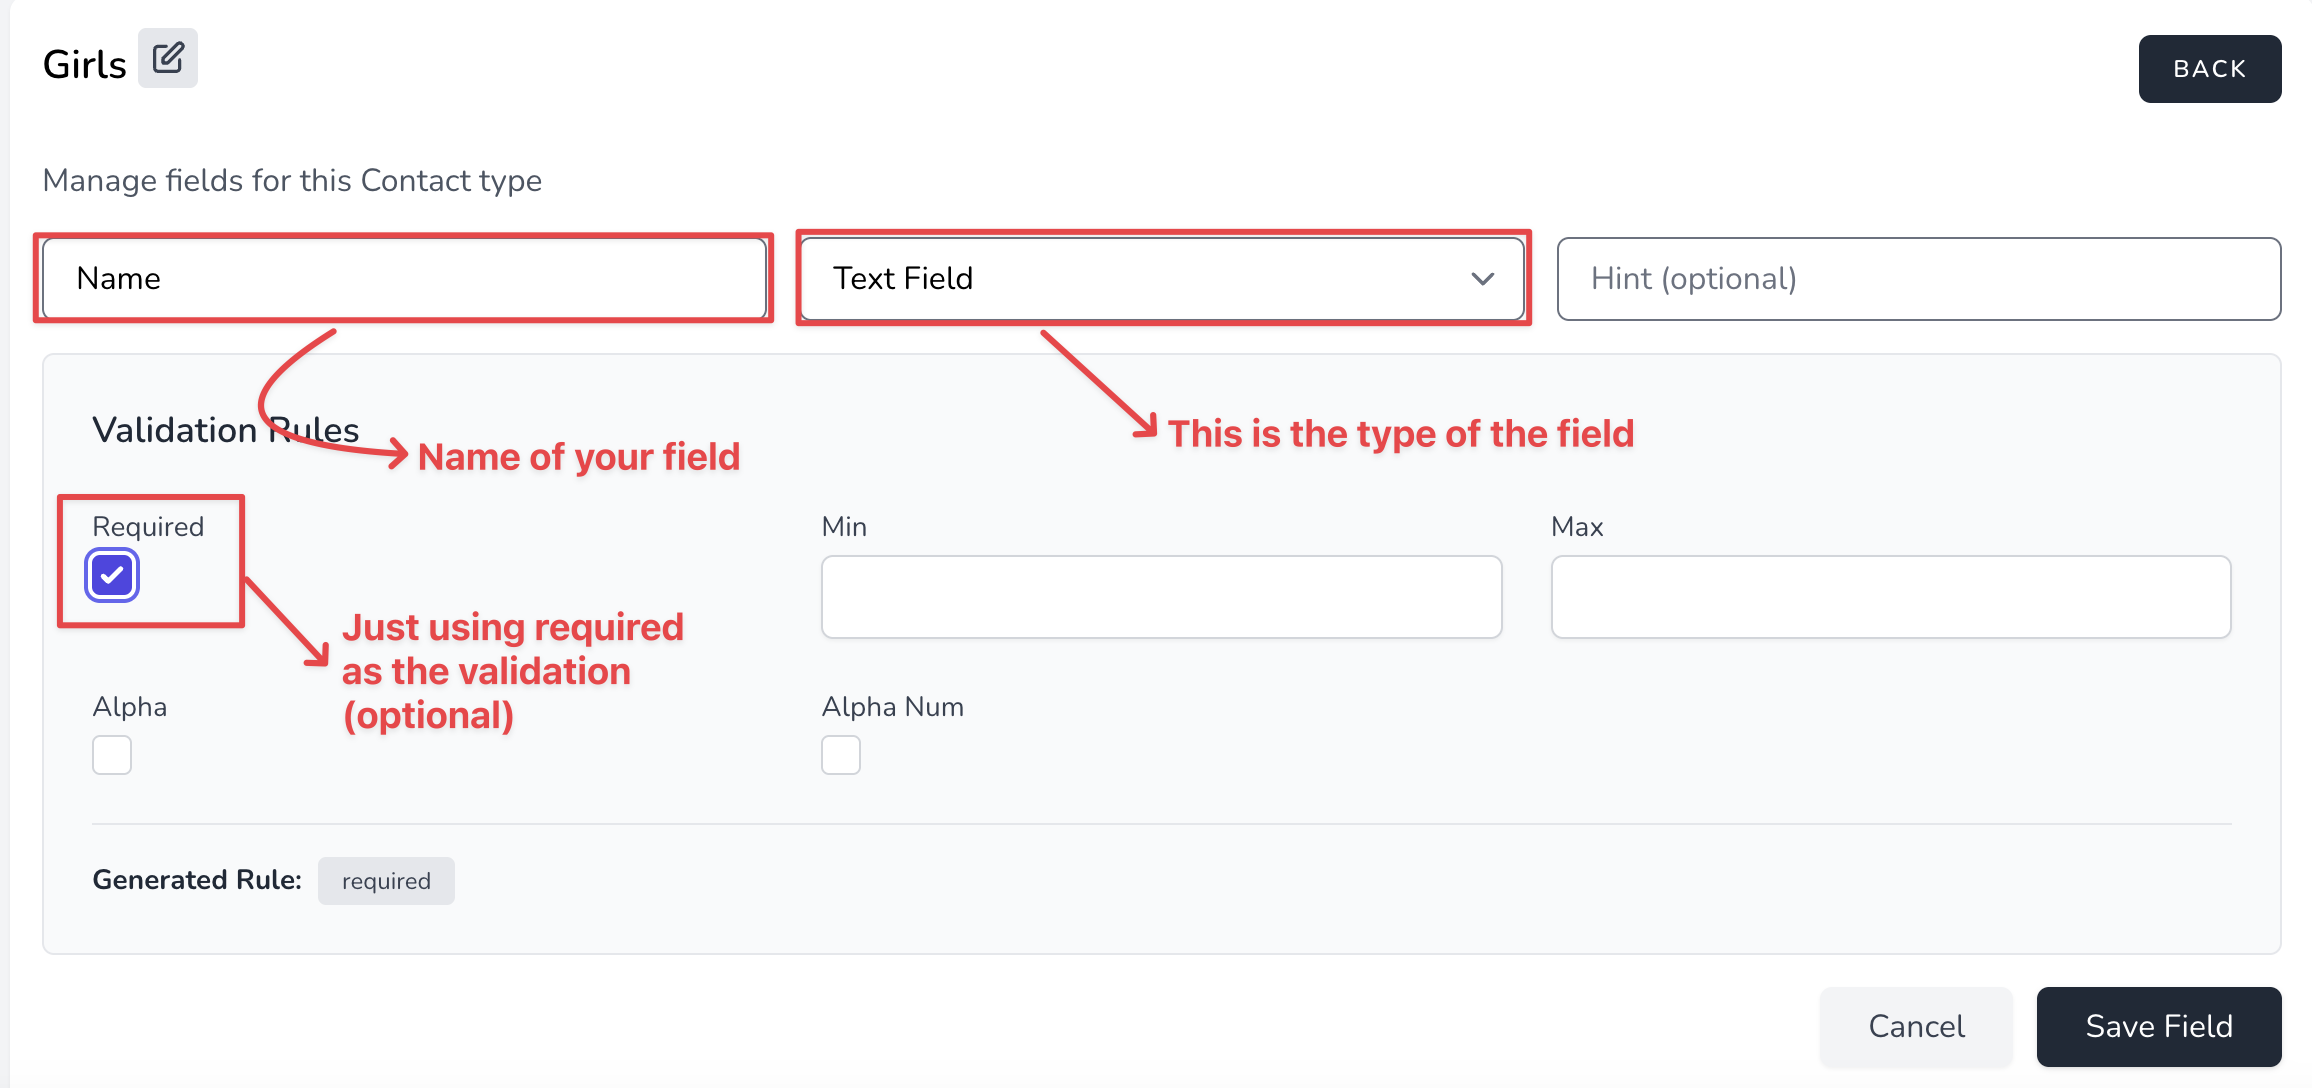
##### 2. Once you create the Contact object, you will be navigated to this screen which lets you start adding the field we identified above
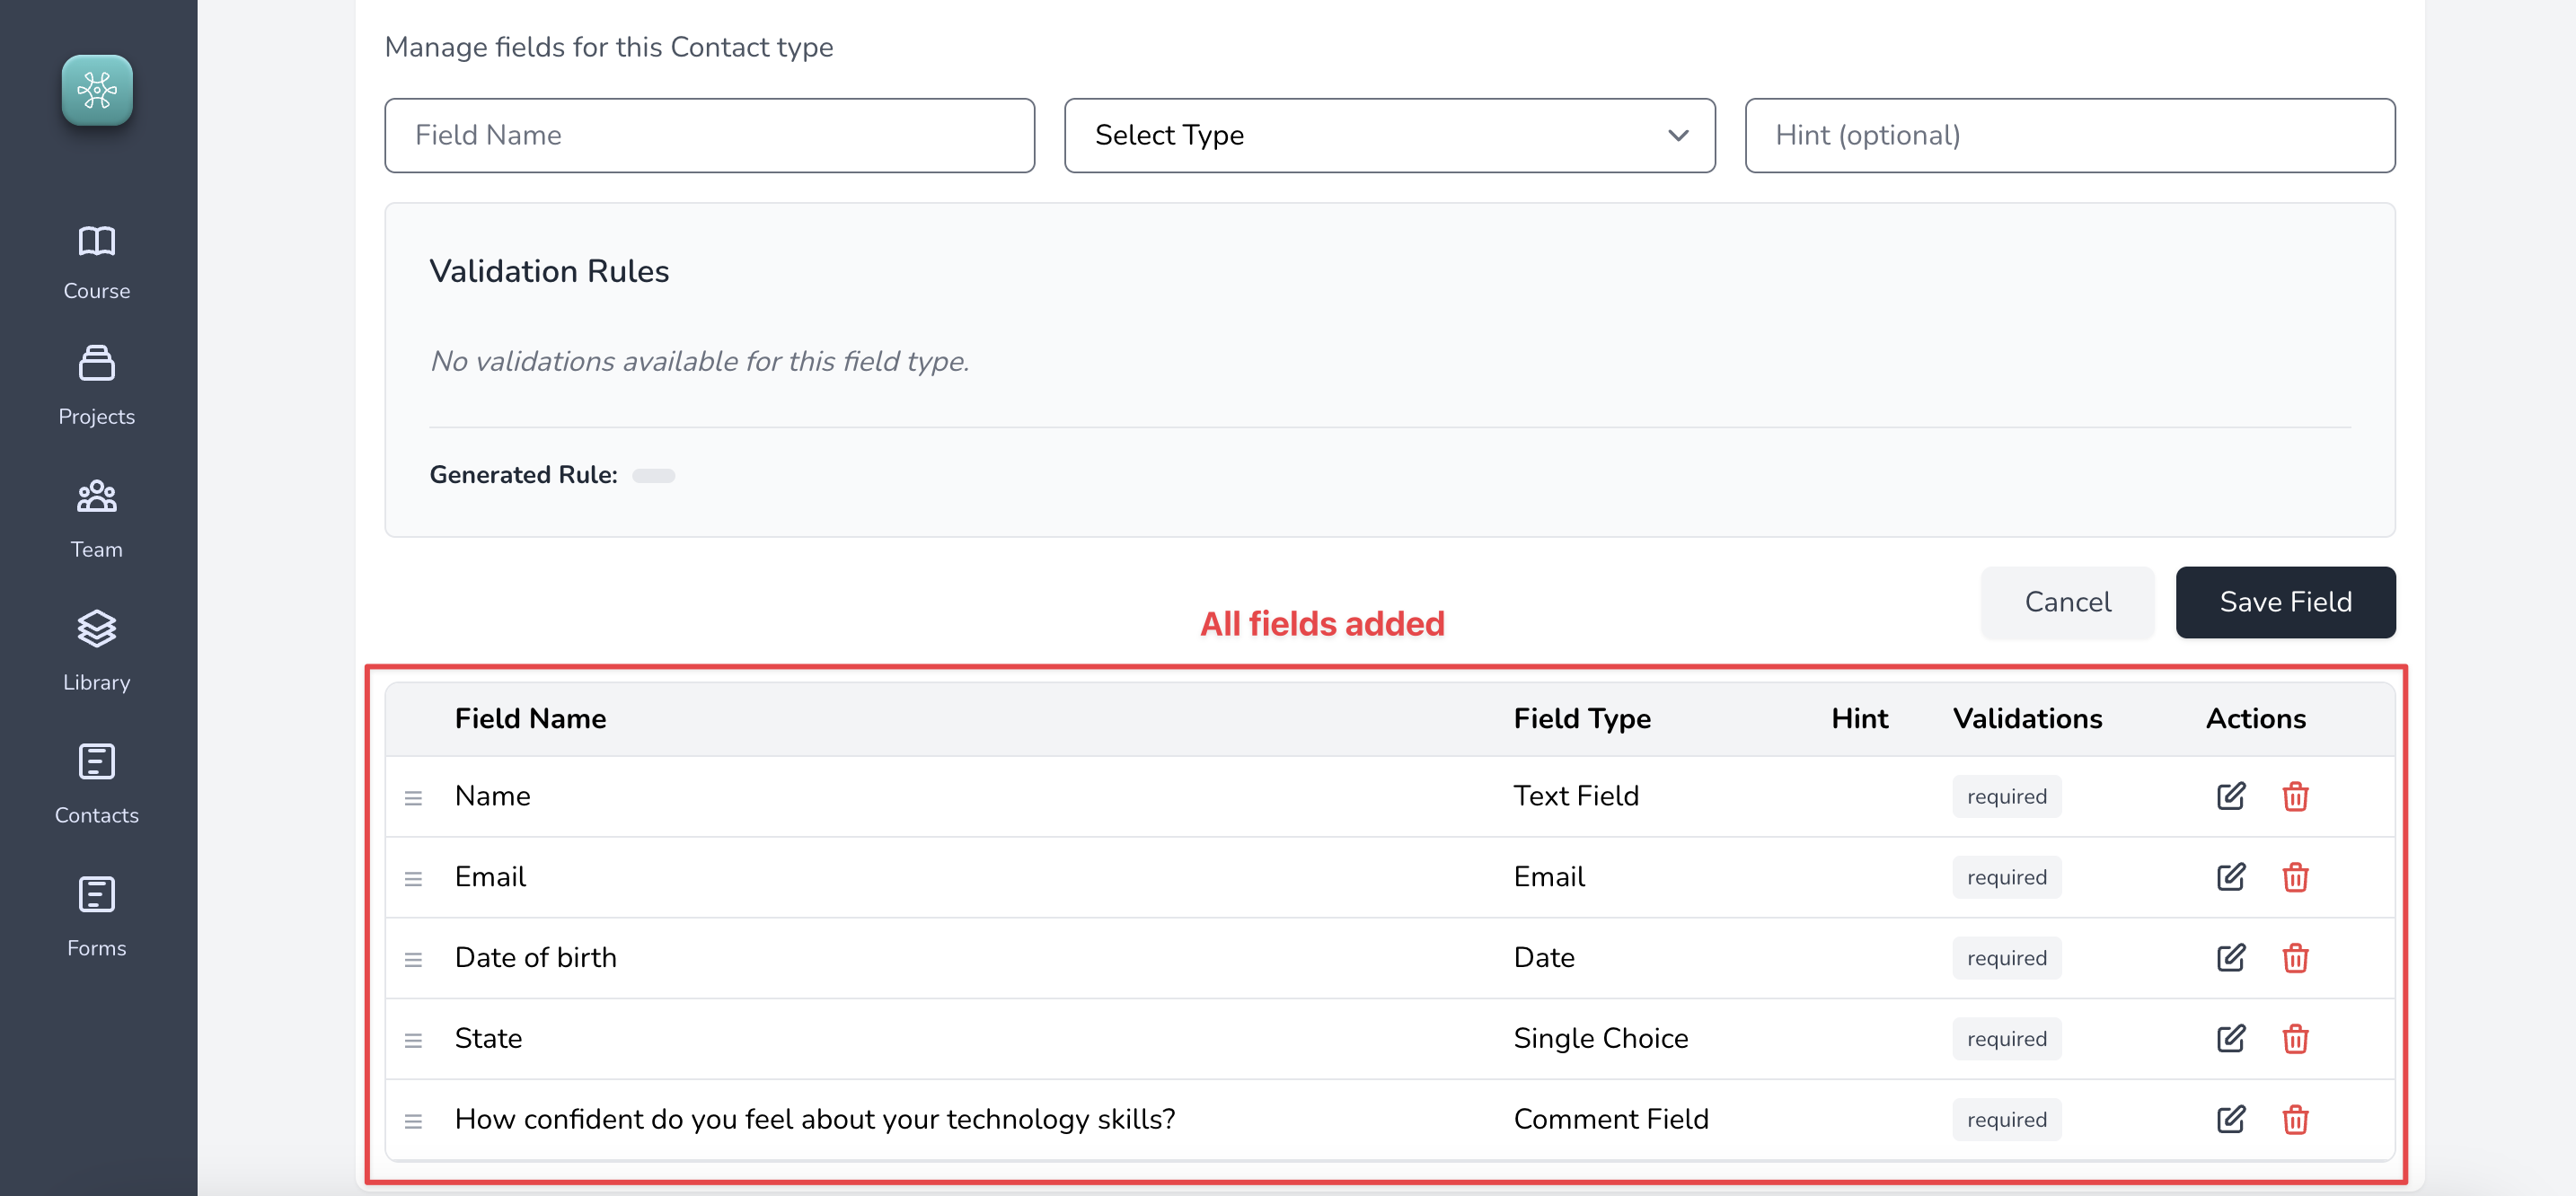
##### 3. Once you add all the fields this is how your screen will look like. The fields along with the datatypes
##### 4. If you want to see what this Contact form will look like, click on the Contacts menu again from the left bar and copy the url for this contact form, like so
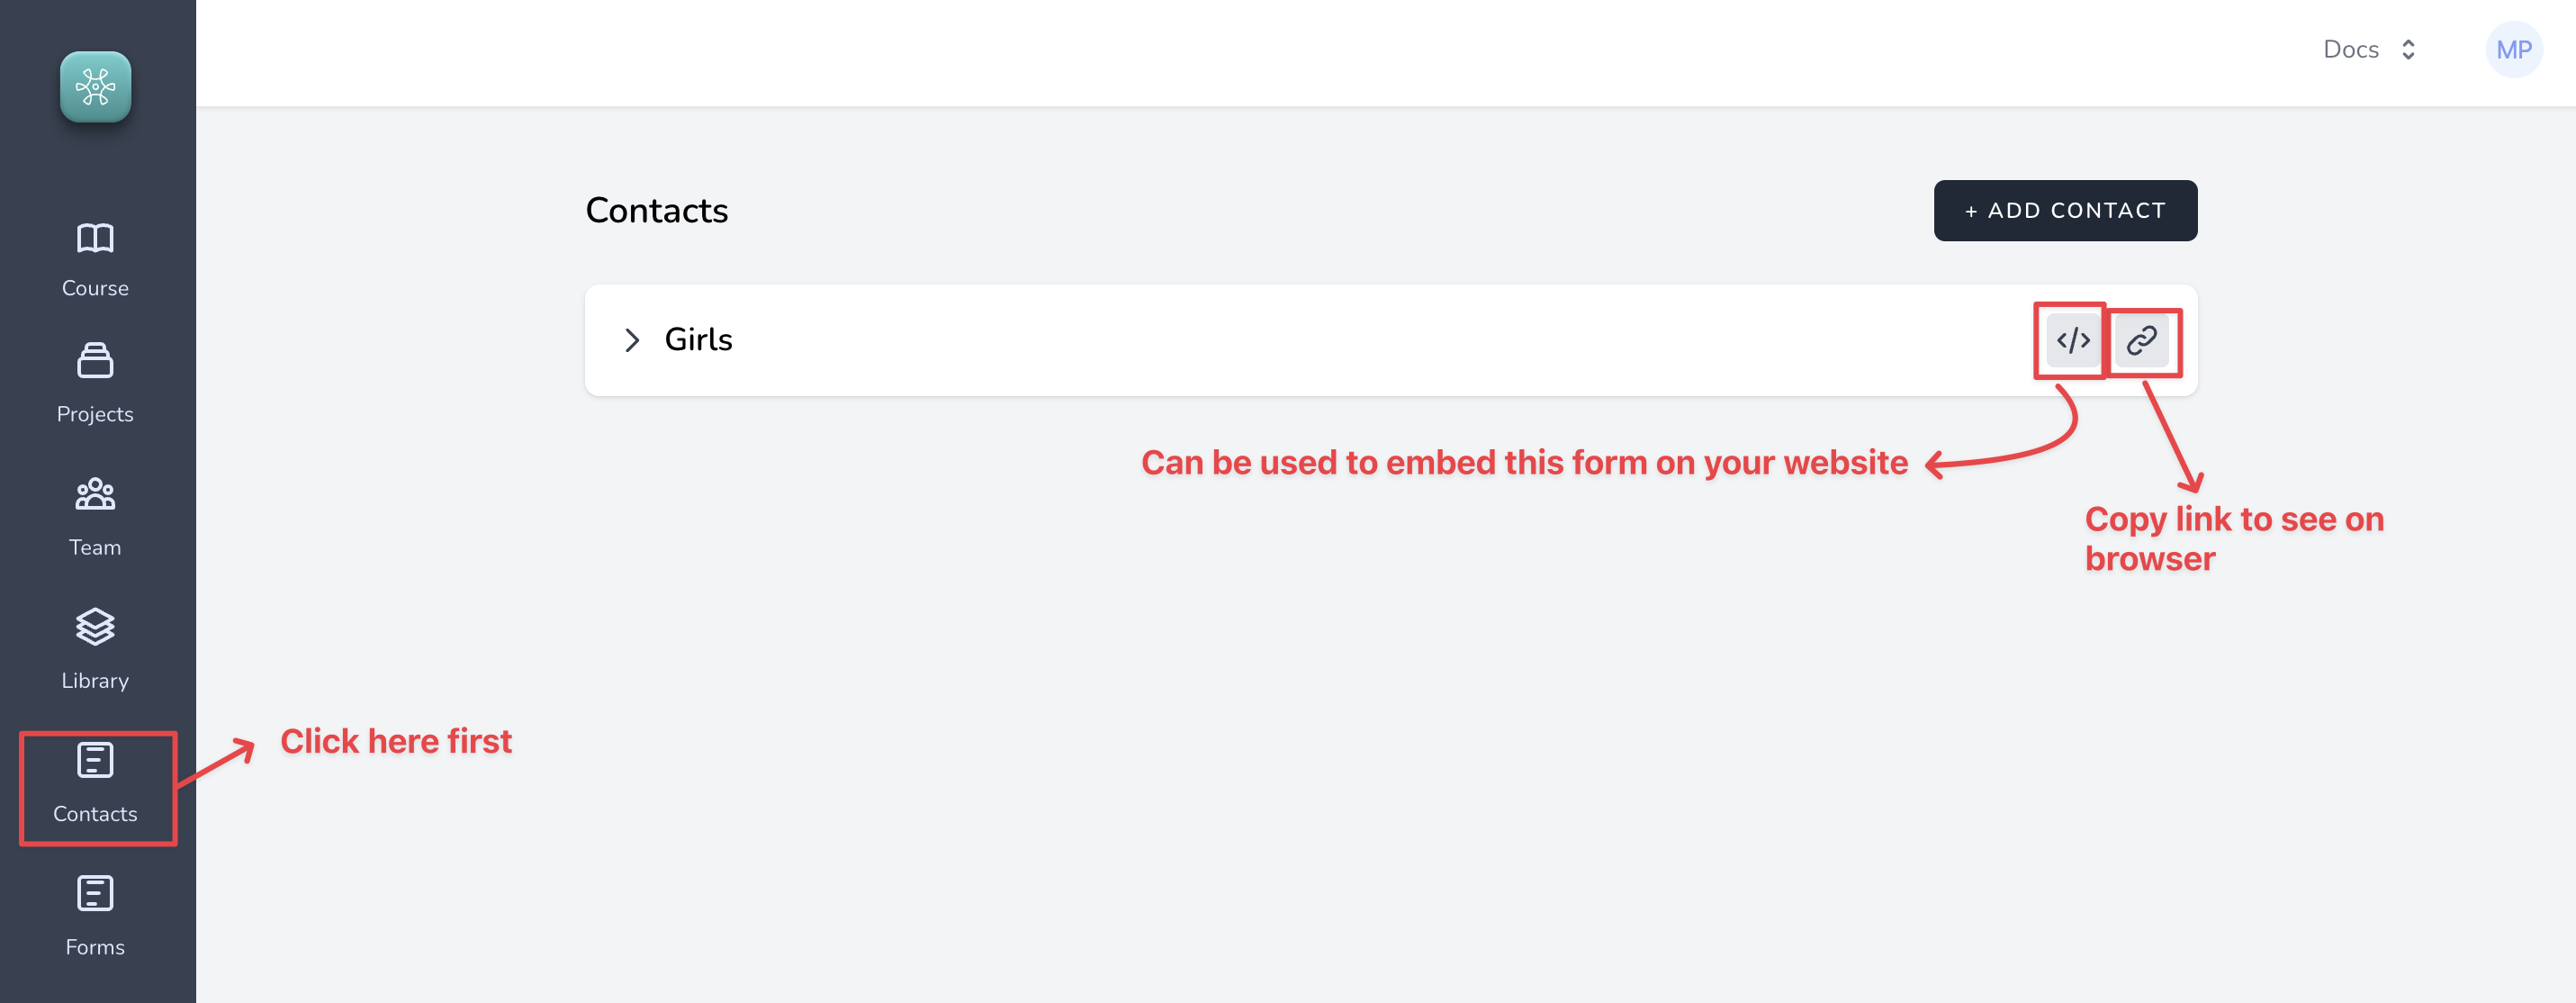
The example form that we just created.
You can share link to collect information and create contacts in the Contact object. Alternatively you can embed the code to your website for collection registrations or leads.
Step 2: lets create a form.
#### Step 2: Create Forms
Setting up forms is very similar to creating contacts.
Continuing with the same example. Let us assume that we are setting up a feedback form so the girls can give our organization feedback on the training program.
We will setup two forms from the perspective of tracking progress these girls have made on their confidence level with technology skills.
==_Mid Program feedback_==
For Mid program feedback we create the following questions
- What was your score on the coding test?
- Did you build a web application?
- How confident do you feel about your current coding skills and why?
==_Post Program feedback_==
For Post program feedback, we create the following questions
- Did you build a web application?
- How confident do you feel about your current coding skills and why?
- Did you get a job?
Let's get started.
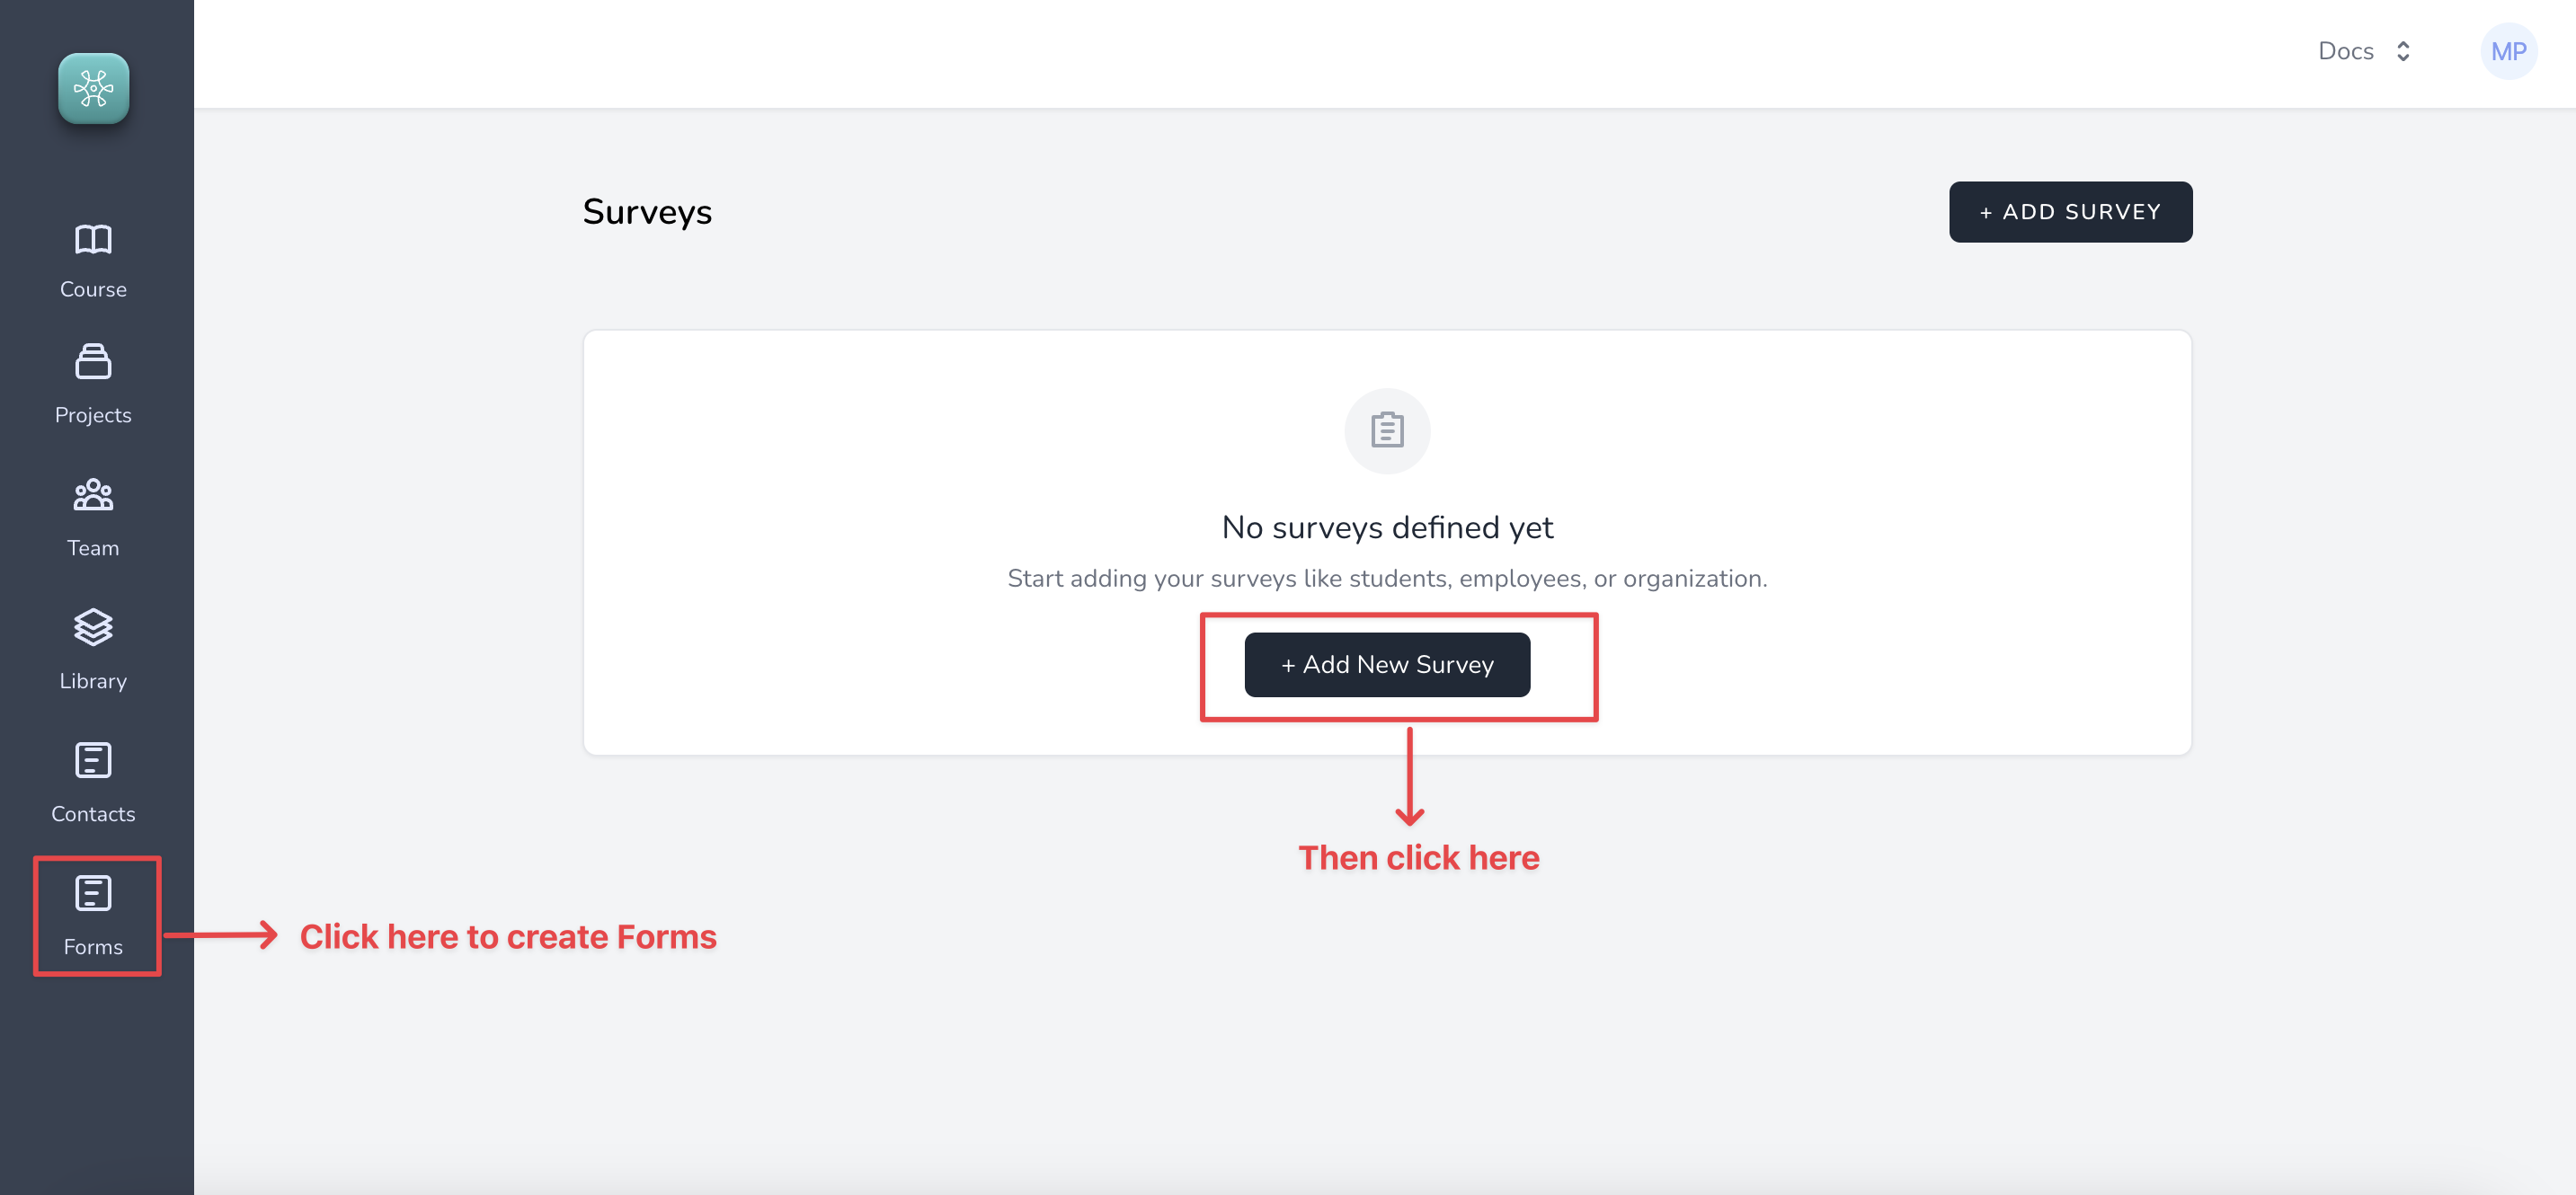
##### 1. Click on Forms menu item from the left side bar. You will be navigated to the screen below.
##### 2. We will name our form ==Mid Program Feedback== and after we save we are navigated to the screen where we can start adding questions
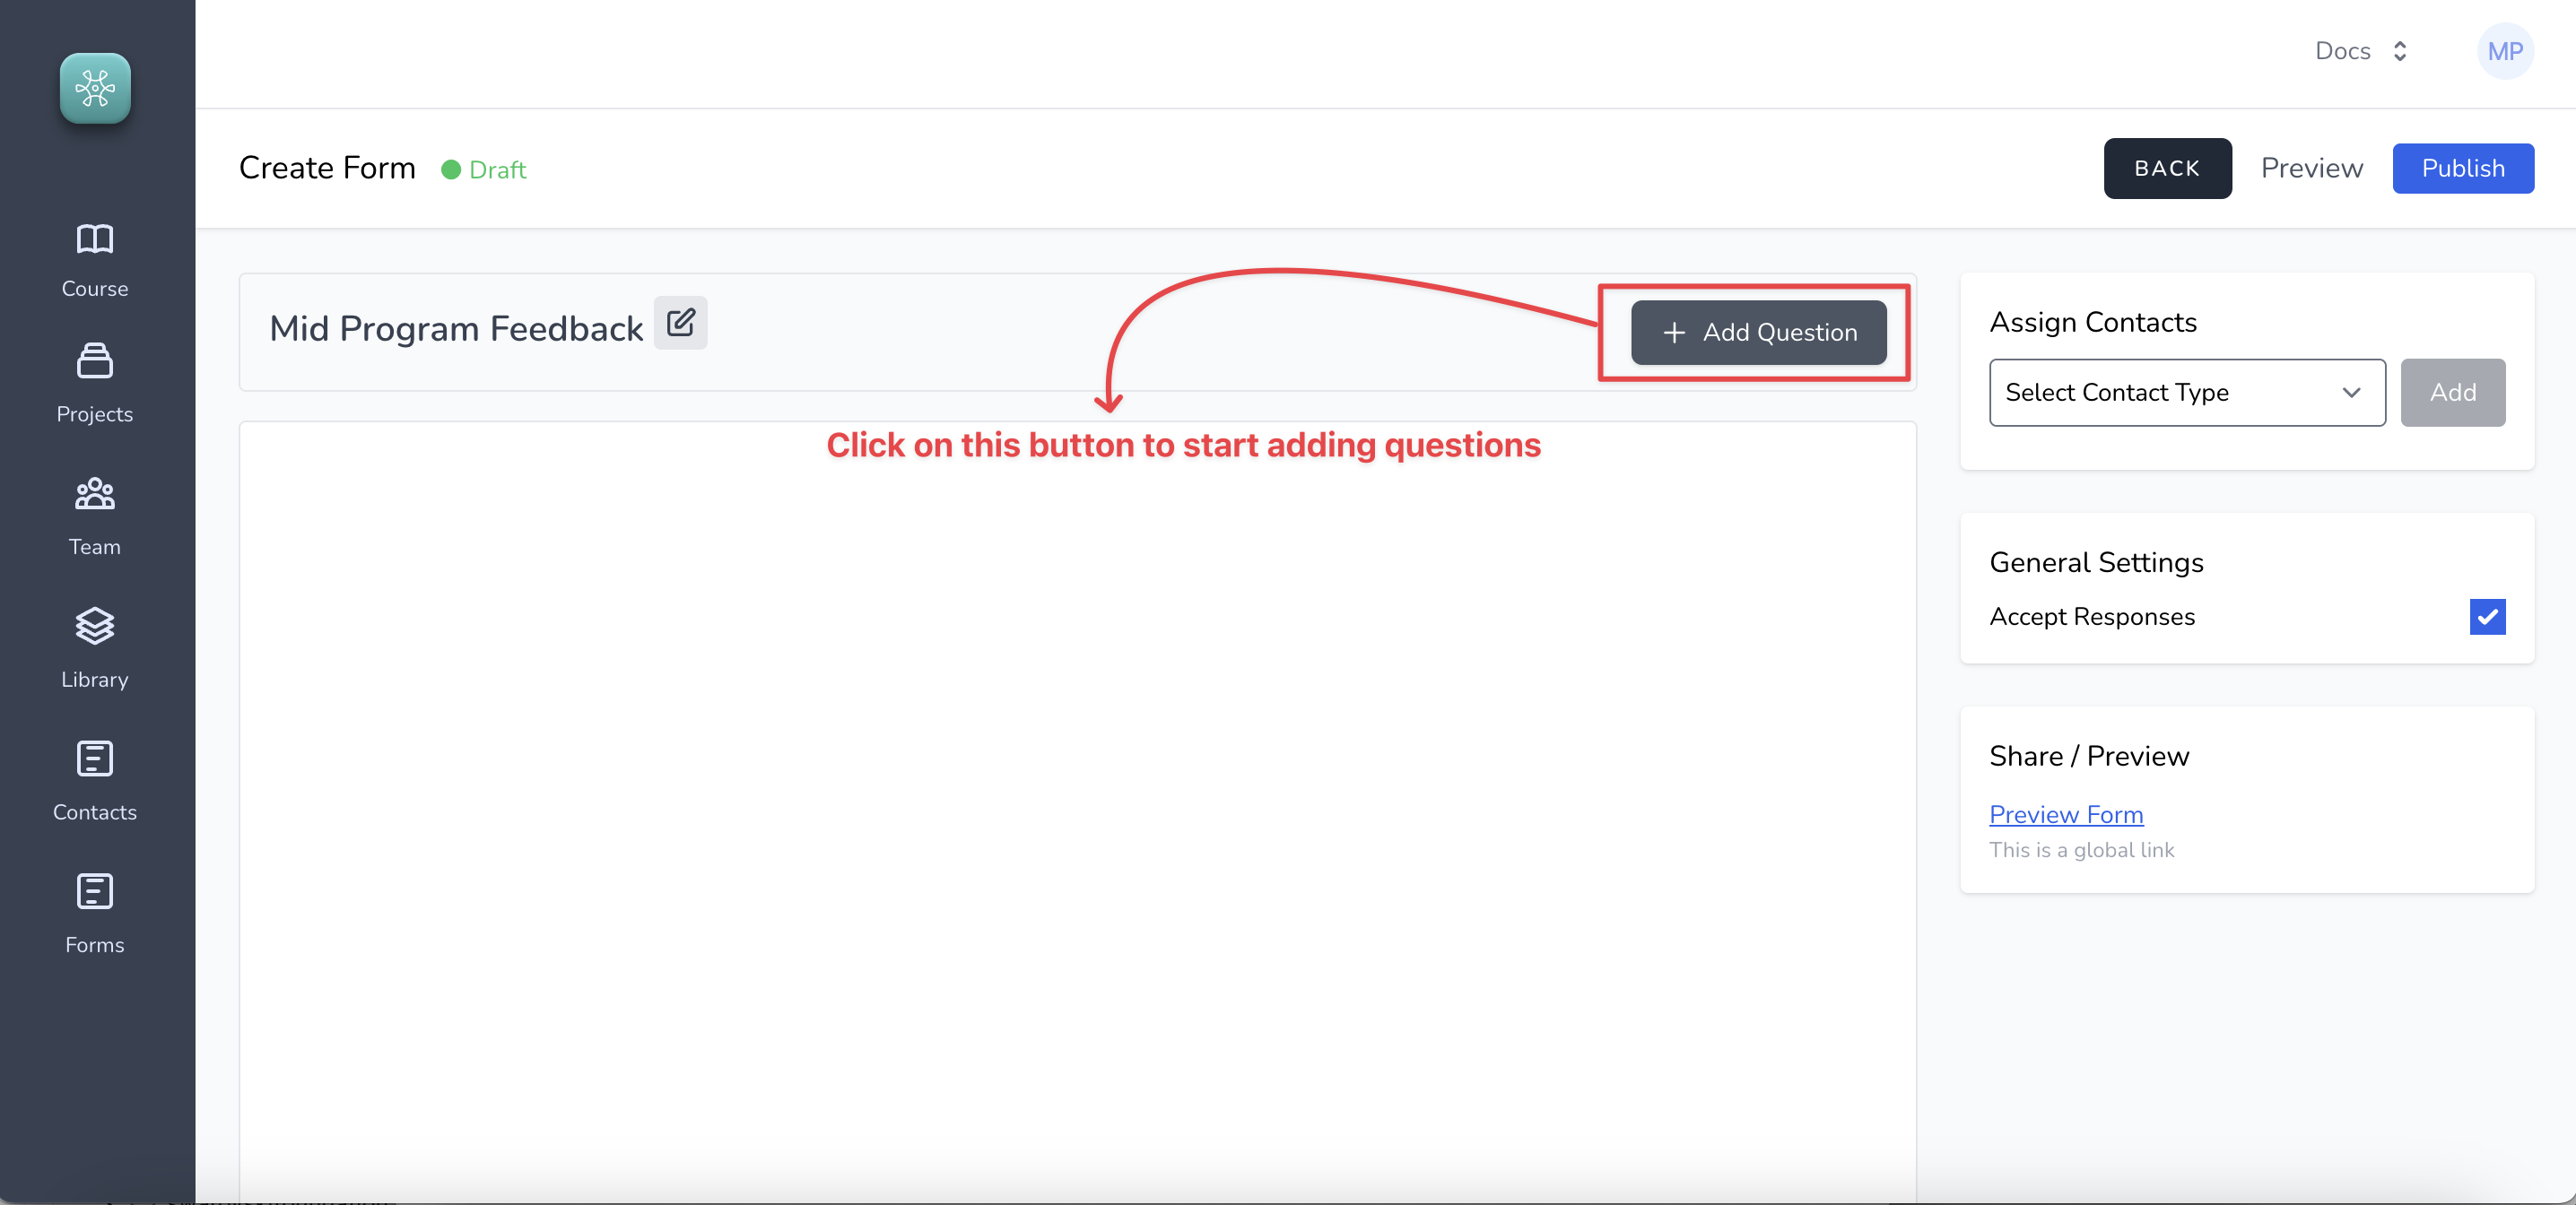
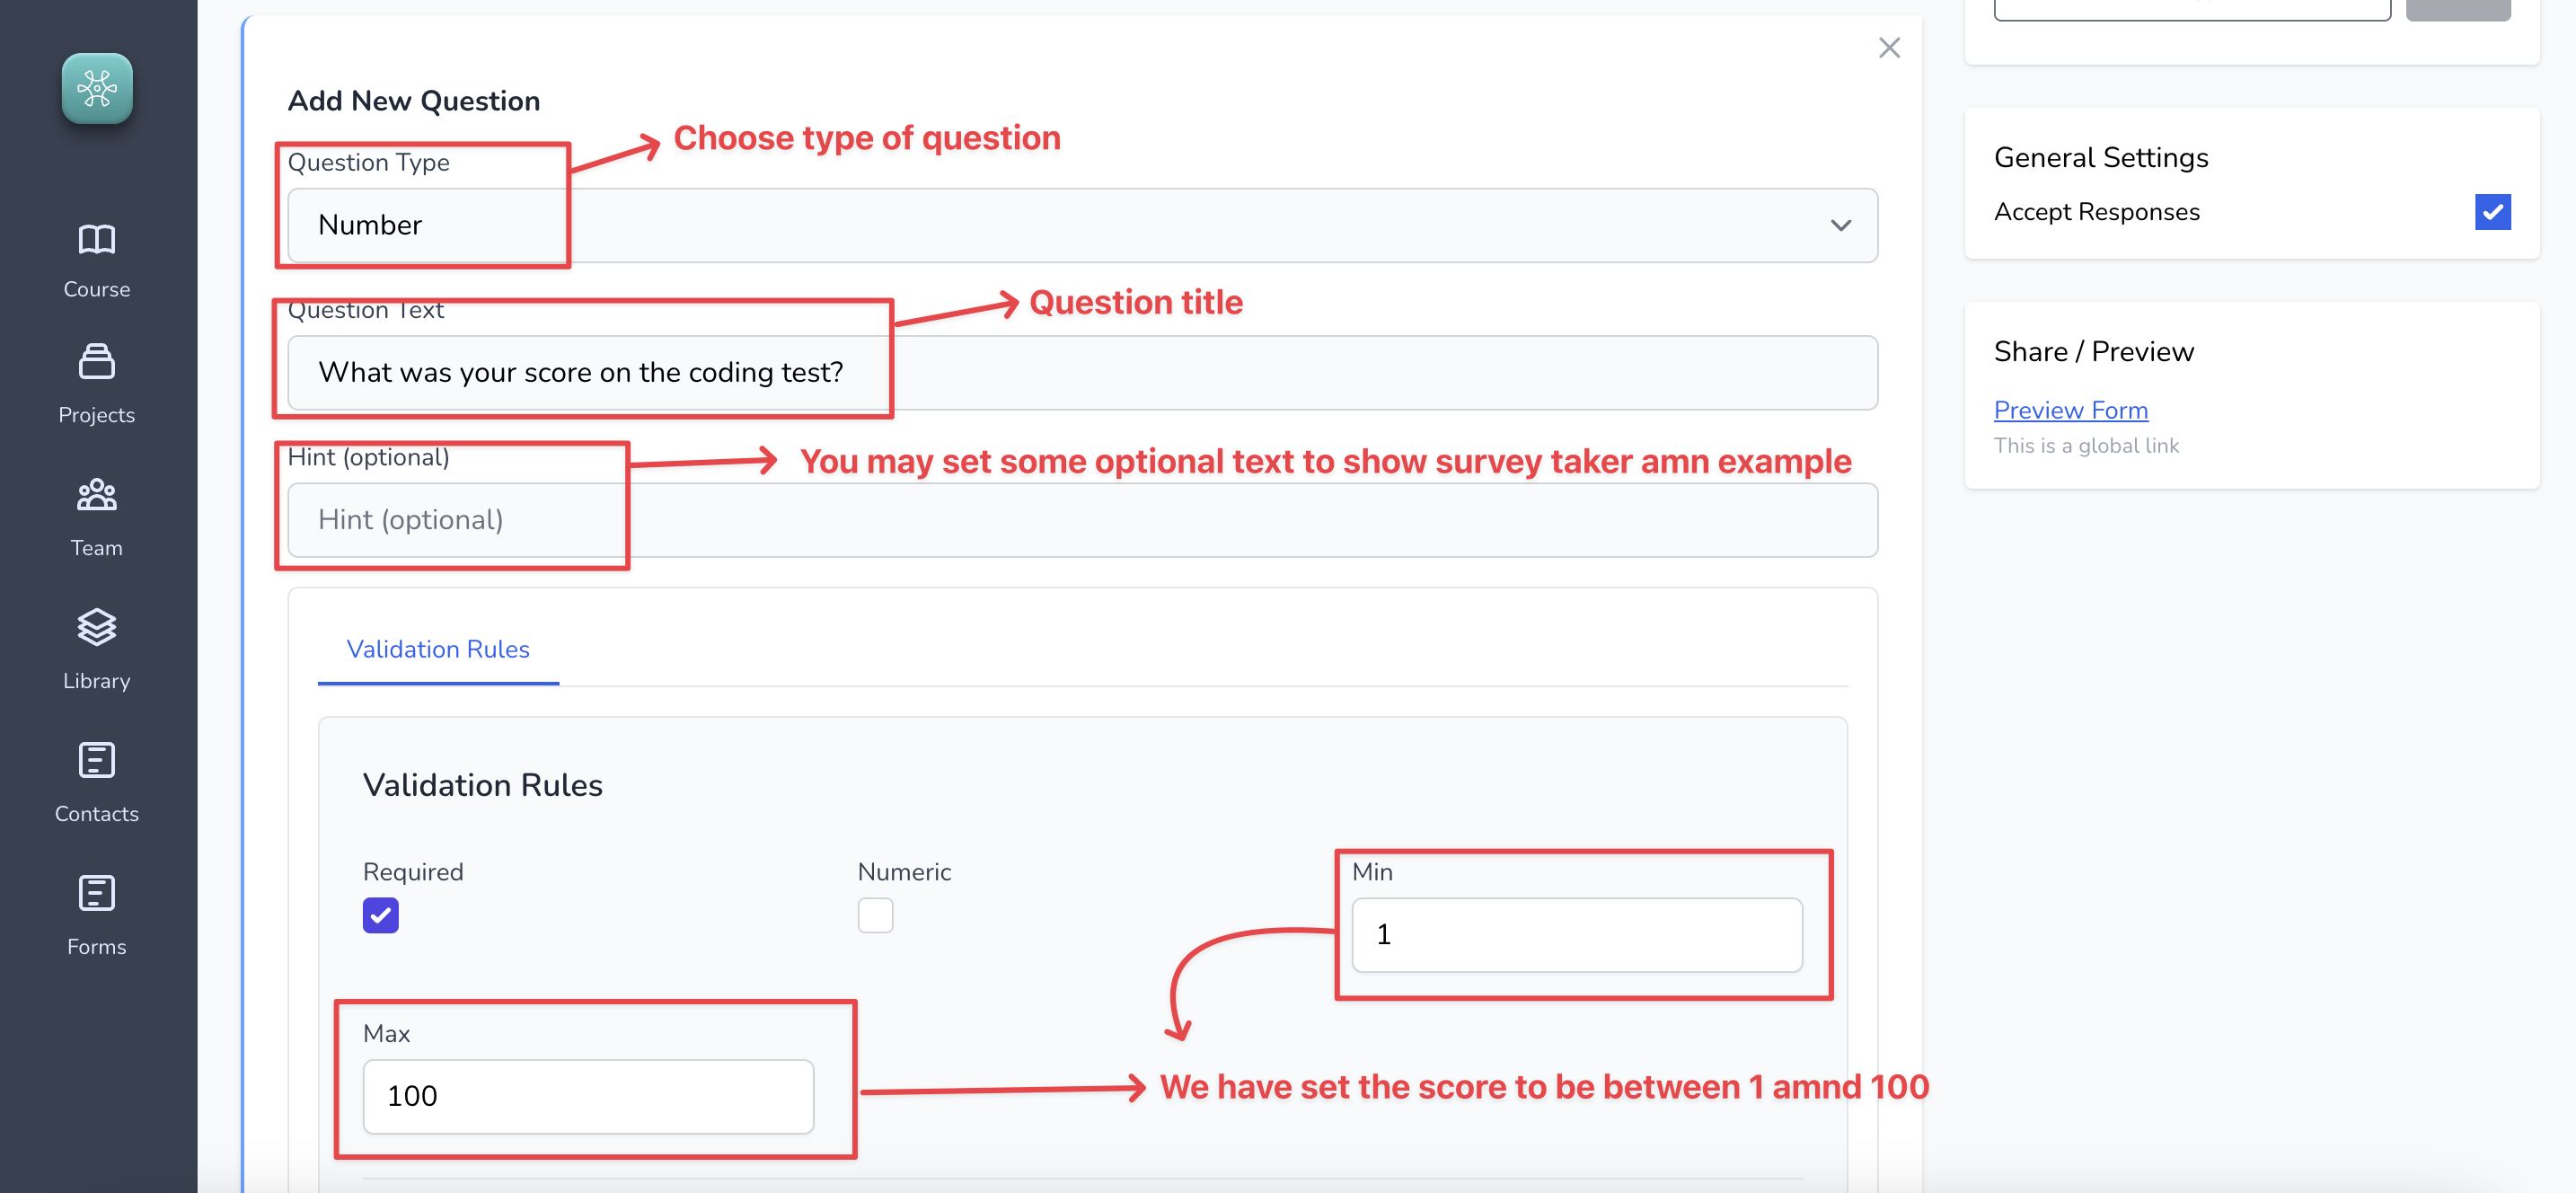
##### 3. Let us add our first question, rest of the questions can be added in the similar manner
##### 4. This is what the completed ==Mid Program Feedback== form will look like
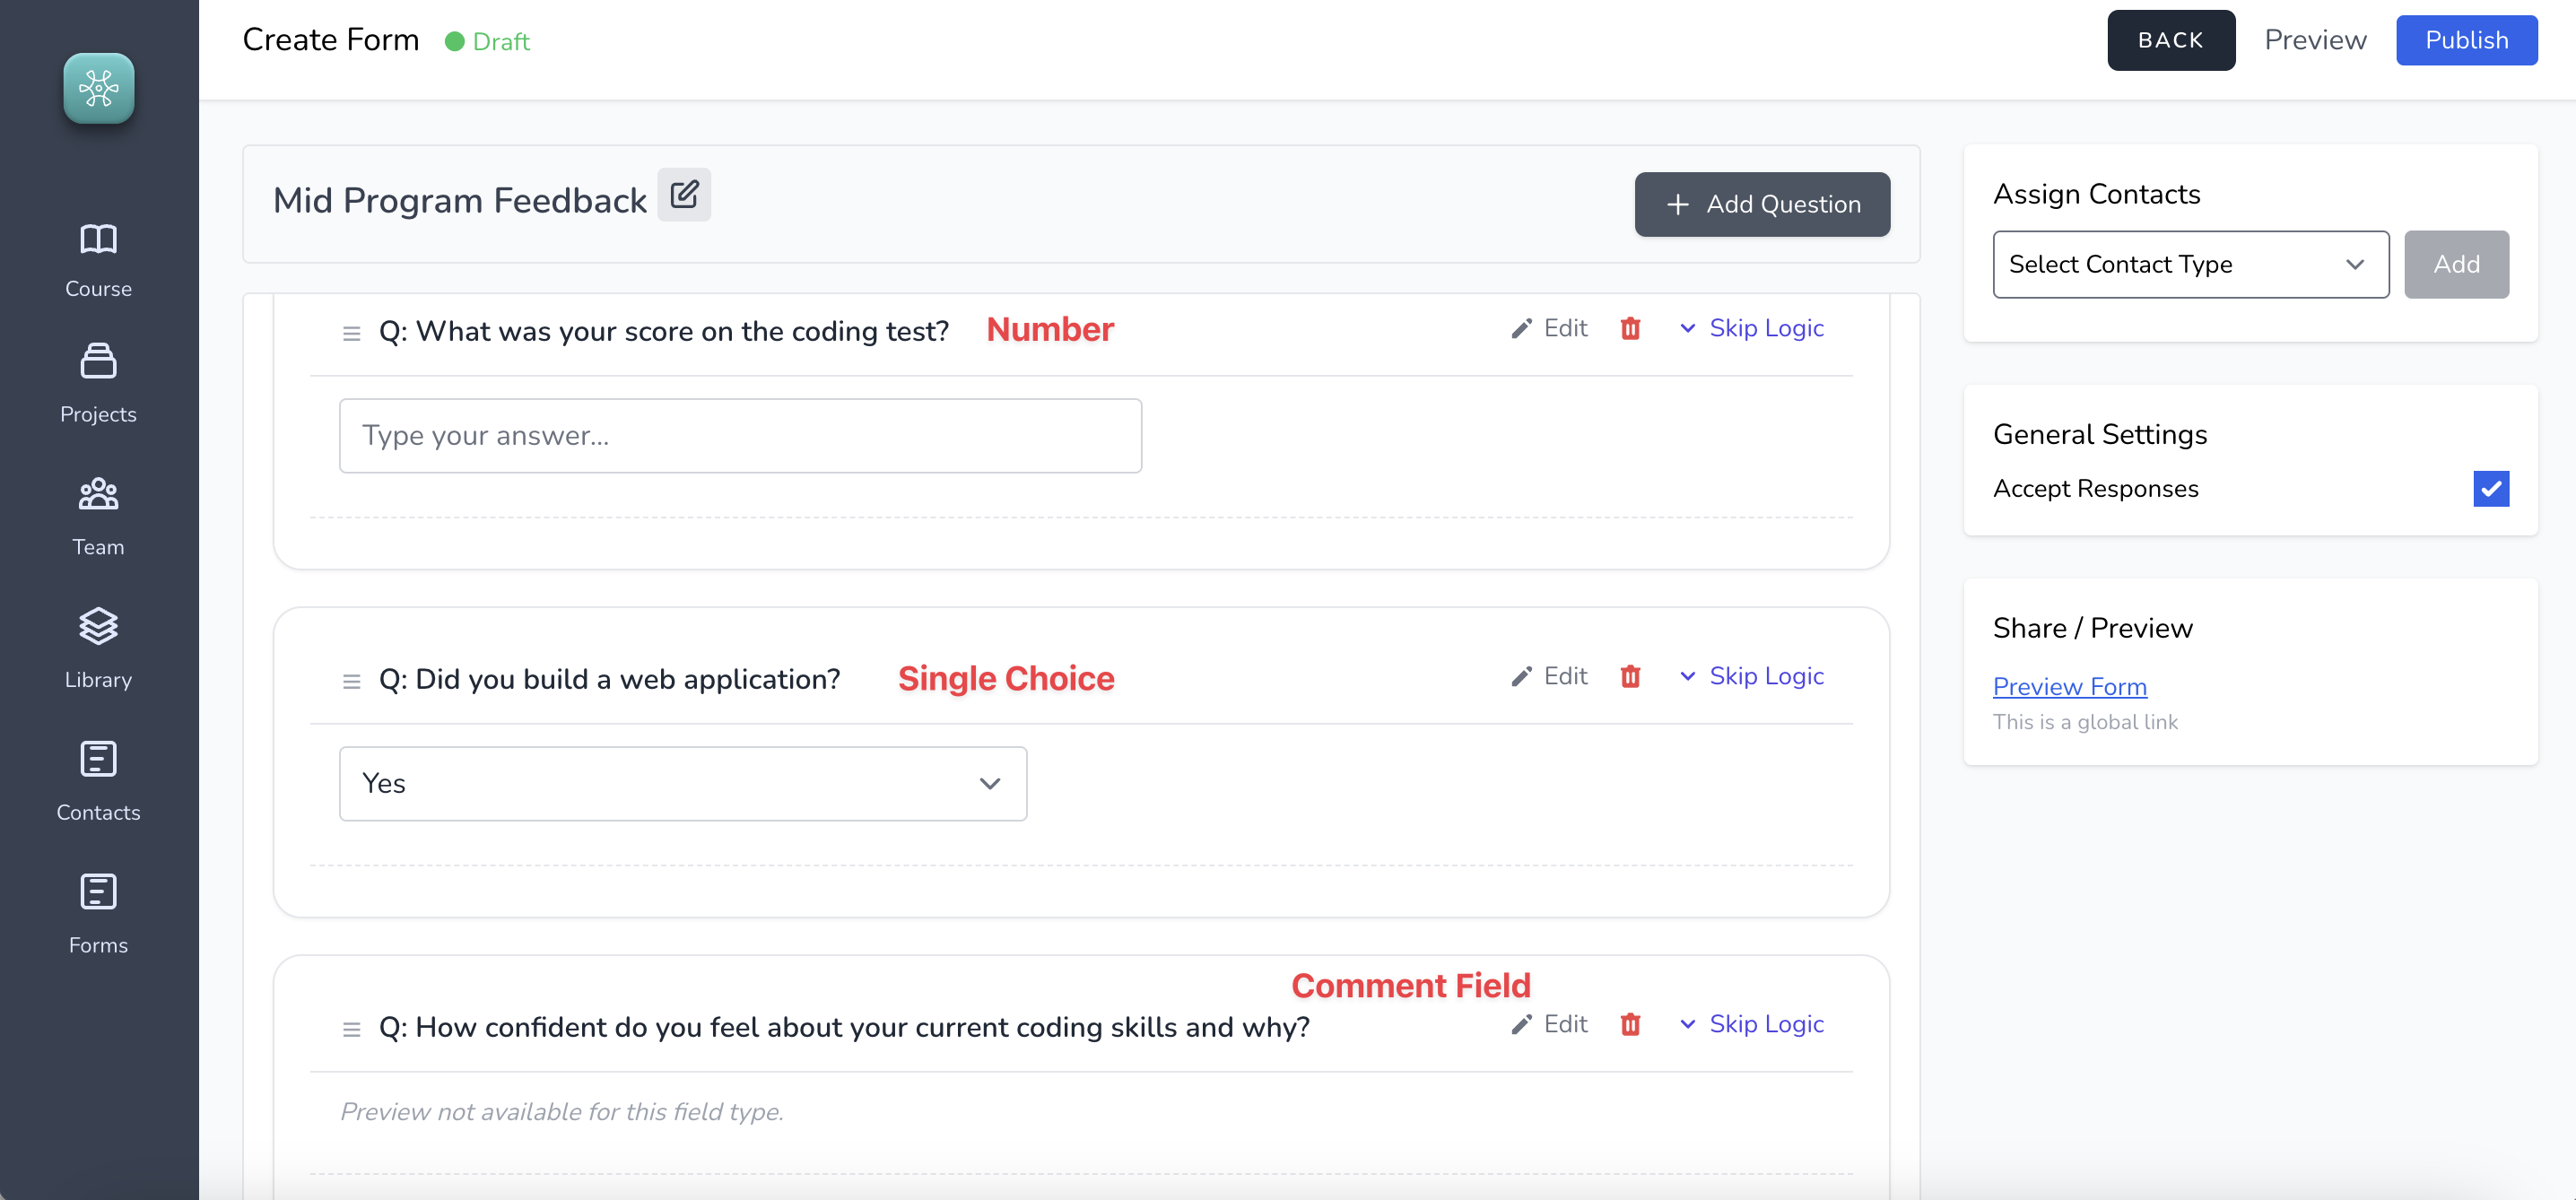
The process of creating the ==Post Program Feedback== form is exactly the same.
Step 3: Establish Relationship between ==Mid Program feedback== form and Girls contact object. The exciting part!
#### Step 3: Establish Relationship
Relationship is the foundational differentiated feature in our forms product that helps the users of our platform to collect clean data. This feature helps us naviagte the following situations
- Eliminate duplicate data, literally saving multiple hours that would otherwise go in deduping process
- Collect data that is free of errors and typos since it allows us to go back to the participants at any point to correct any data that might be wrong
- Help combine data from multiple forms (in this example, ==mid and post== needs to be combined to measure progress for example)
It literally takes 2 seconds to establish relationship, let us look at how to do that
##### 1. Navigate to the form (specifically the screen shown below)

##### 2. From the screen below, select Girls from the drop down and click on ==Add==
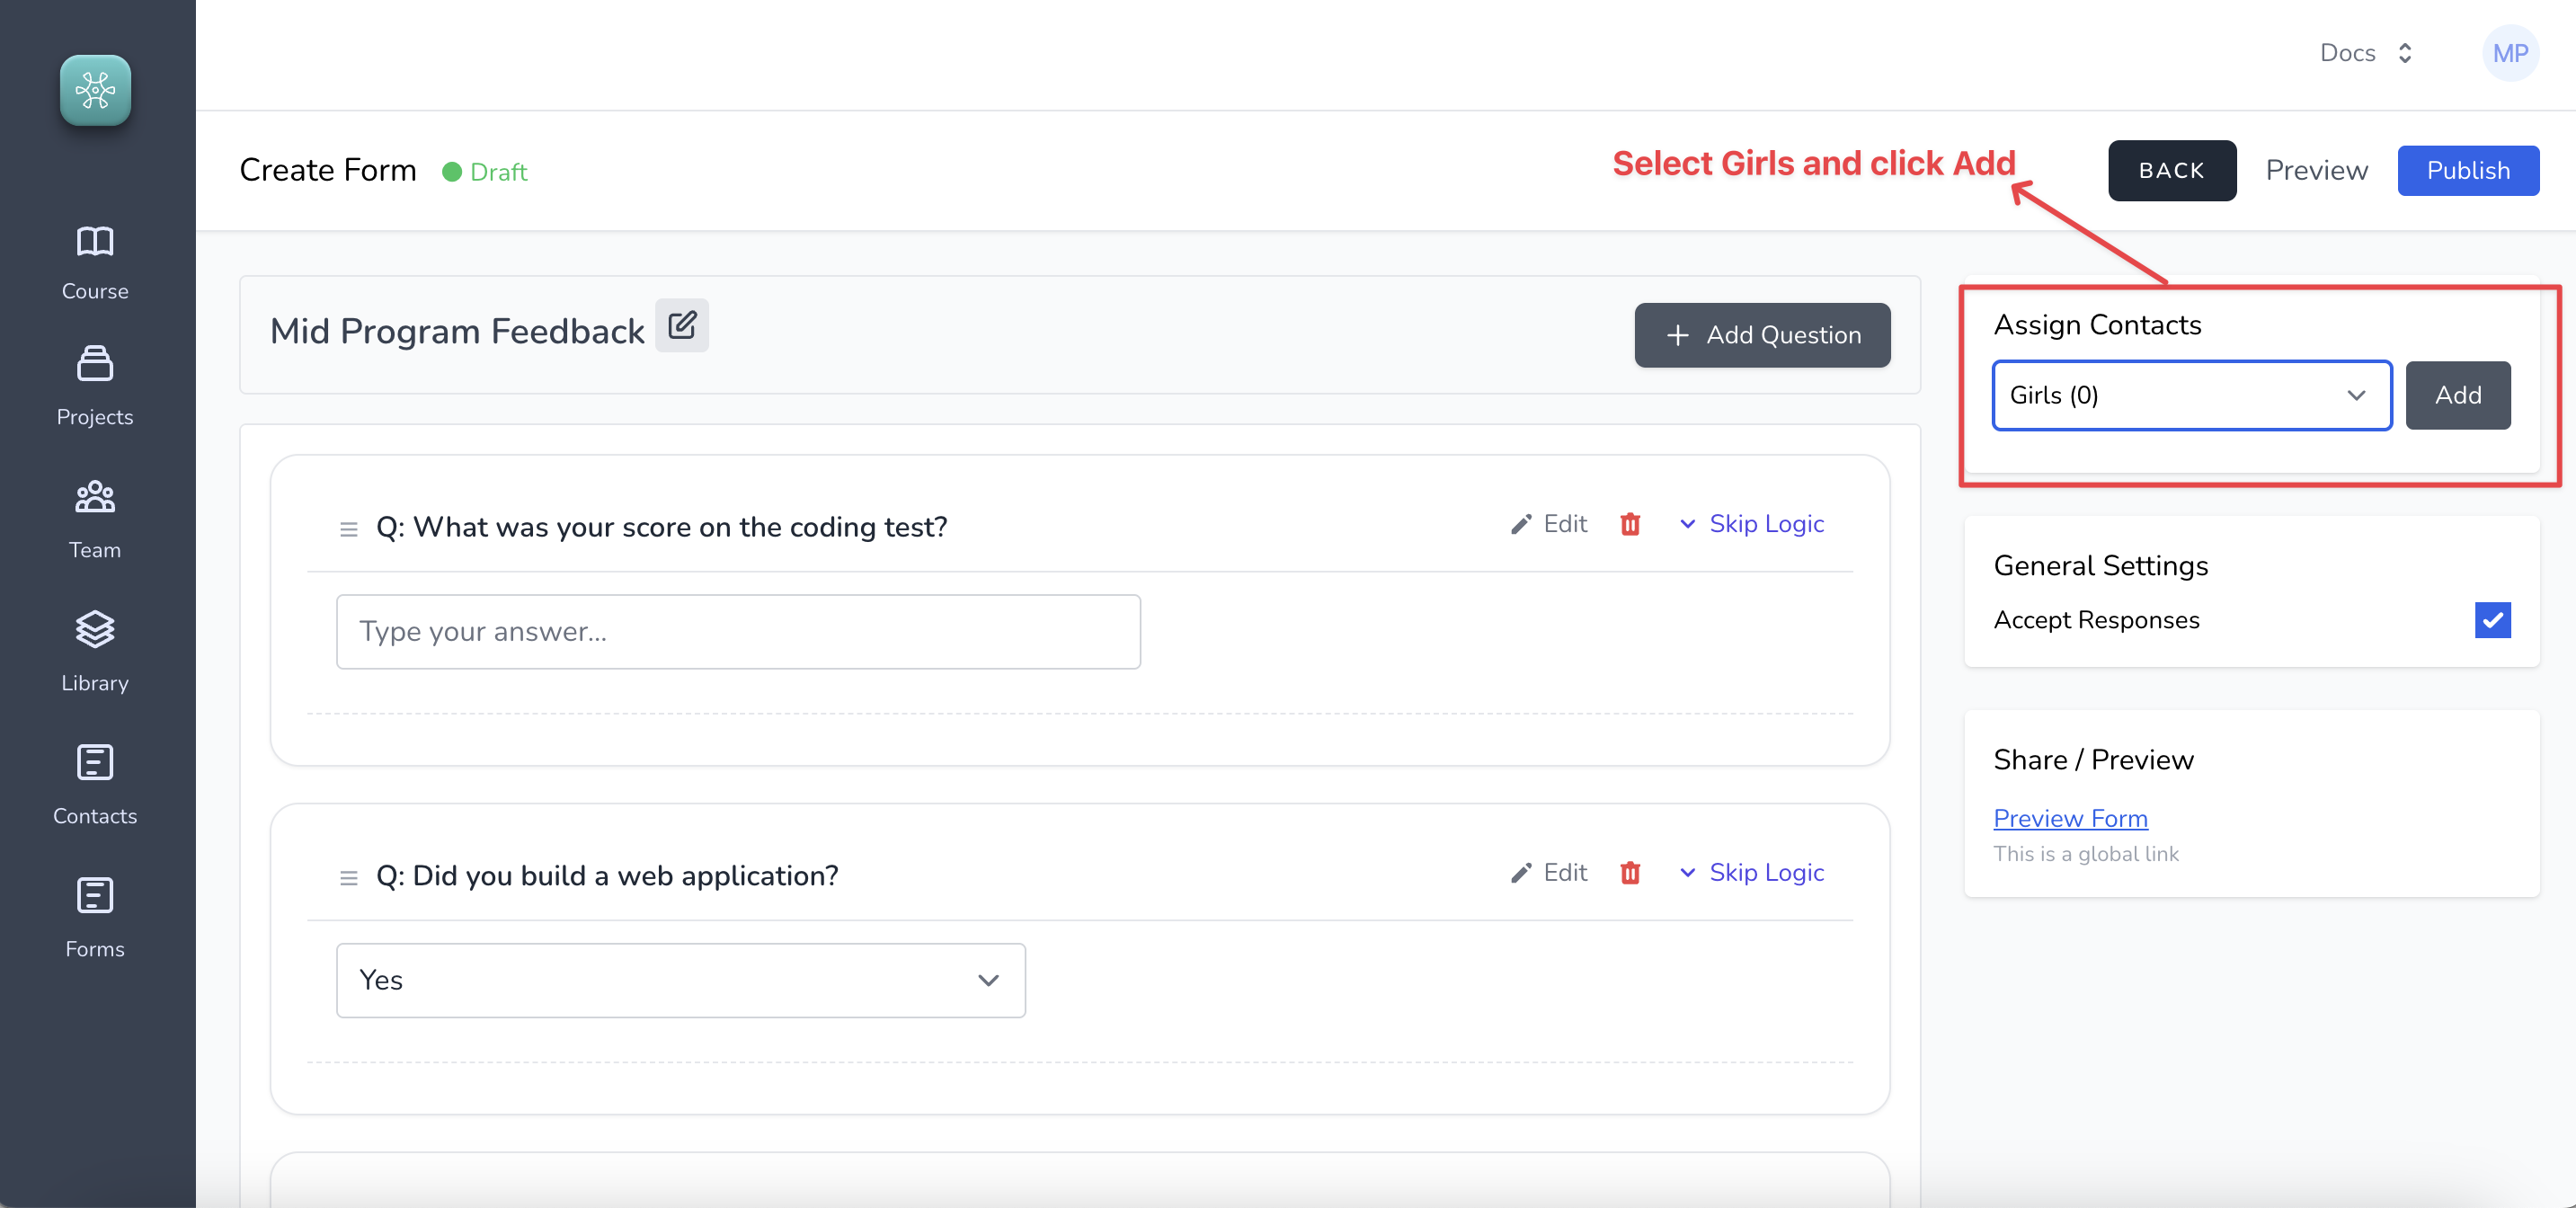
Thats it! To see this in action and understand what ==relationship== does, we will need to start adding data into our Contacts and Forms.
Step 4: Adding data
#### Step 4: Collect data
In this step you will learn how to collect clean data. In particular you will learn the following:
- Collecting static(demographic) data and creating Contacts
- Collecting deduped data (without any duplicates)
- Correcting typos and mistakes in the data
- How to followup with the same stakeholders for data collection or data correction on a different form
Going back to the example we started. We need to start enrolling the girls and collect mid and post forms data from enrolled girls who are part of the program.
##### 1. Creating Contacts
Click on Contacts from the side menu bar, the screen will look like so
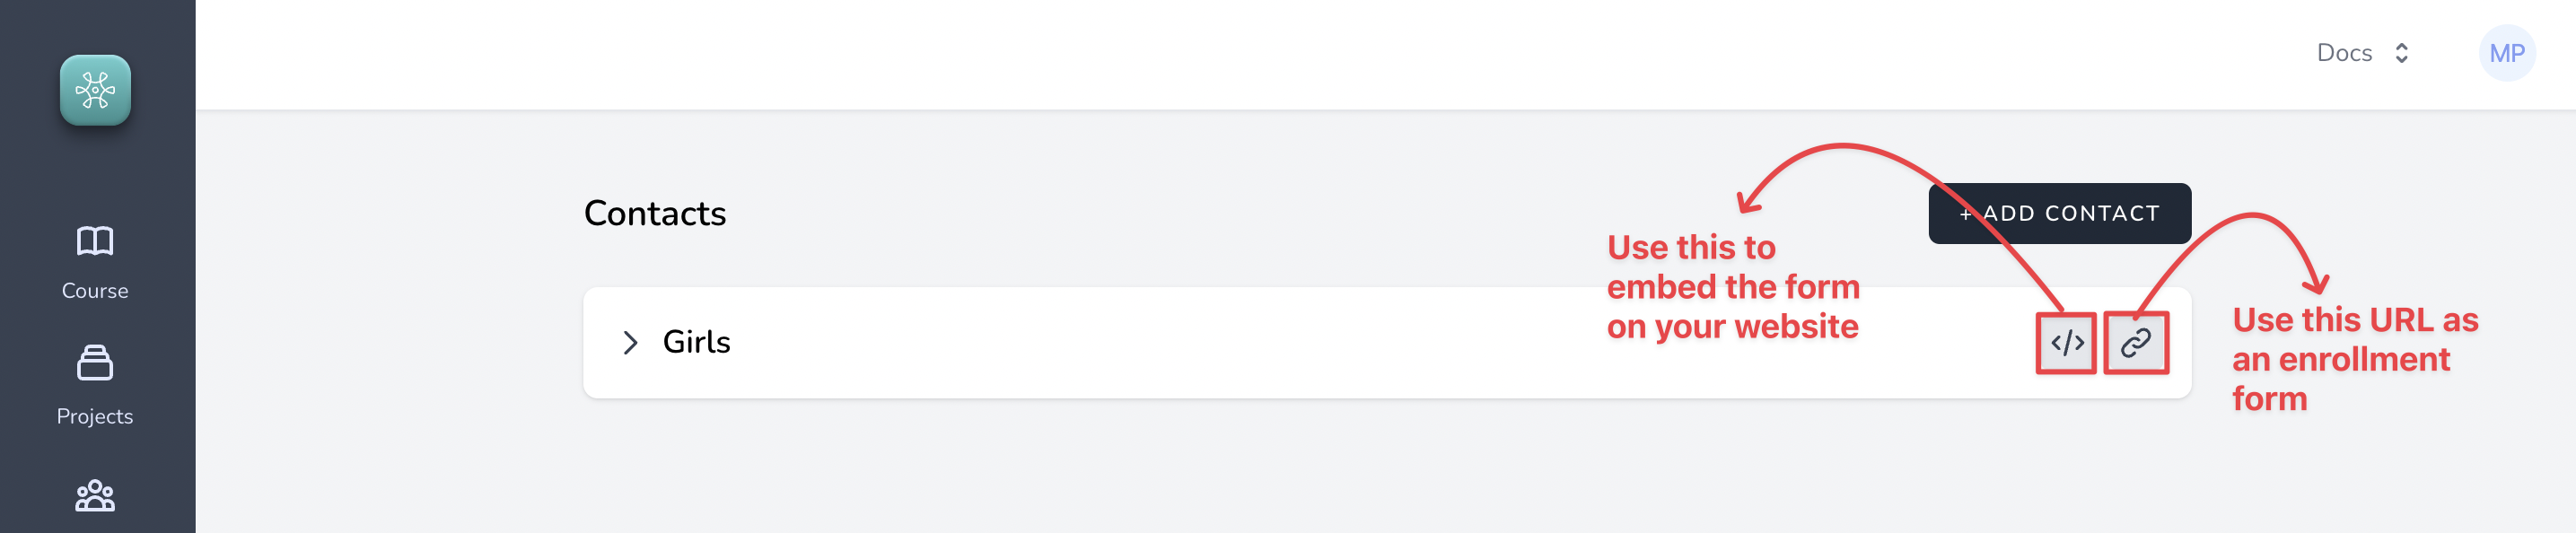
You can use the form link as an enrollment form to start entering conatct information for the girls
or
You could embed the form on your website to collect registration information directly from your website
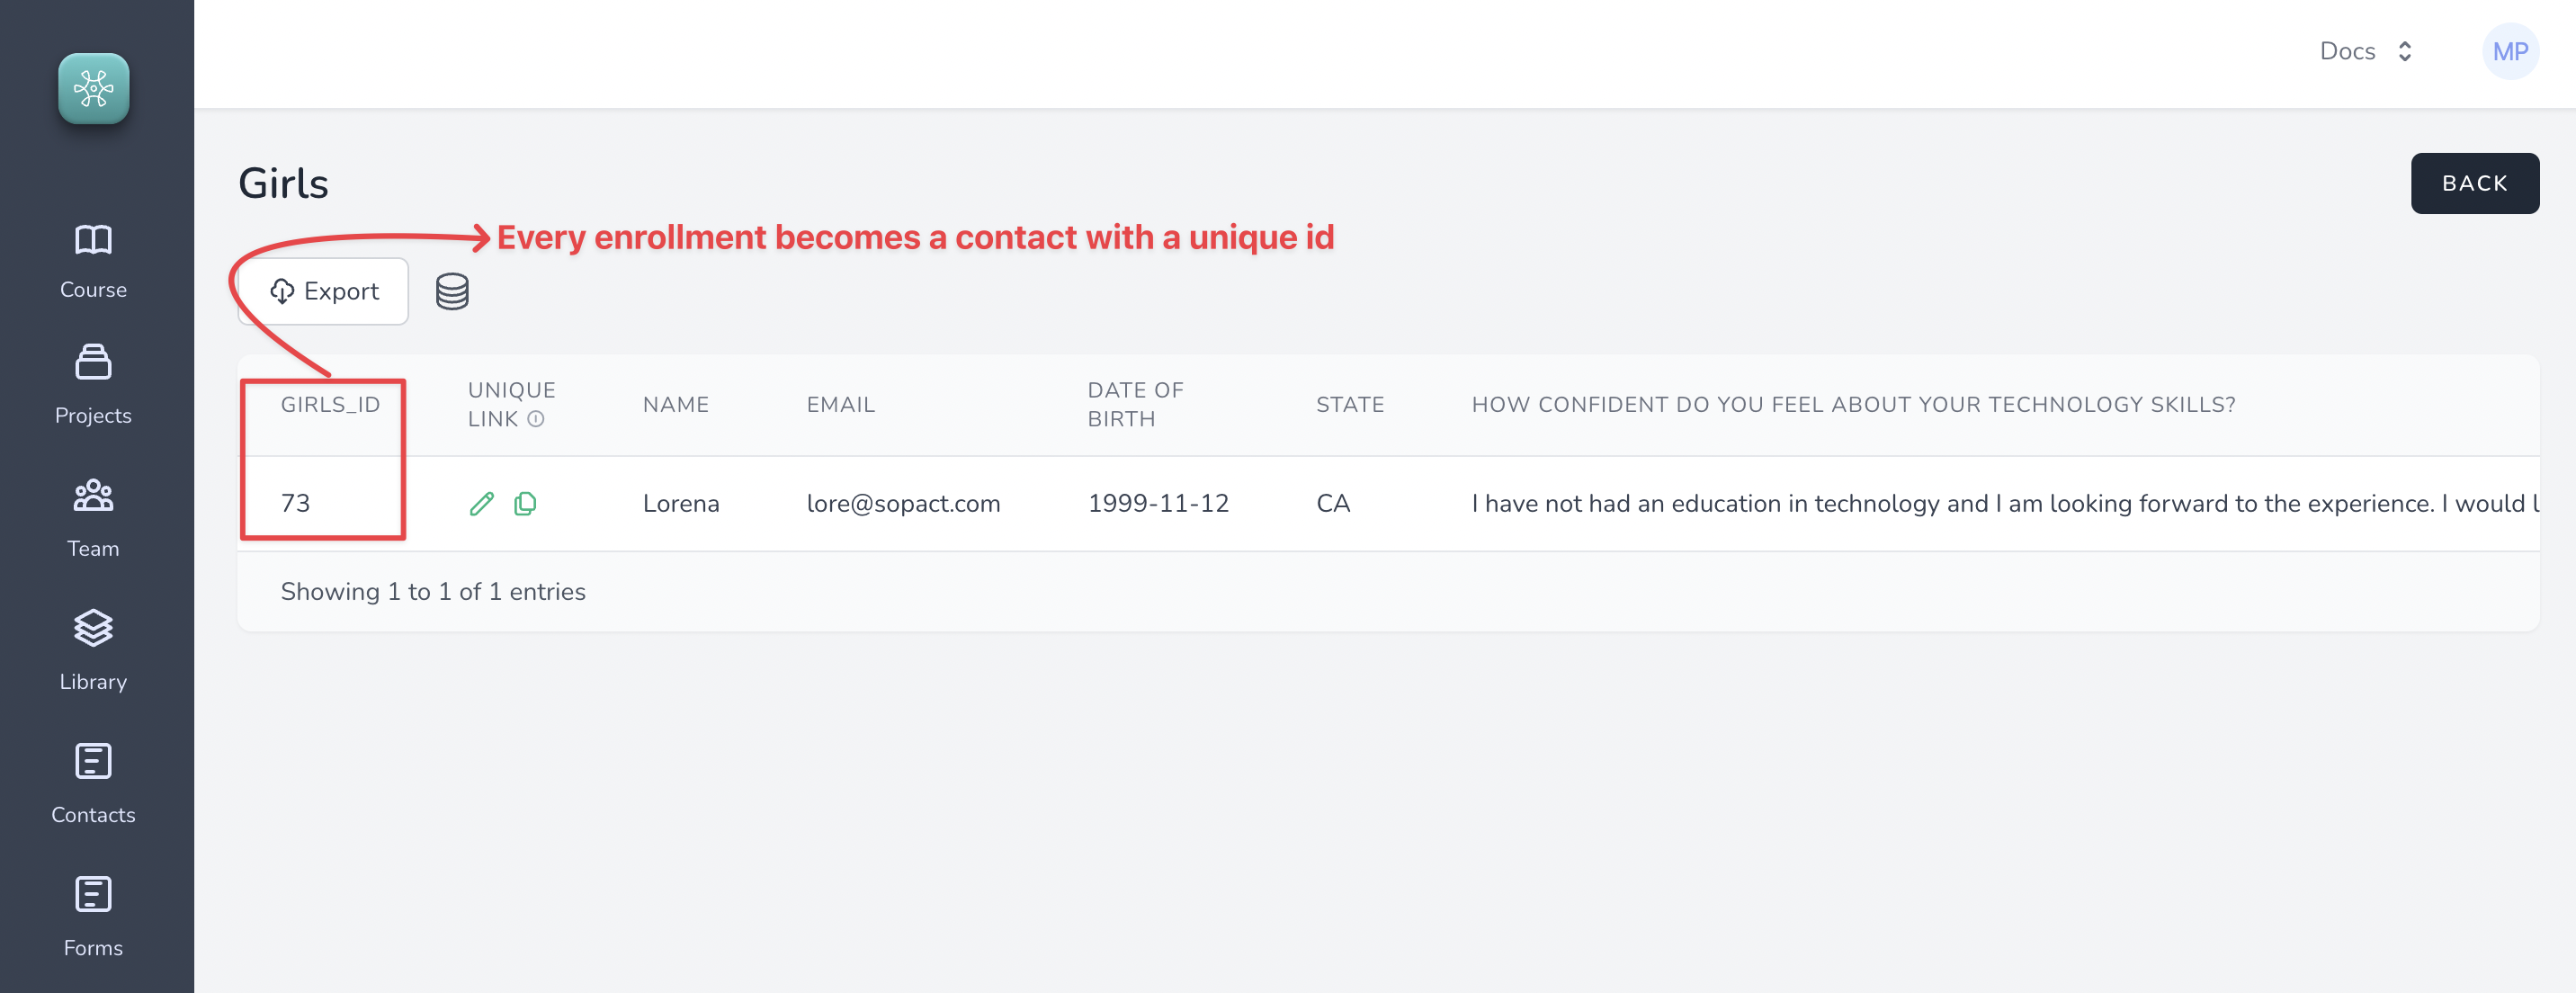
Every enrollment submitted through this form becomes a contact and gets a unique id, like so
##### 2. Collecting data on feedback form (deduped data)
Remember the relationship step? You will now see the advantage of that.
Let us assume that the contact we just created needs to fill the ==mid program feedback form==
Navigate to forms and click on the ==Mid Program Feedback==, like so
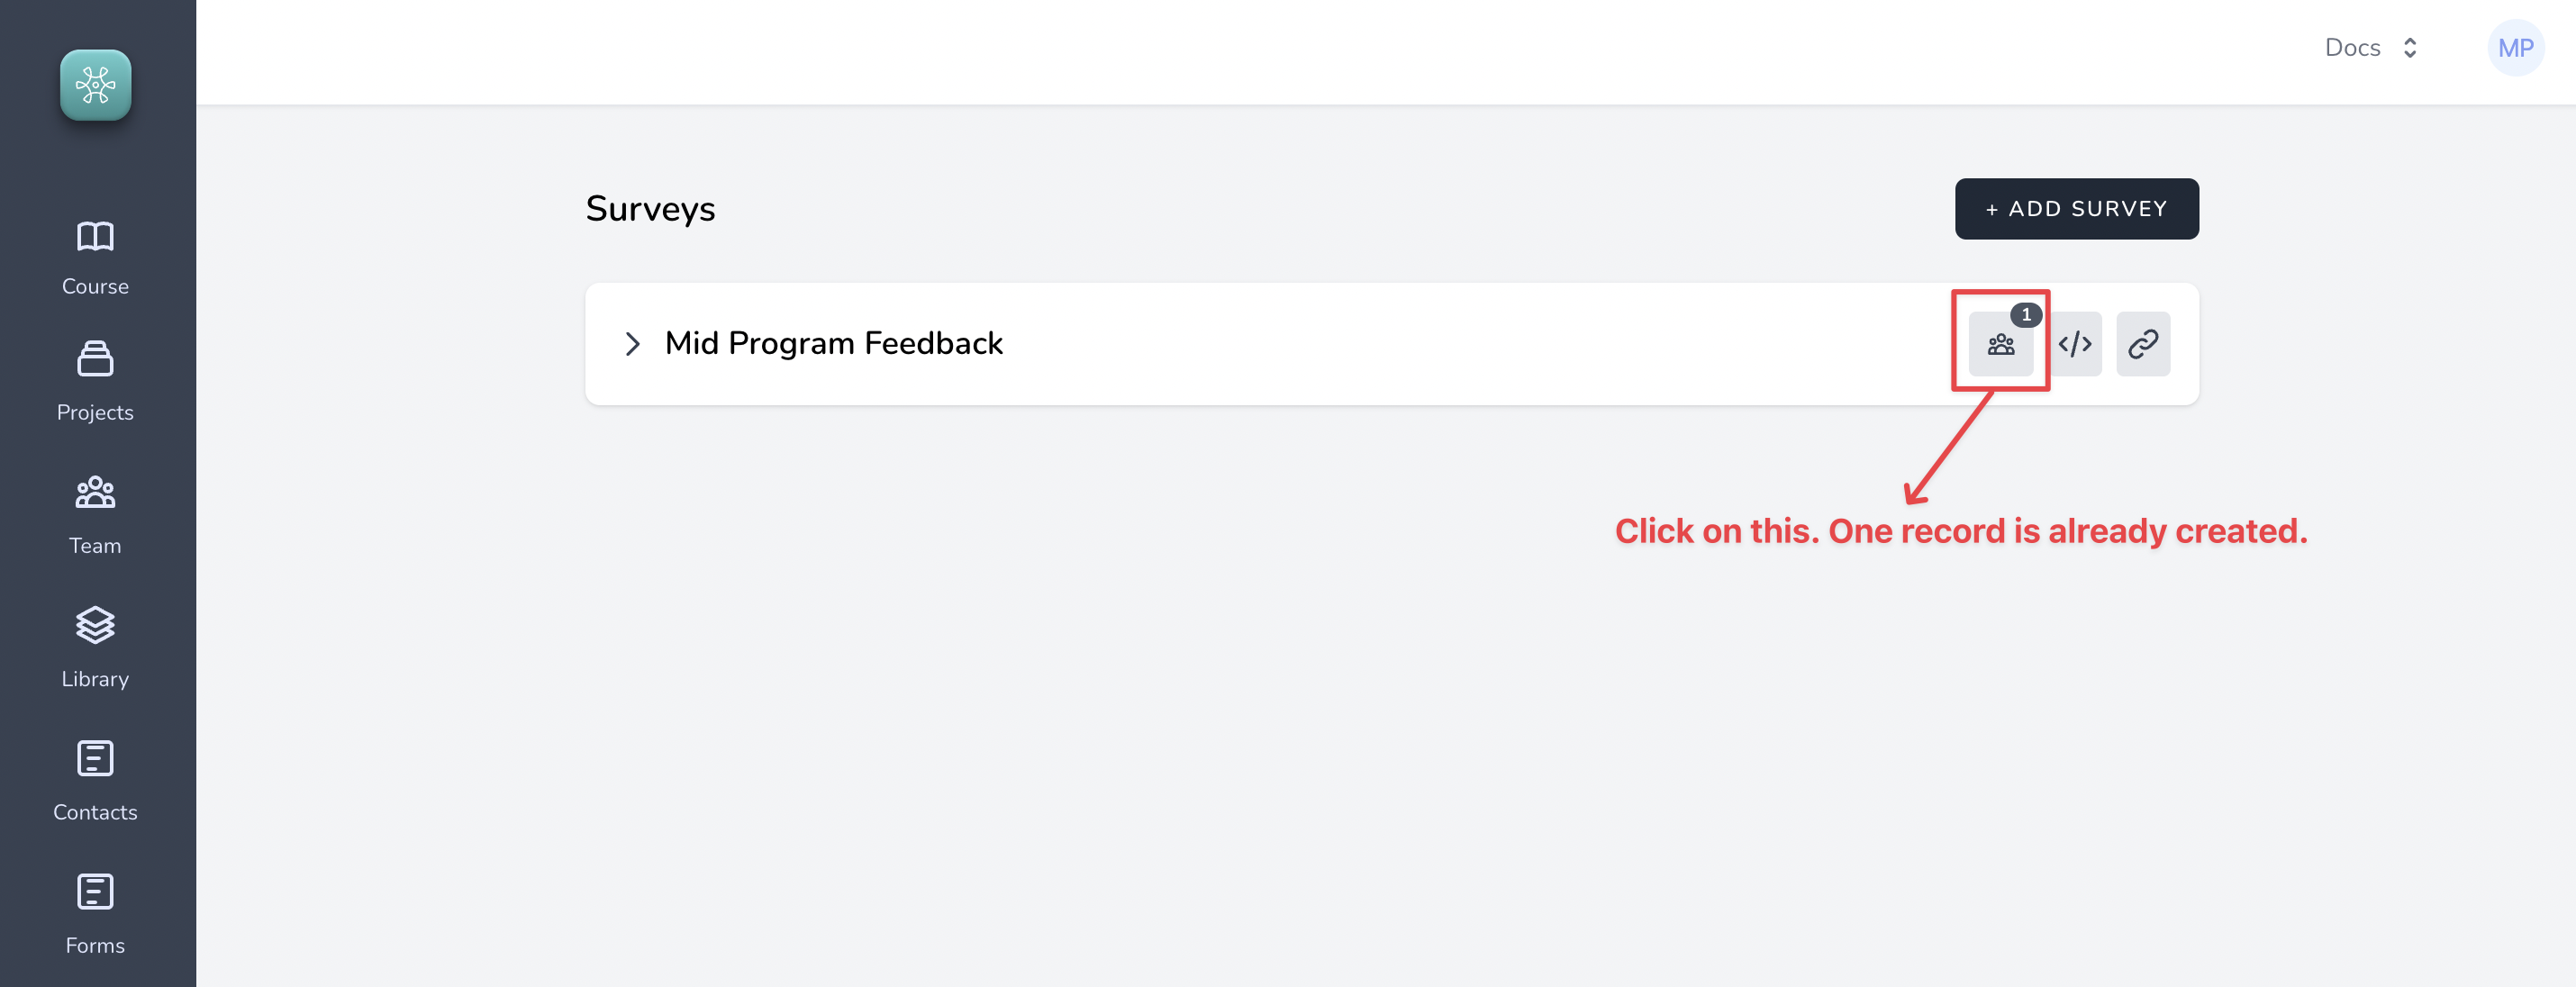
You will notice that a record was automatically created for the girl that was just enrolled through the Contact form. And it has the same unique id that was generated through contacts
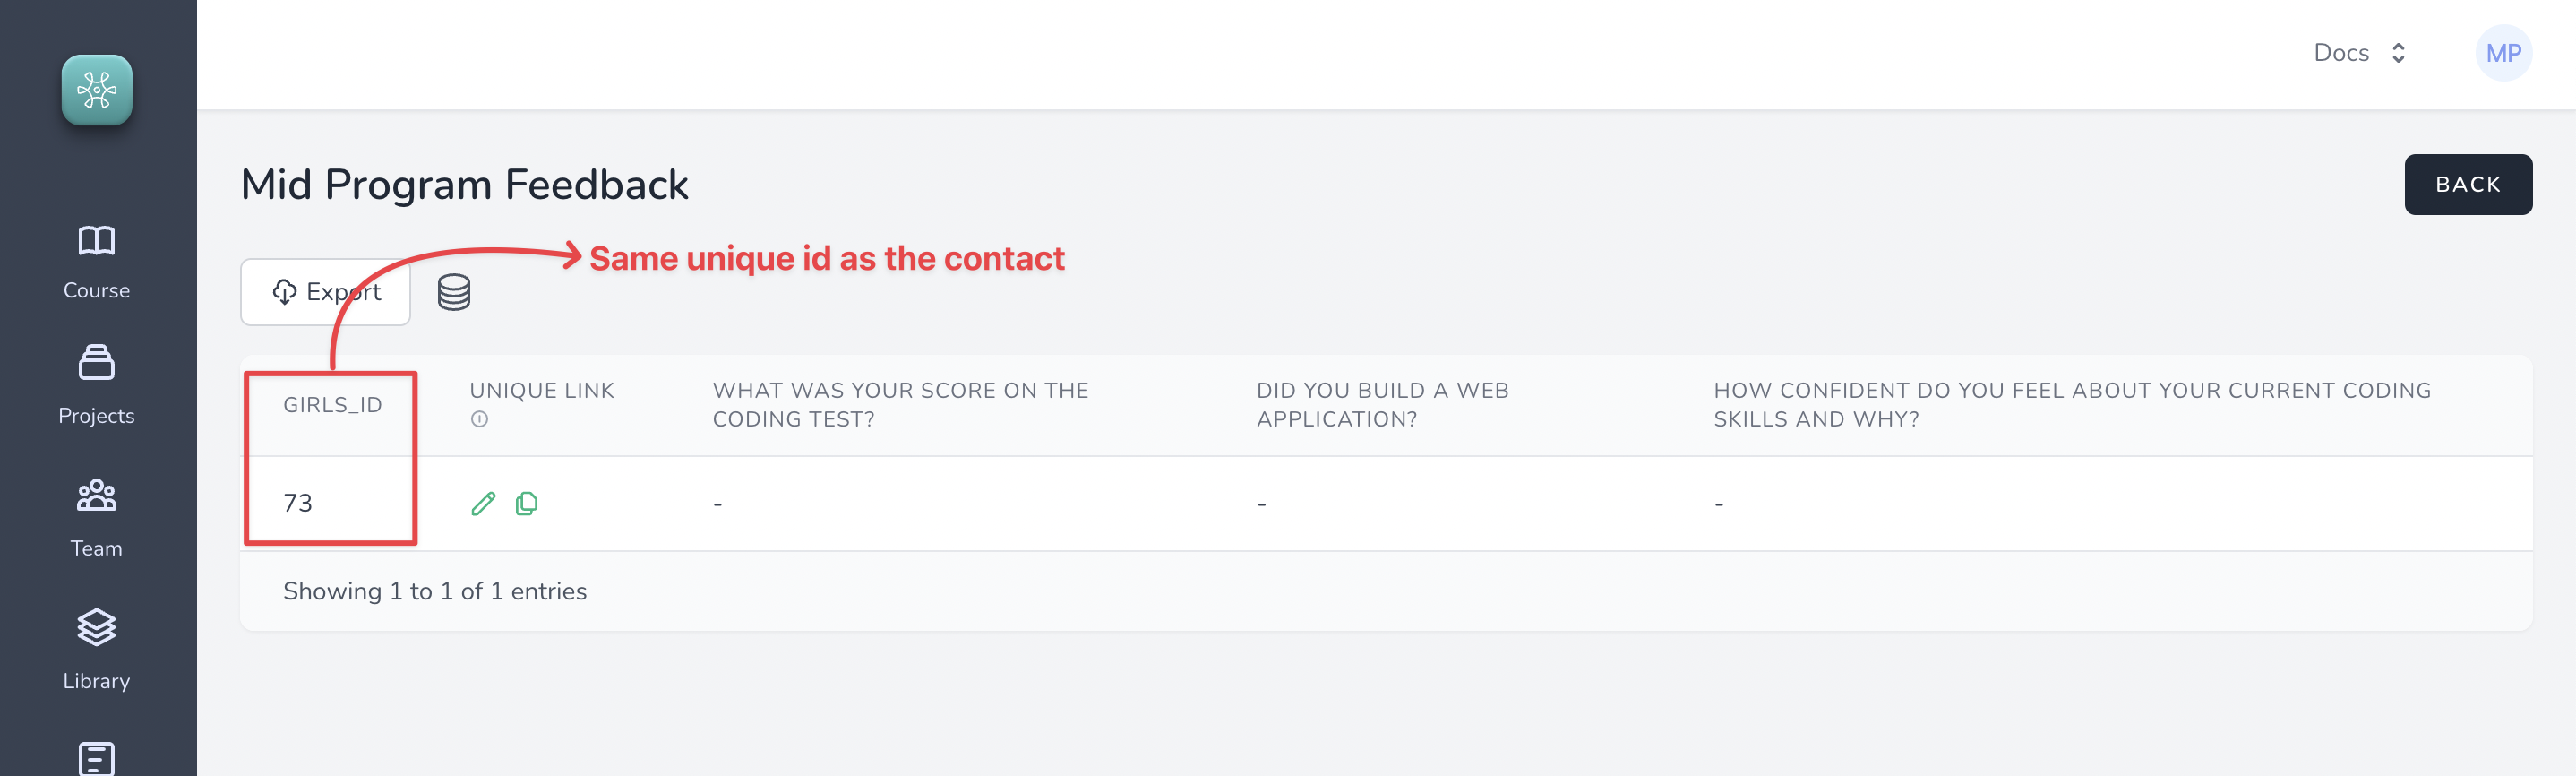
To get data from this girl, we could just copy the url and send it to the girl on an email
You can click on this example URL that belongs to "Lore" (in our example).
The beauty of ==Relationship== feature is that only the girls in the contacts get a spot on the forms and every girl gets a unique link to fill in ==Mid Program form== and ==Post Program form==. This ensures that the girls can respond to the forms **only once**, eliminating the possibility of duplicate data that causes all sorts of problems during data analysis.
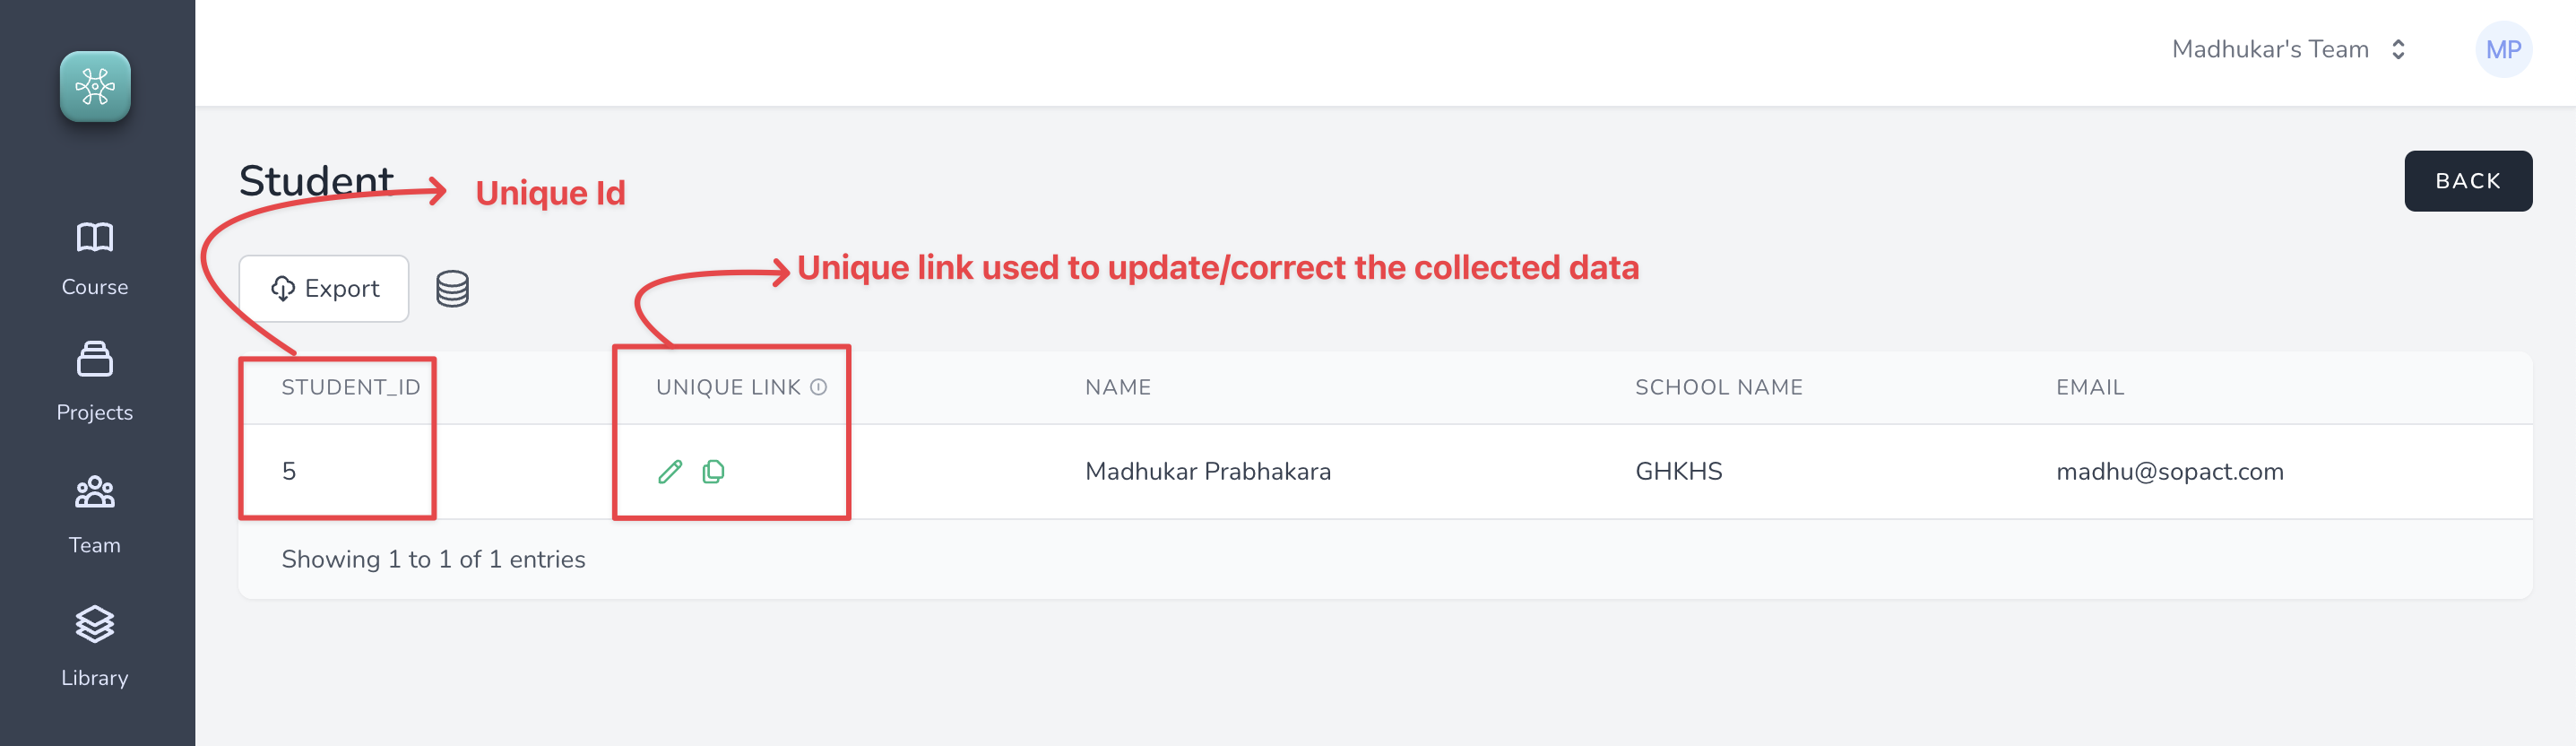
##### 3. Correcting typos and mistakes in the collected data
Correcting typos and mistakes in Contacts or Forms is super simple.
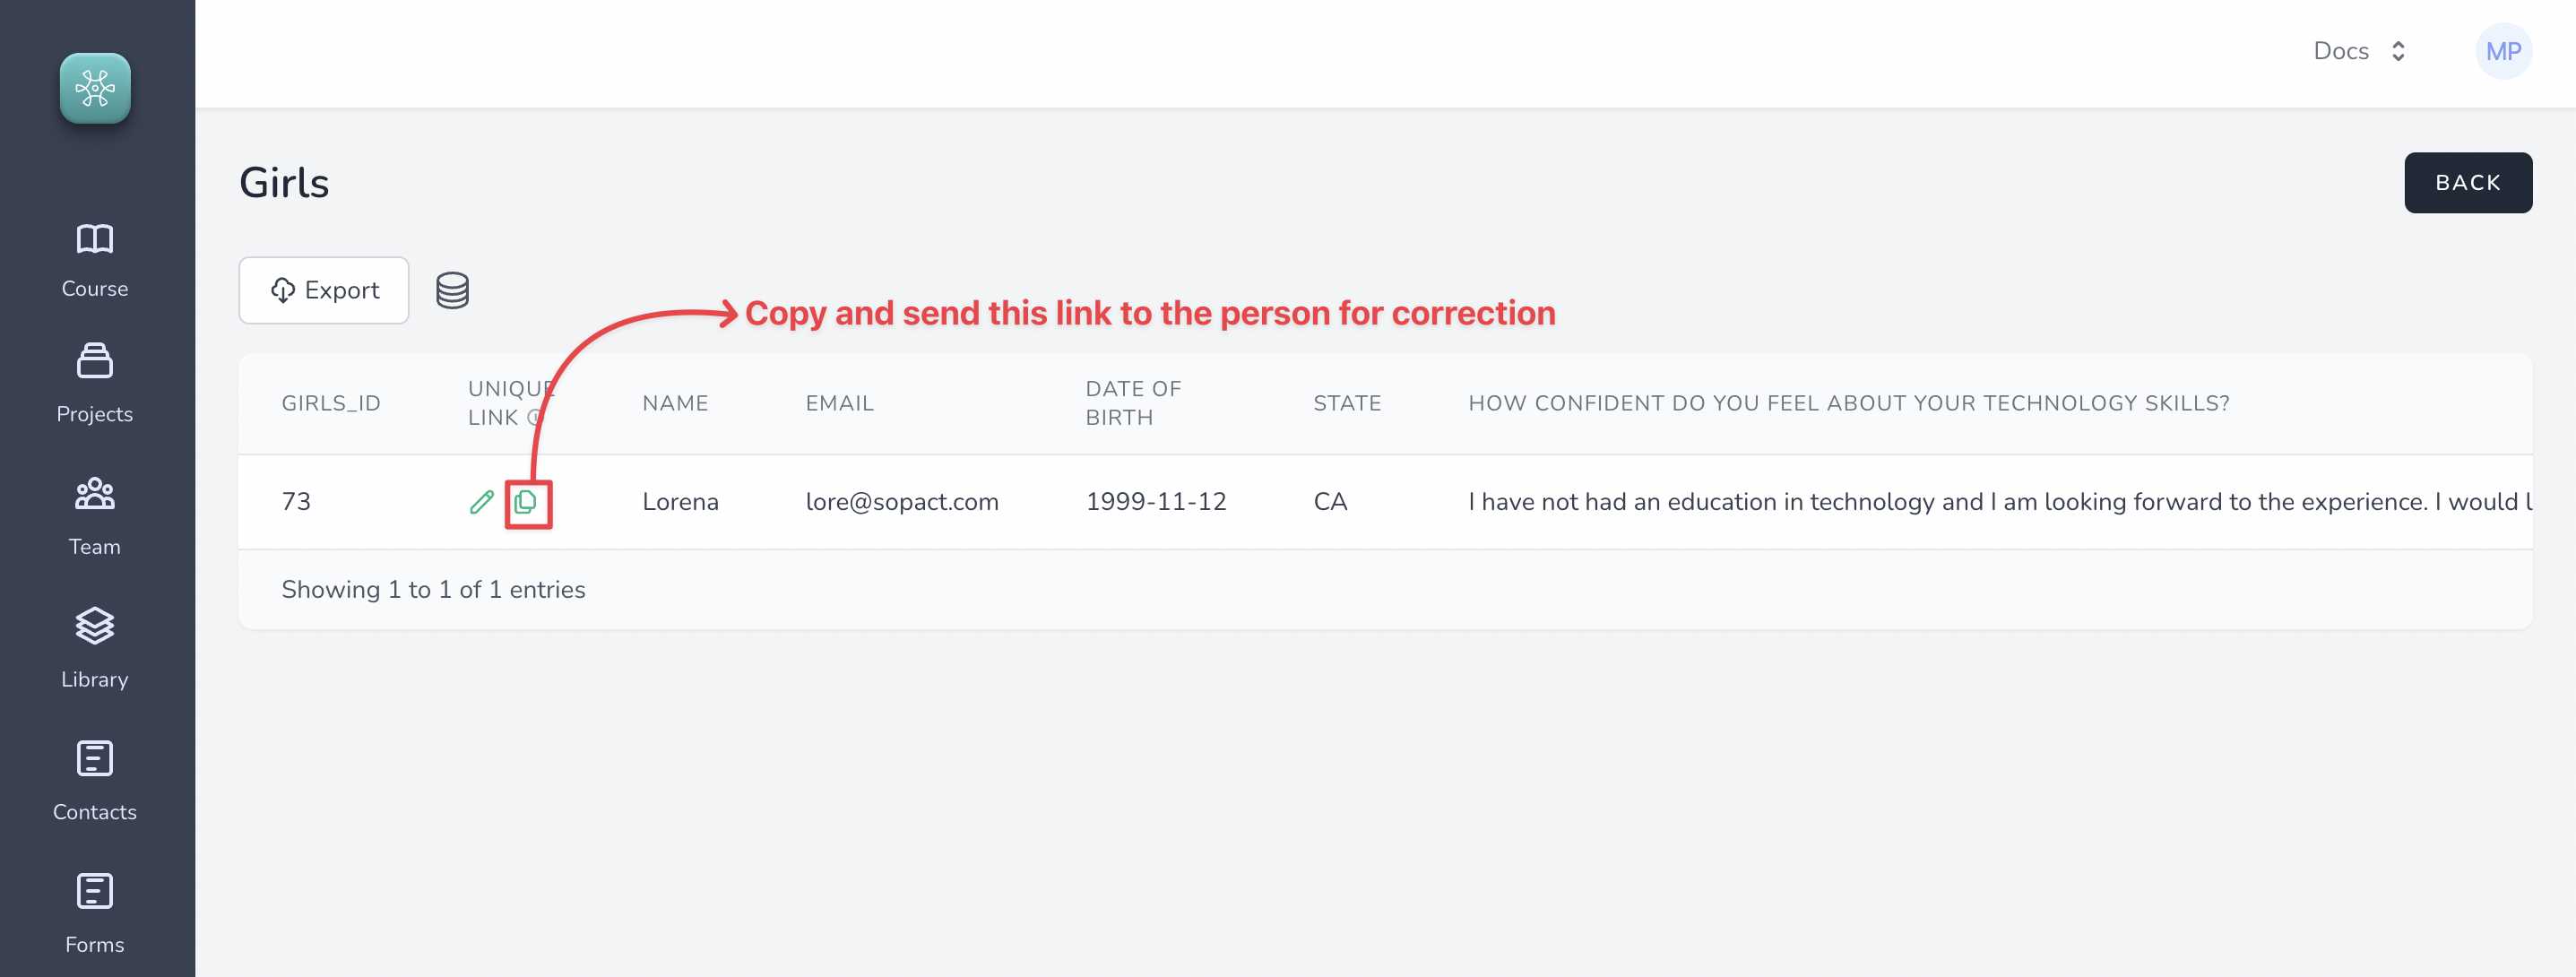
Every entry in the Contacts or Forms gets a unique link that can be used to correct data.
For example, in the Girls contact object, we can correct the data by simply copying the unique link and sending it to the person for correction
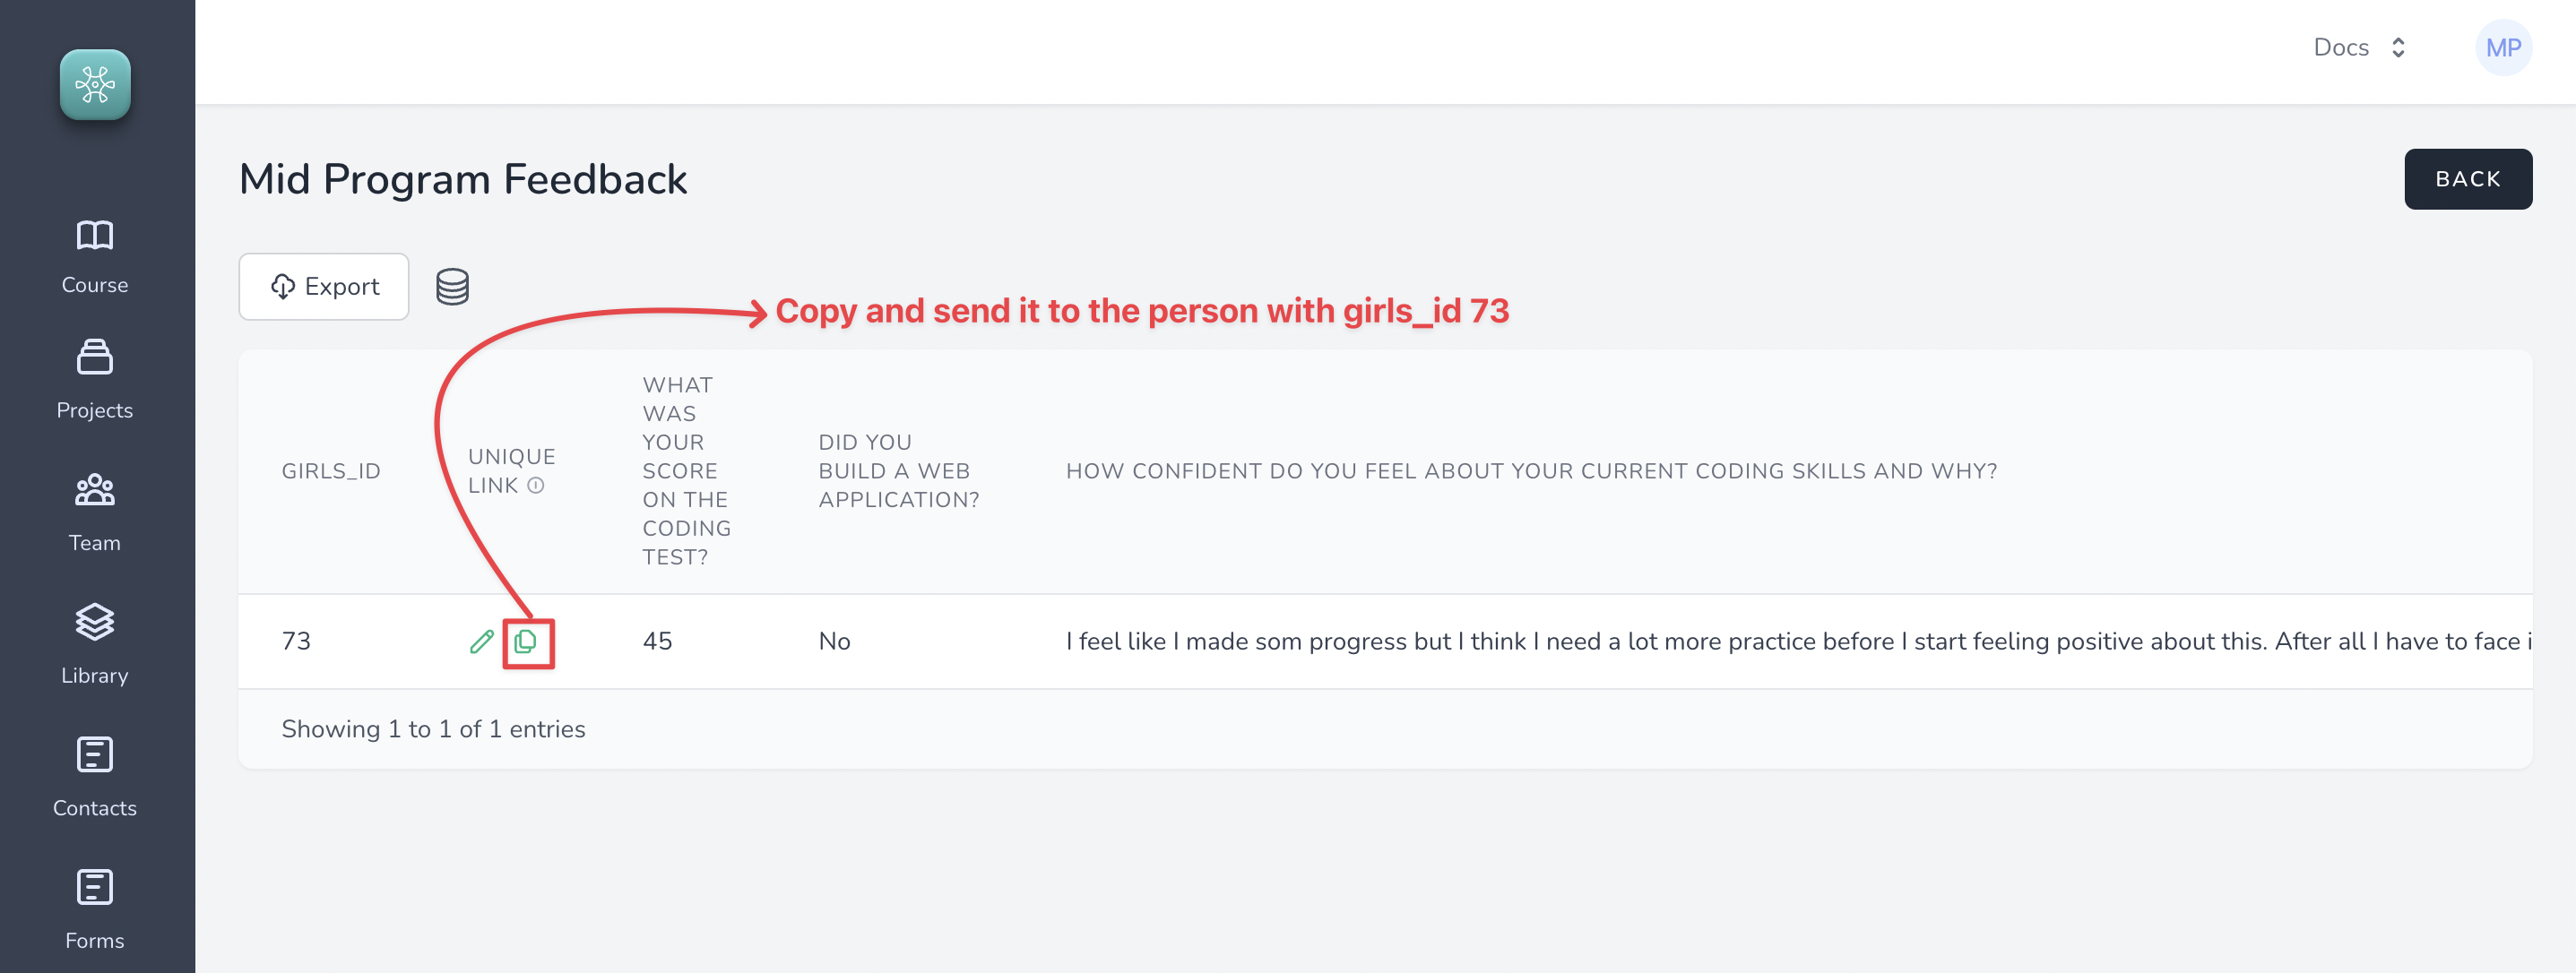
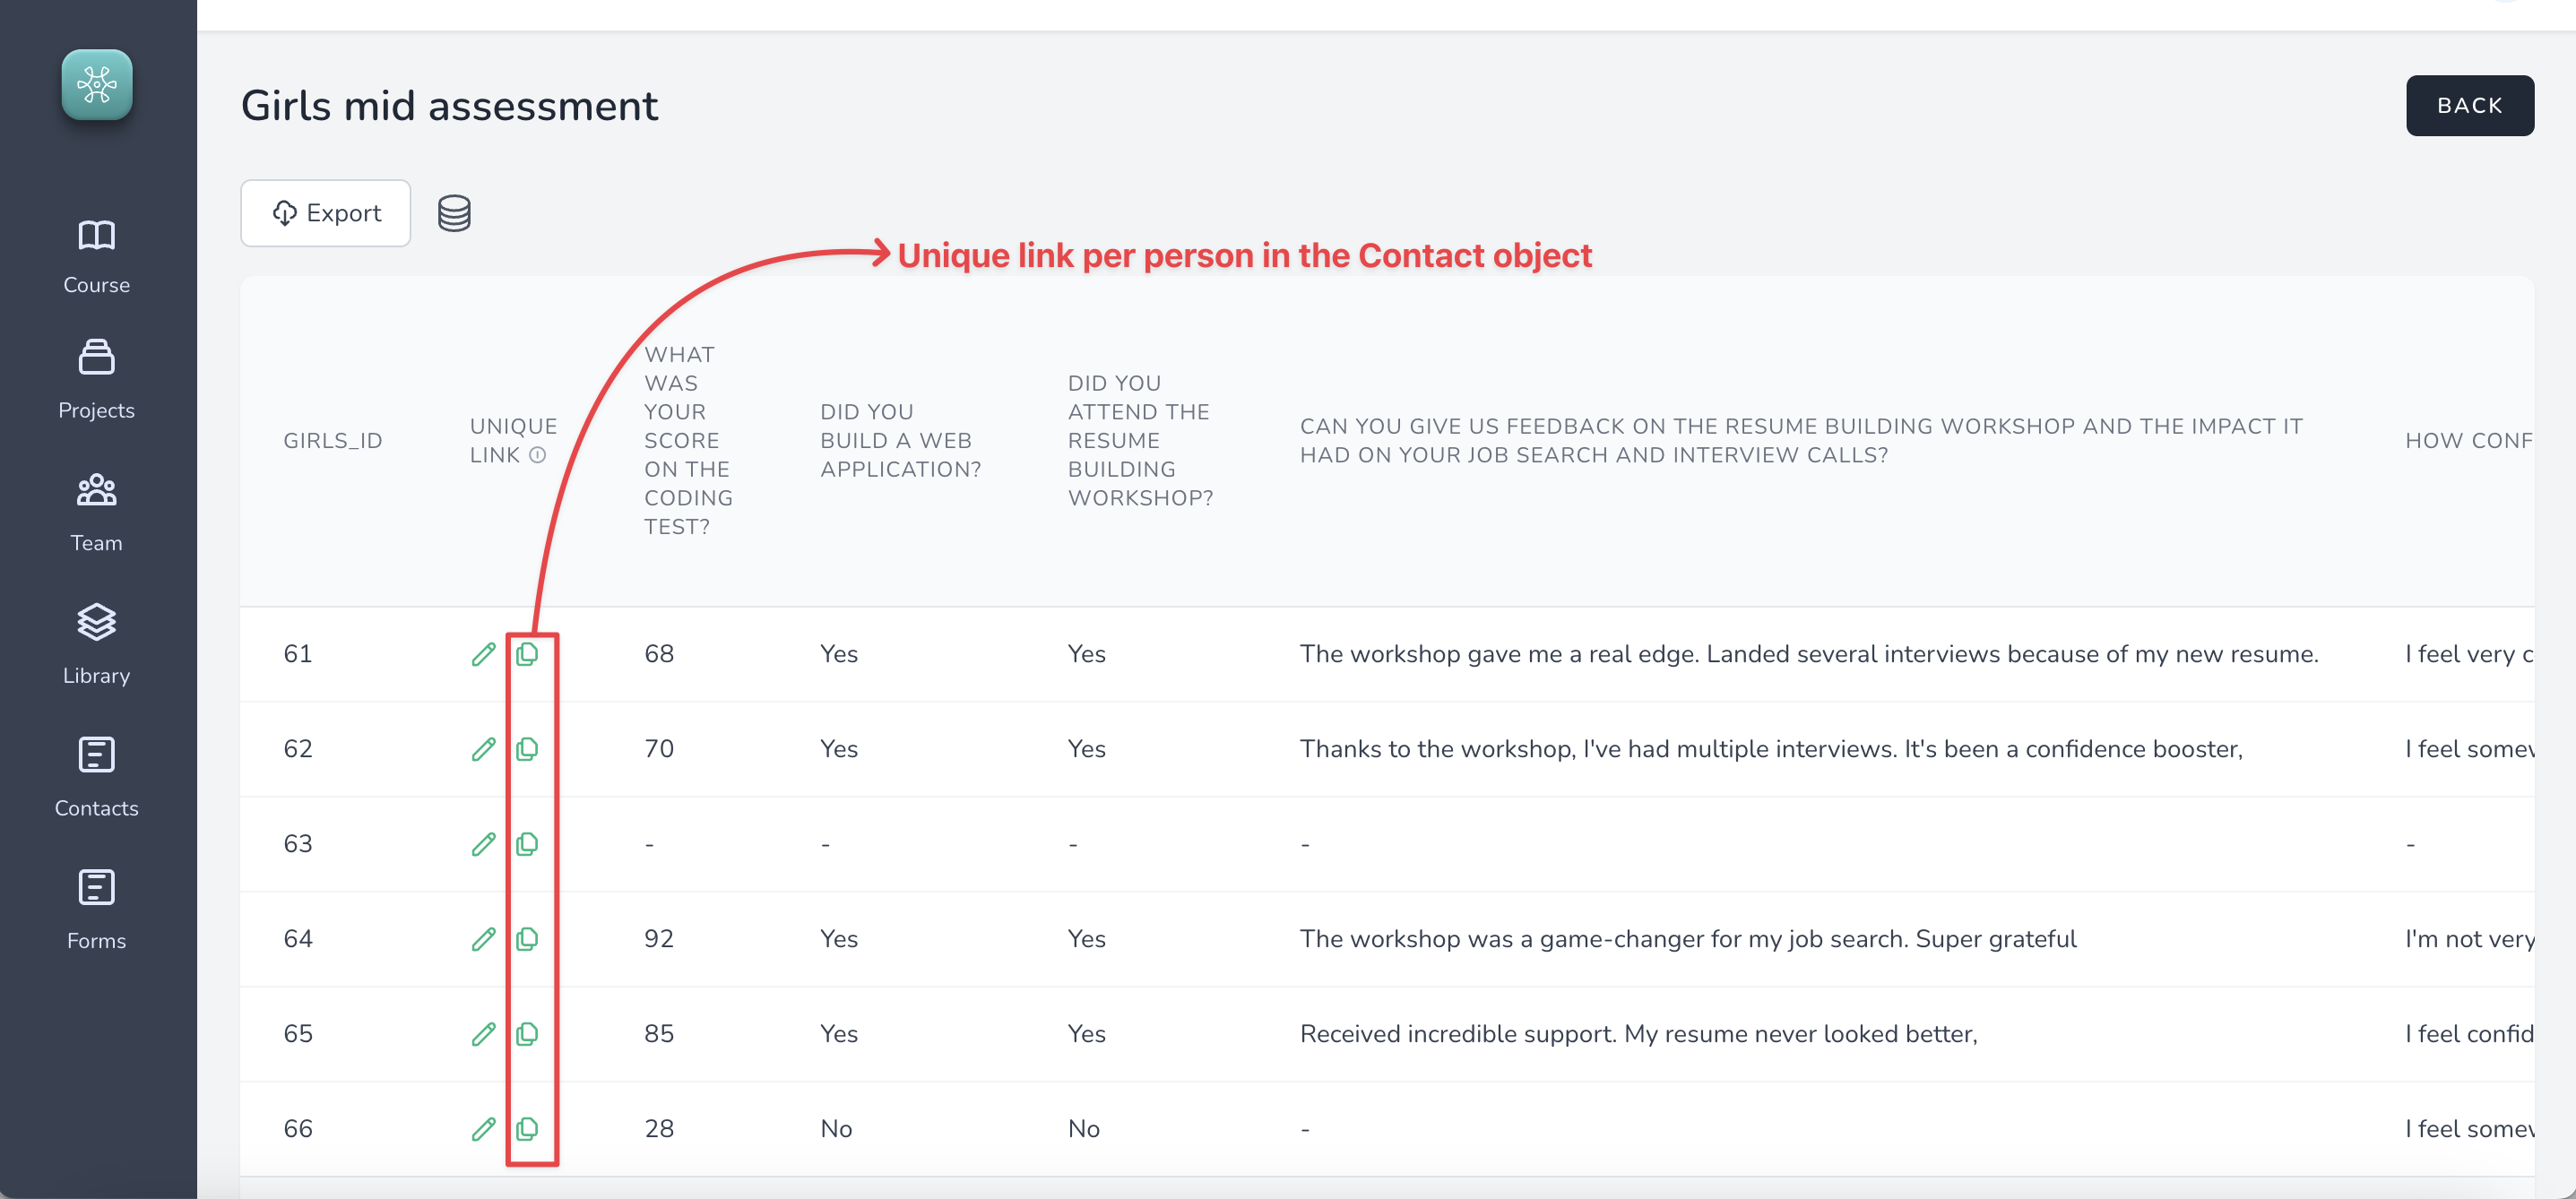
Similarly in forms, we get a unique link per record. This is because of the Relationship feature which ensures that there are not duplicate records in the forms and keeps the unique id generated in the Contacts in sync with the related Forms.
For example, the unique id that exists in the Contacts, the same exists in Forms (==Mid Program form==) which helps in managing a unique link per record in the forms as well. We can once again just copy and send the link to relevant person with that unique id
##### 4. Collecting data on follow up forms from the same stakeholders
Collecting data from the same girls on followup forms is super simple.
1. Create the followup form, for example, ==Post Program Feedback==
2. Establish Relationship with Girls contact
3. Step 2 ensures that every girl in Girls contact gets a unique link to post feedback on ==Post Program Feedback== form
4. Send the unique links to the girls and collect data
Thats it!
Congratulations! You now have an end-to-end working data collection system using Sopact Sense.
_Follow our Detailed How-tos to understand advanced concepts._
#### Step 5: Building designer-quality reports in minutes
Now that you have collected data on the survey, let us look at how to quickly generate reports that not only analyze the collected data but also produce beautiful-looking reports that are instantly shareable.
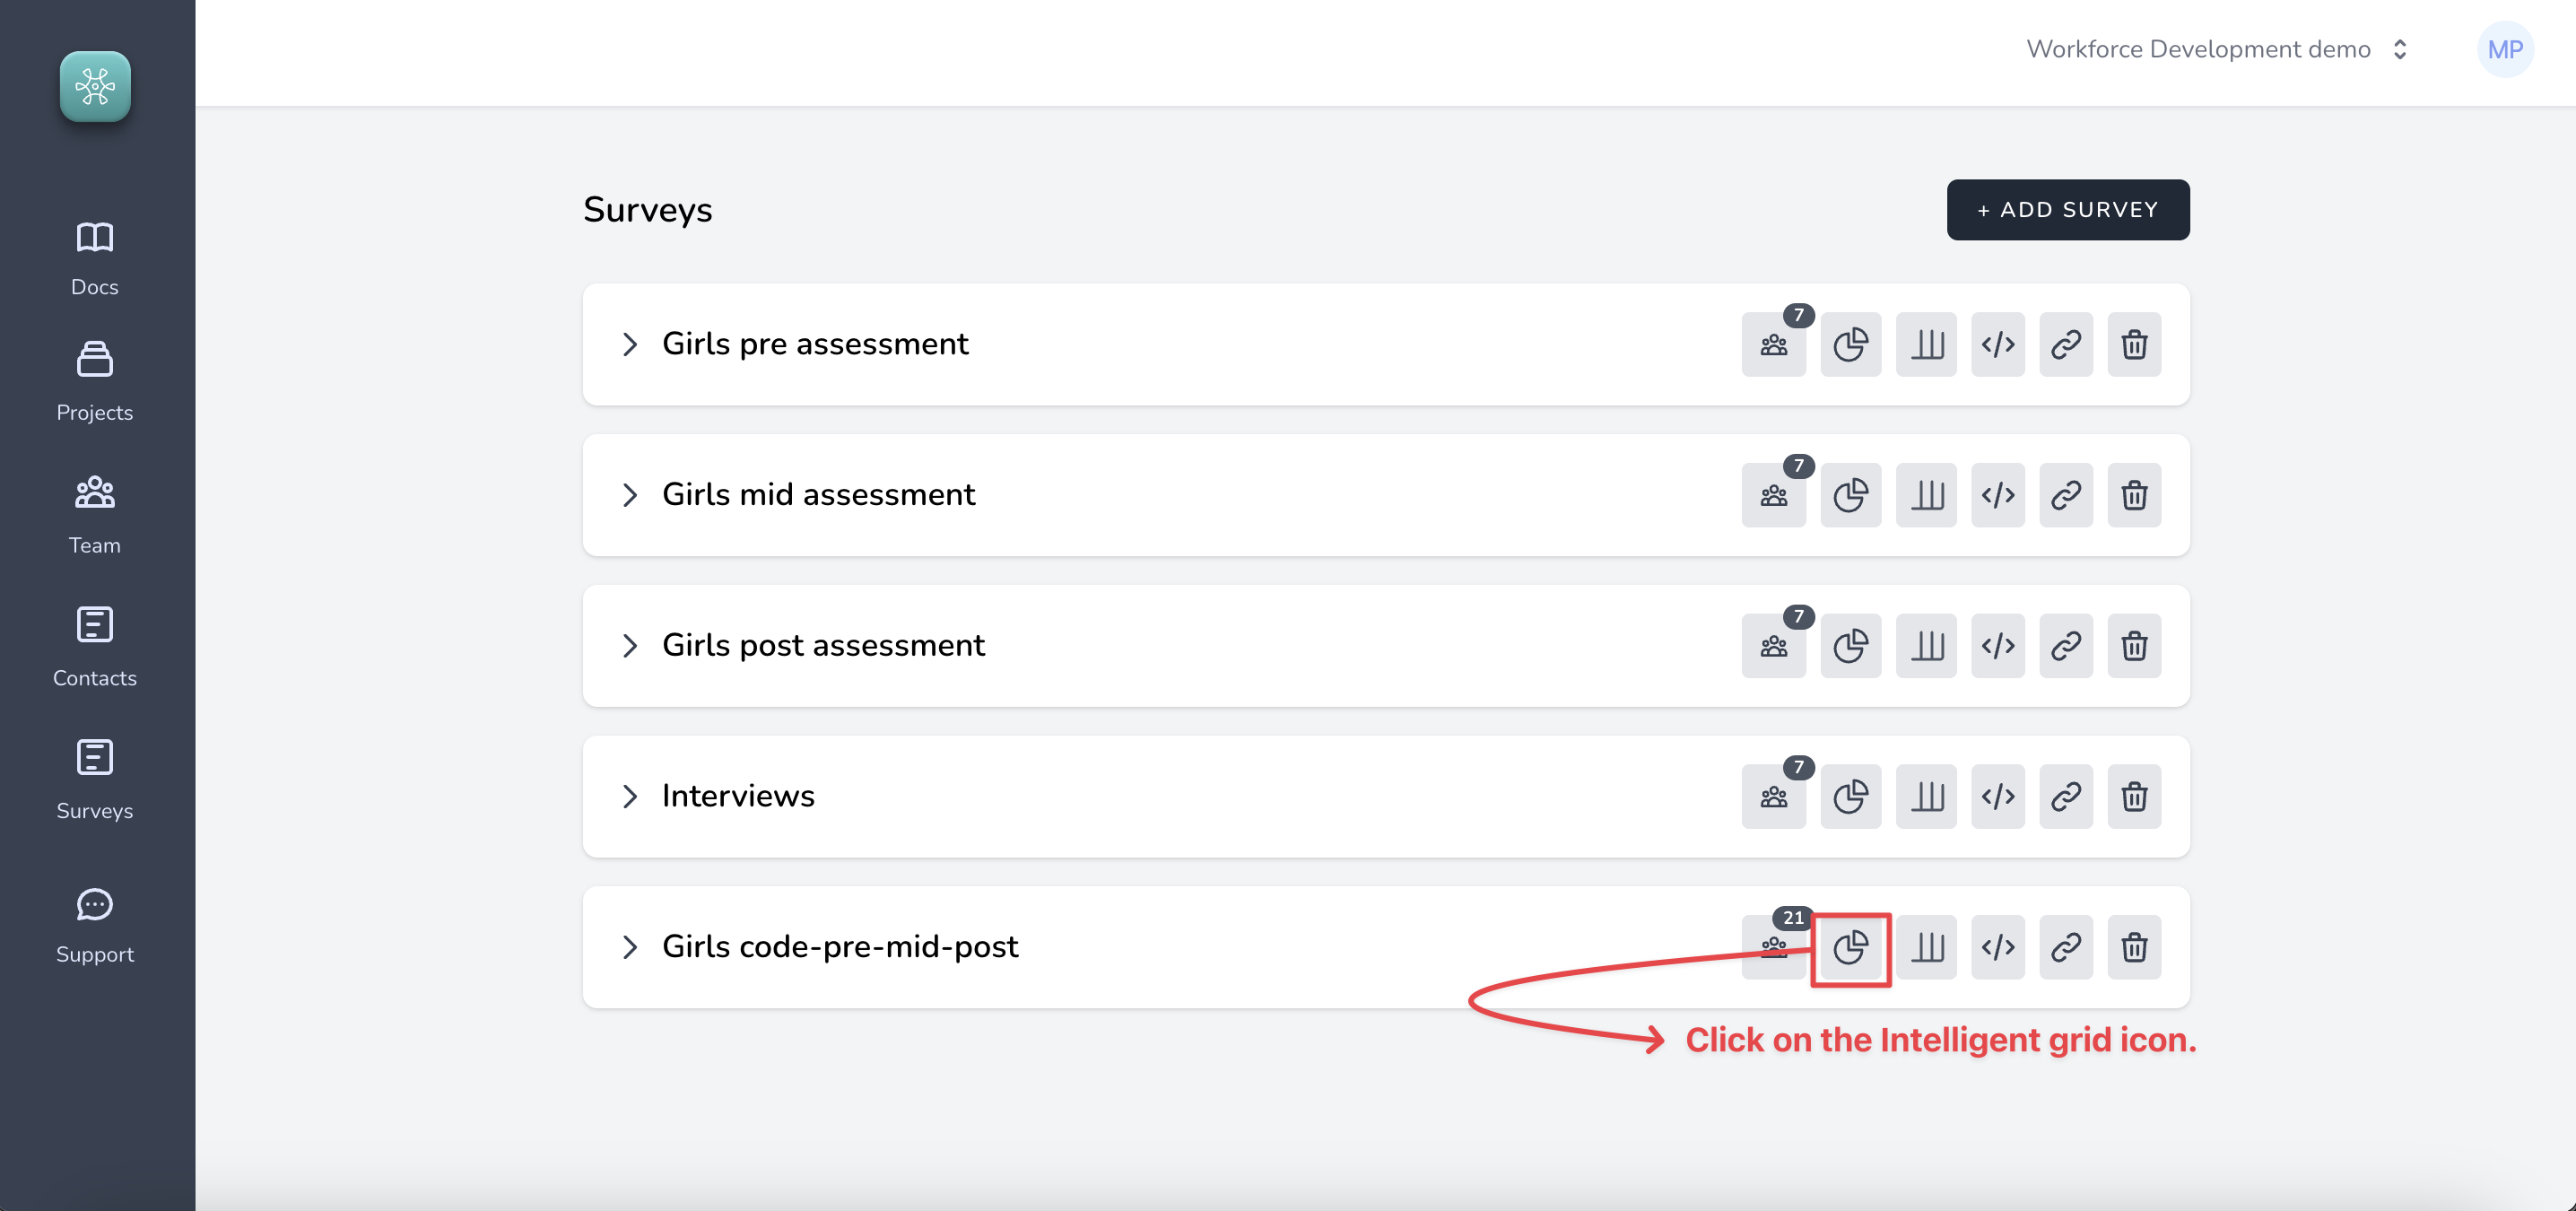
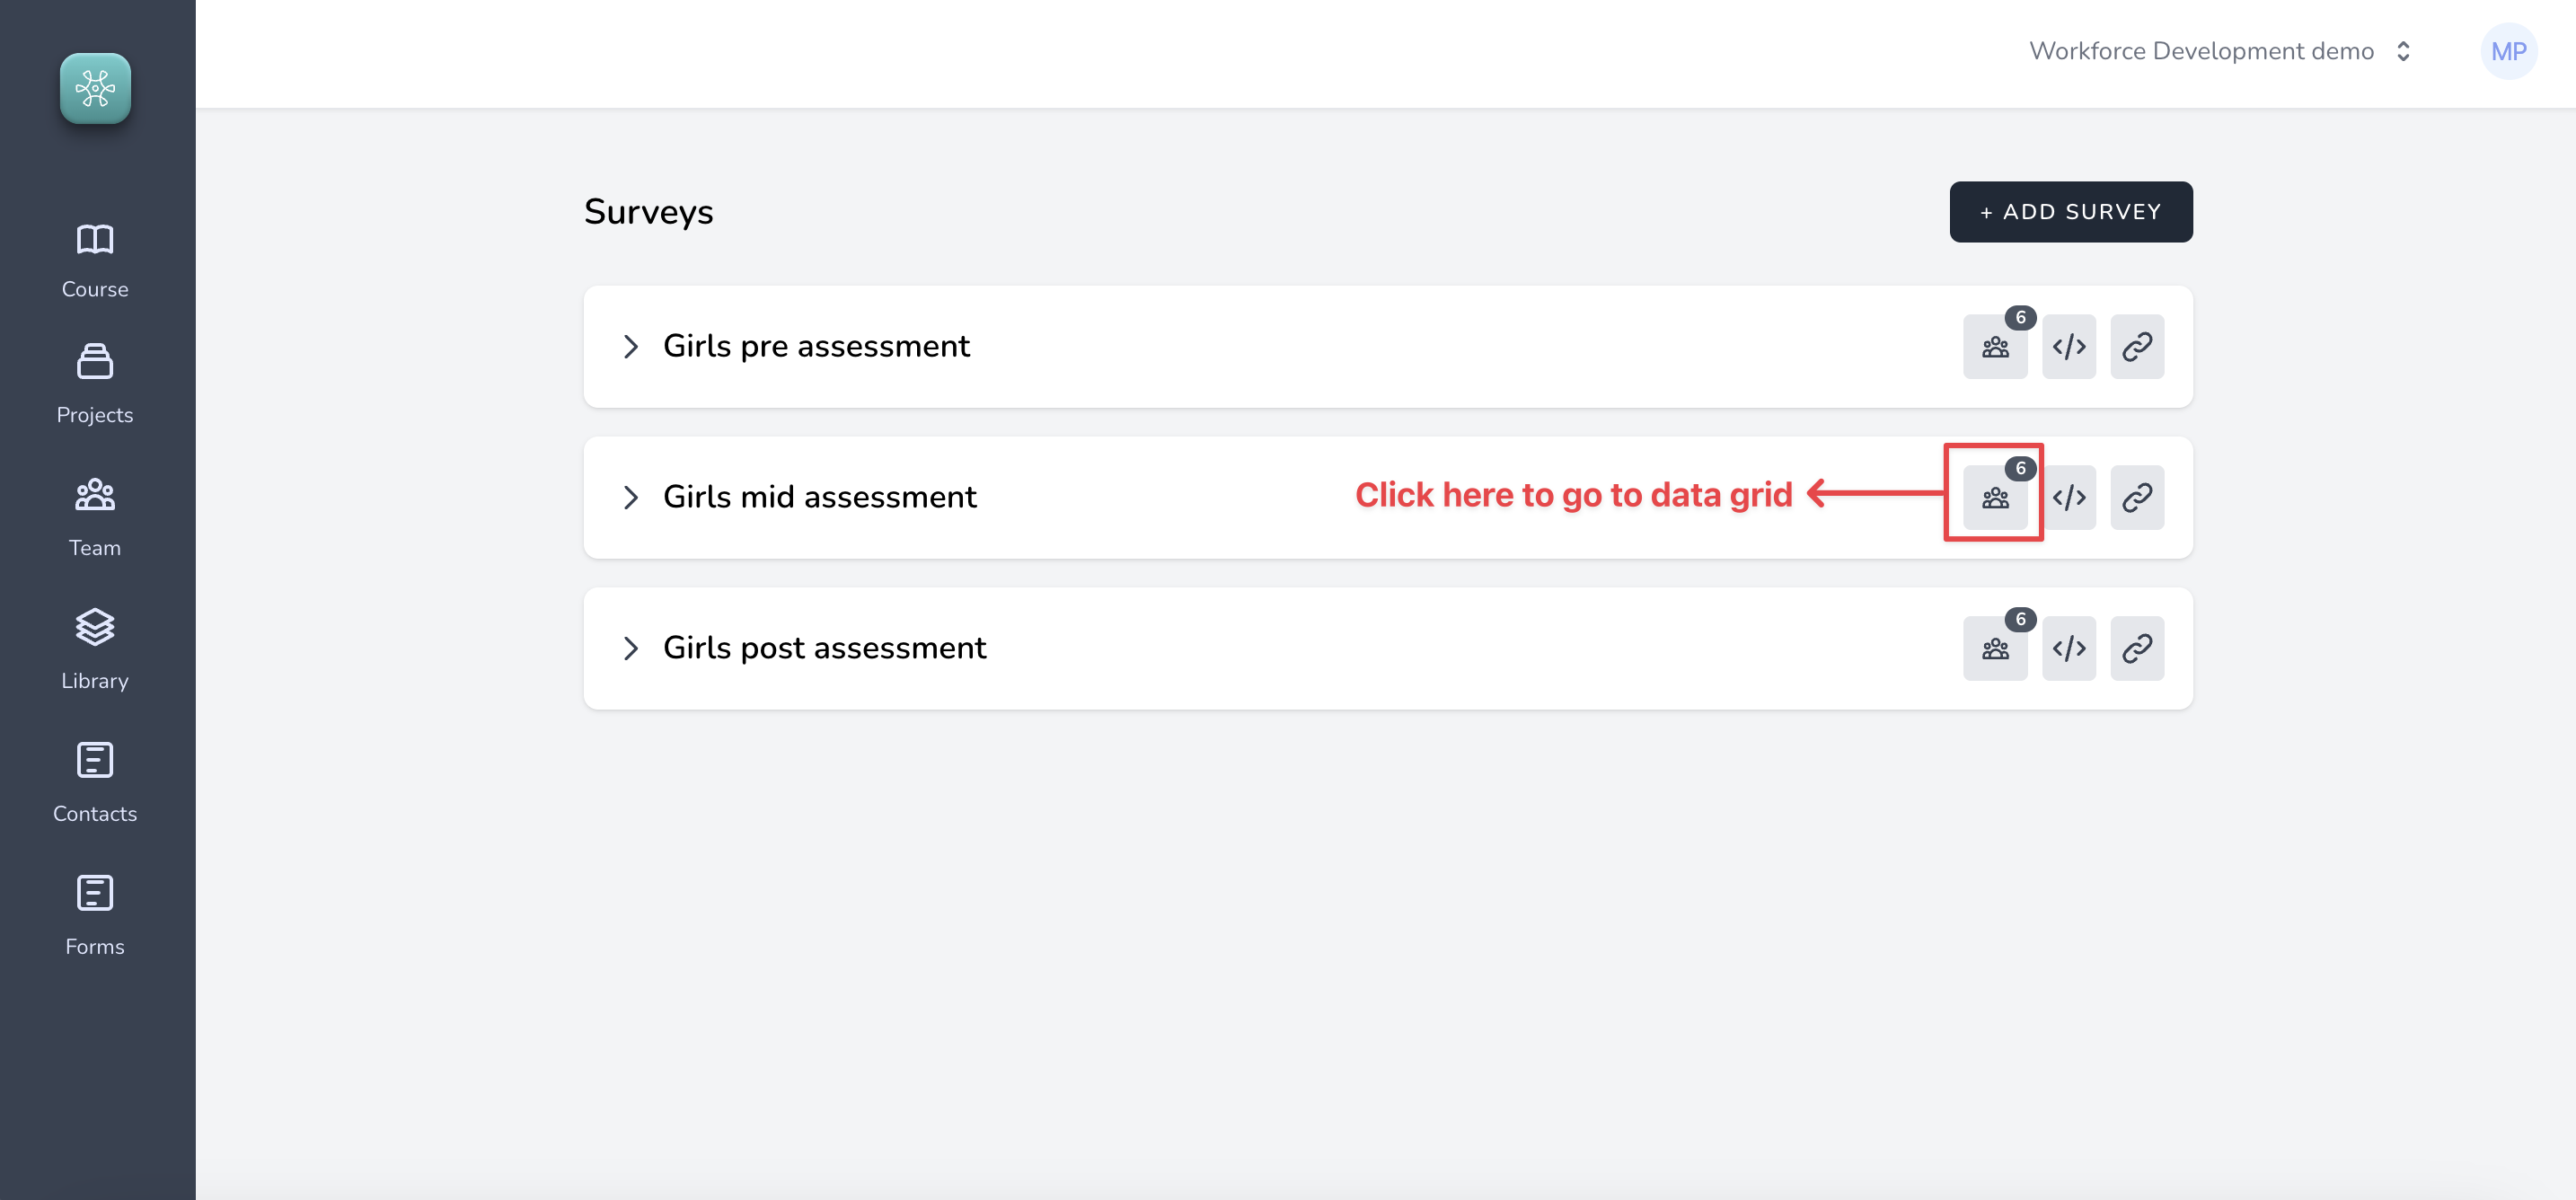
##### 1. Building reports through Intelligent Grid
On the surveys list, click on the Intelligent Grid icon for the corresponding survey, like so
##### 2. Write your prompt and generate report
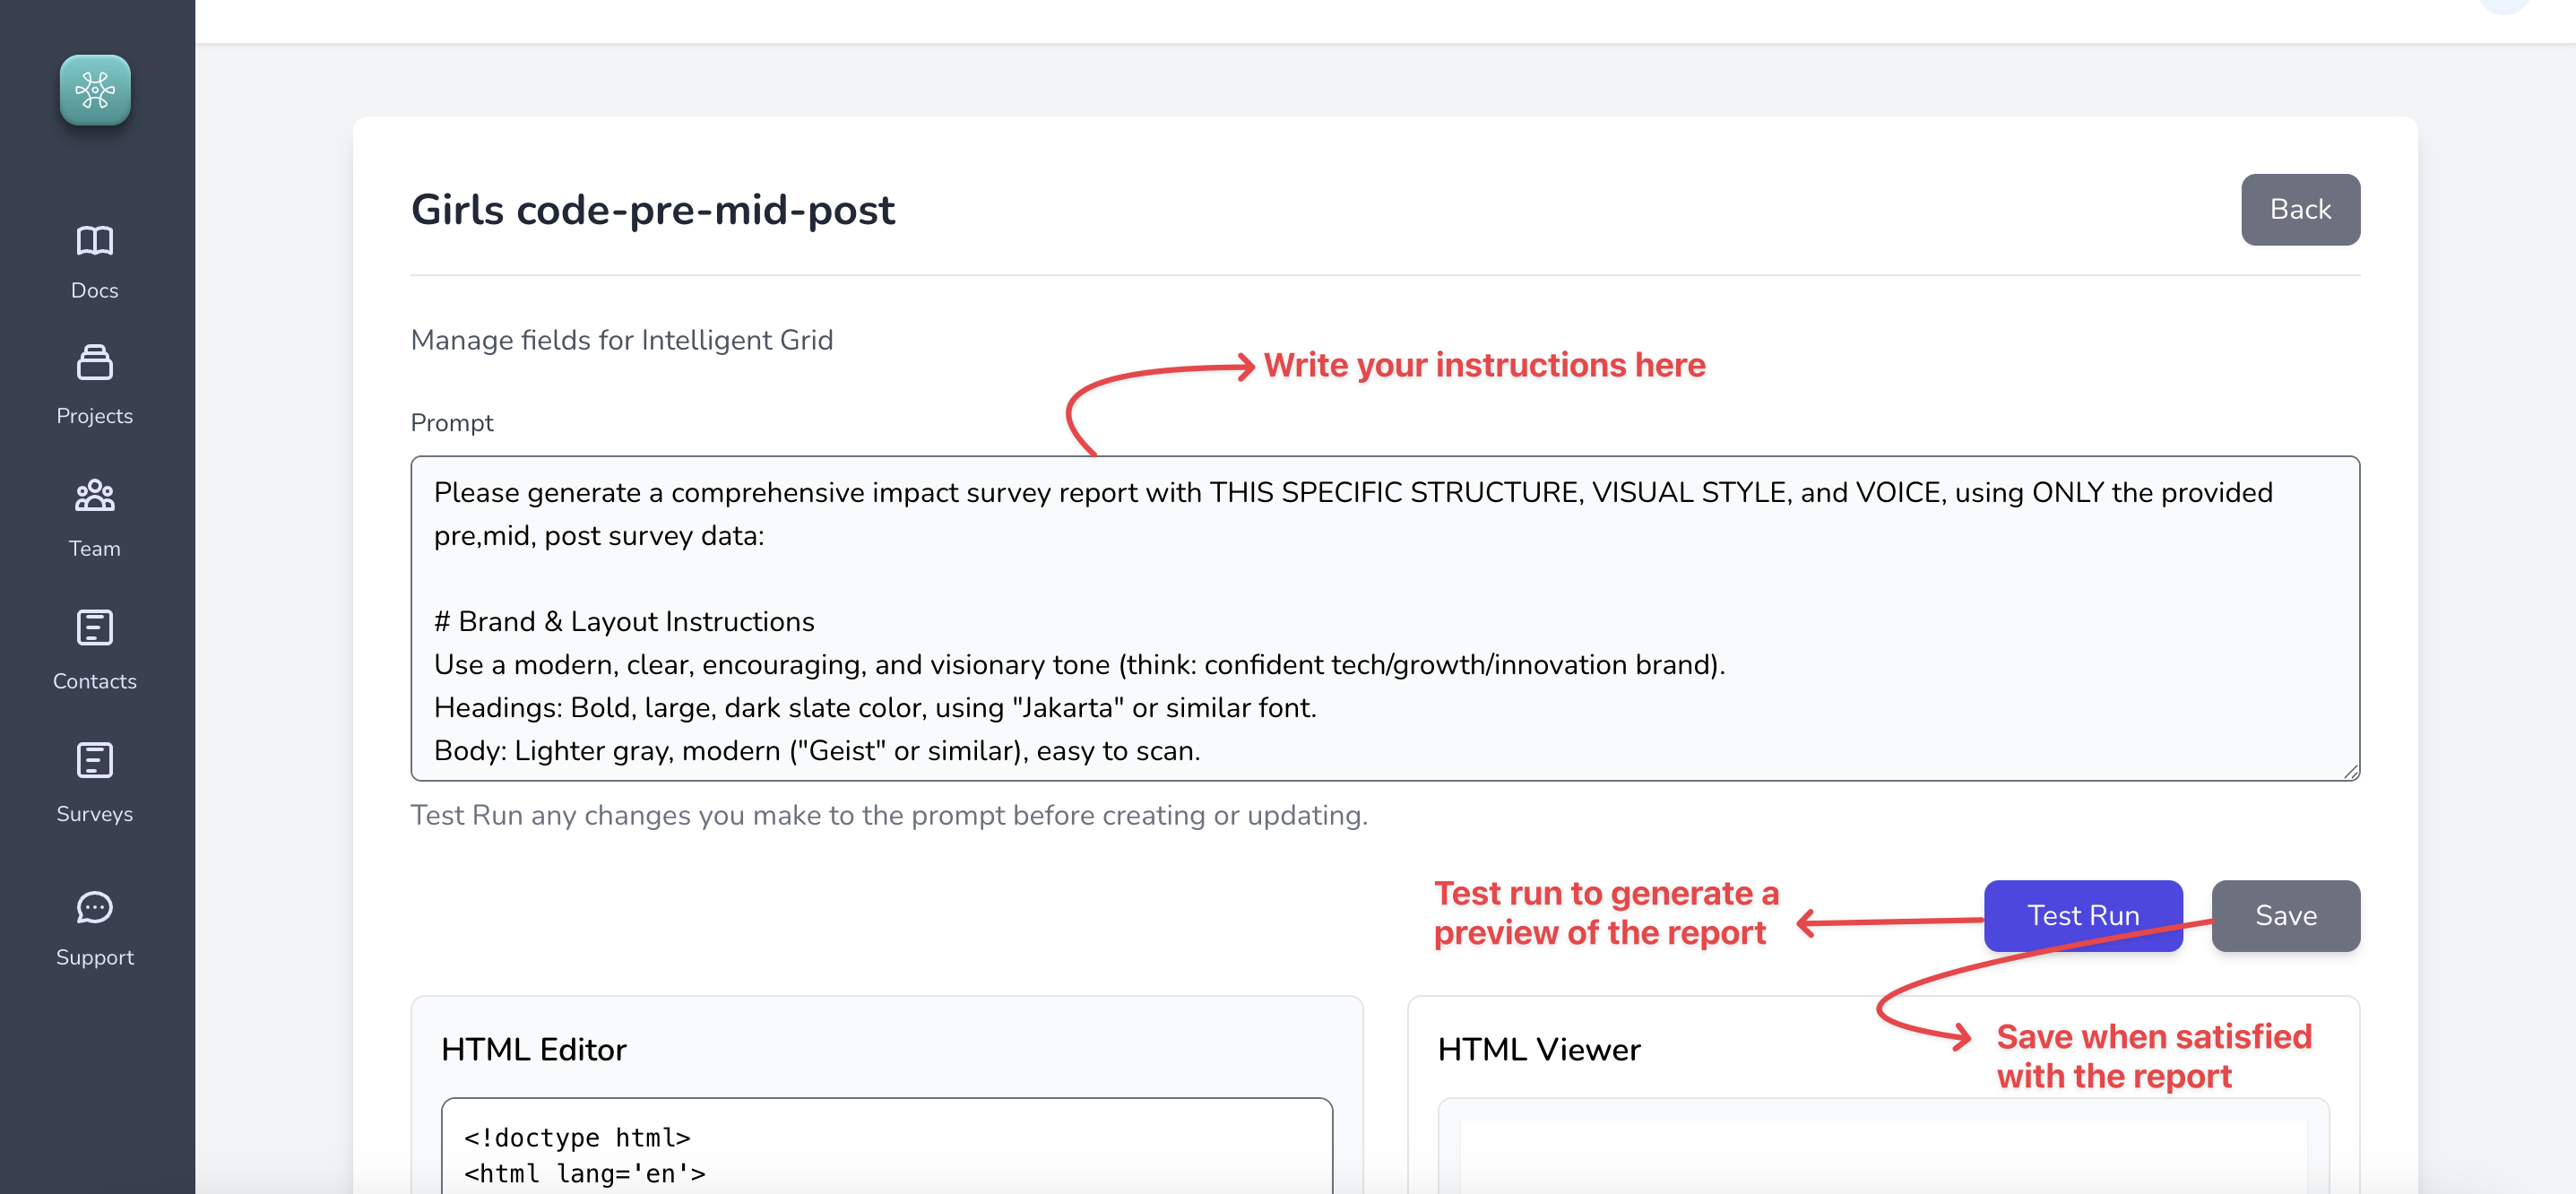
##### 3. Copy link and share it with anyone
Once you save the report, you can simply copy a global link for the report and share it with anyone on the internet (its is a public link), like so

#### Qualitative data analytics
While not necessary to understand the fundamentals of our system, this feature is extremely useful for extracting useful insights in different forms from unstructured data such as open-ended responses and documents containing text.
==We accomplish this my introducing a very innovative field type called "Intelligent Cell".==
Let us quickly see what you can do with this.
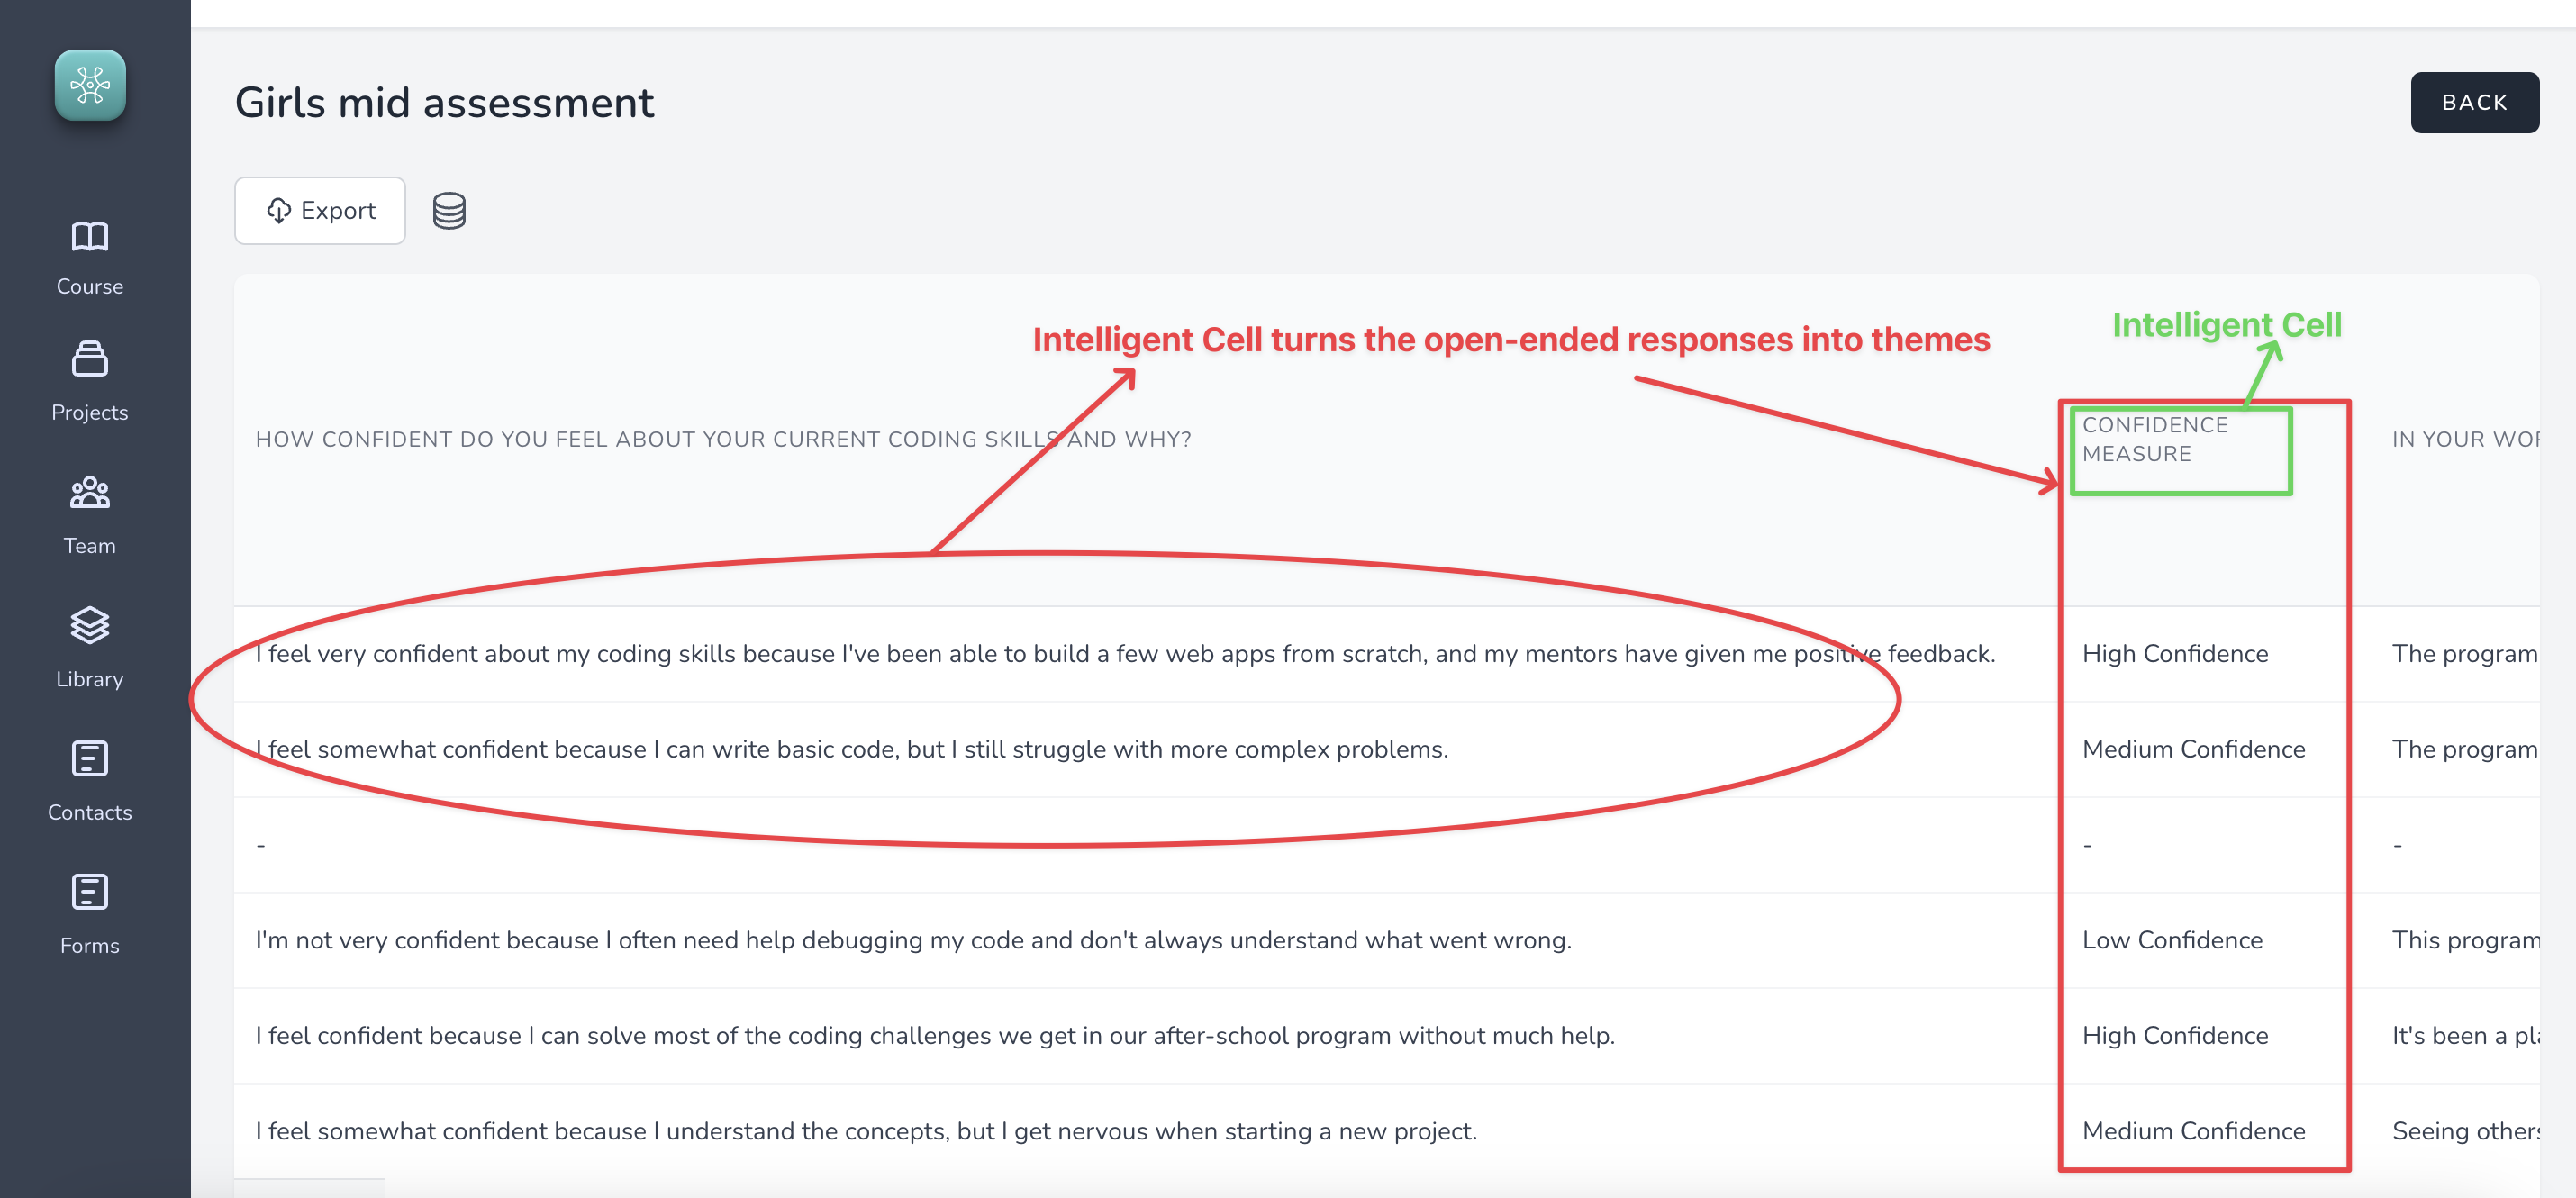
In the image above, you can see the open-ended responses being turned into quantifiable themes which allows you to answer metrics such as
> % of girls that improved their confidence level during the training program
Let us see how to configure an Intelligent Cell field type for our forms.
Going back to the ==Mid Program Feedback== form
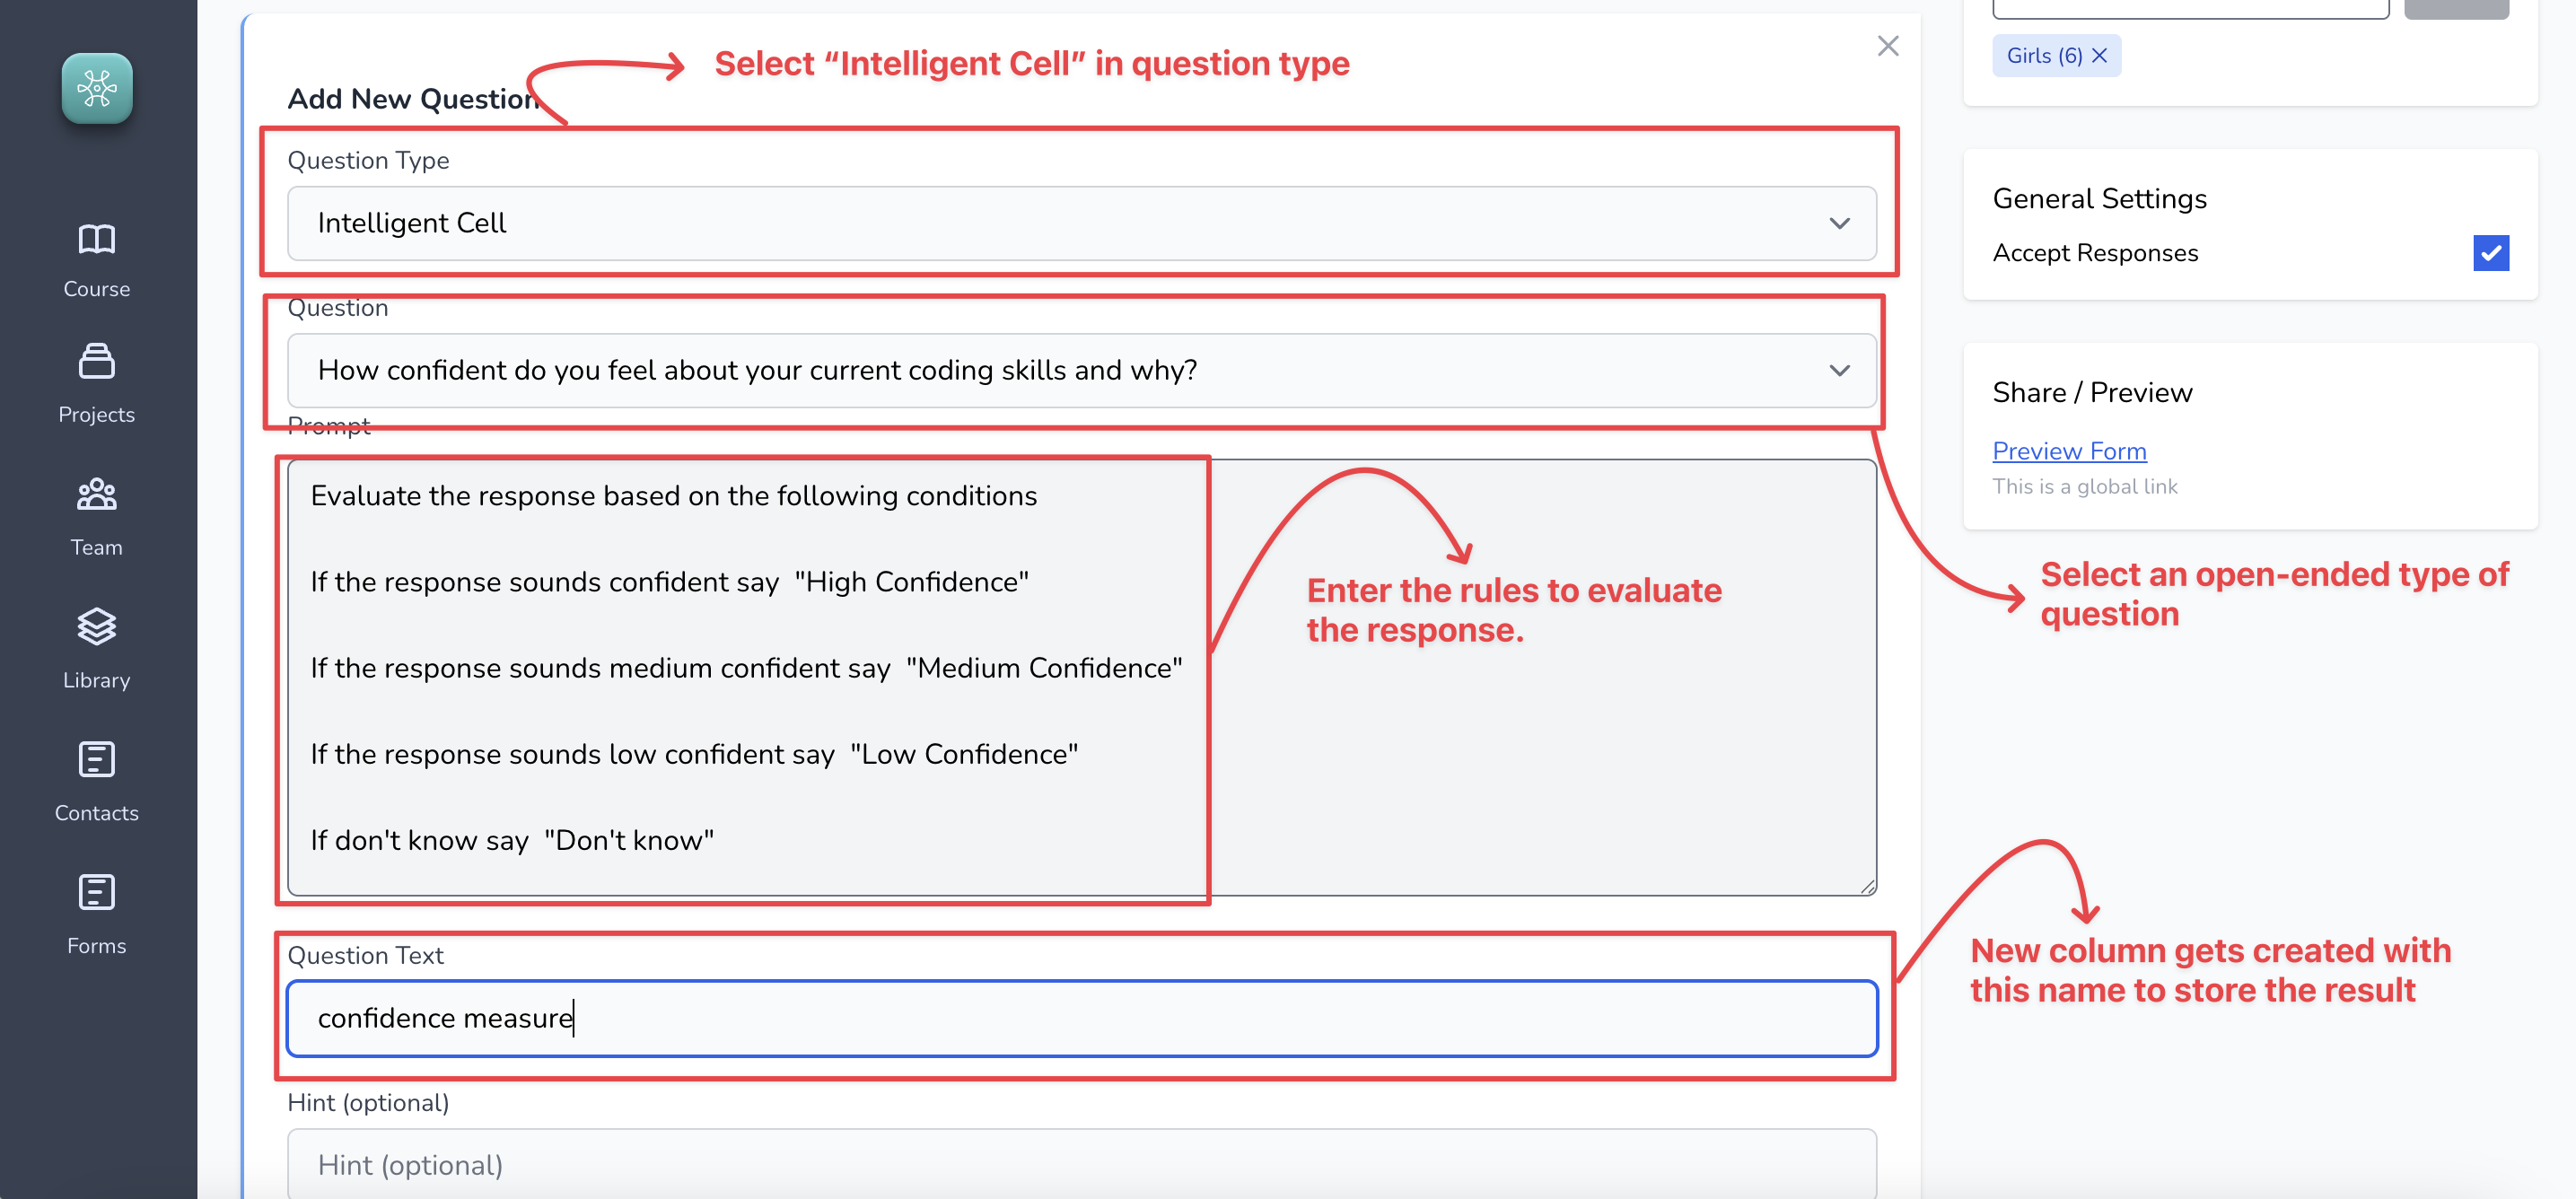
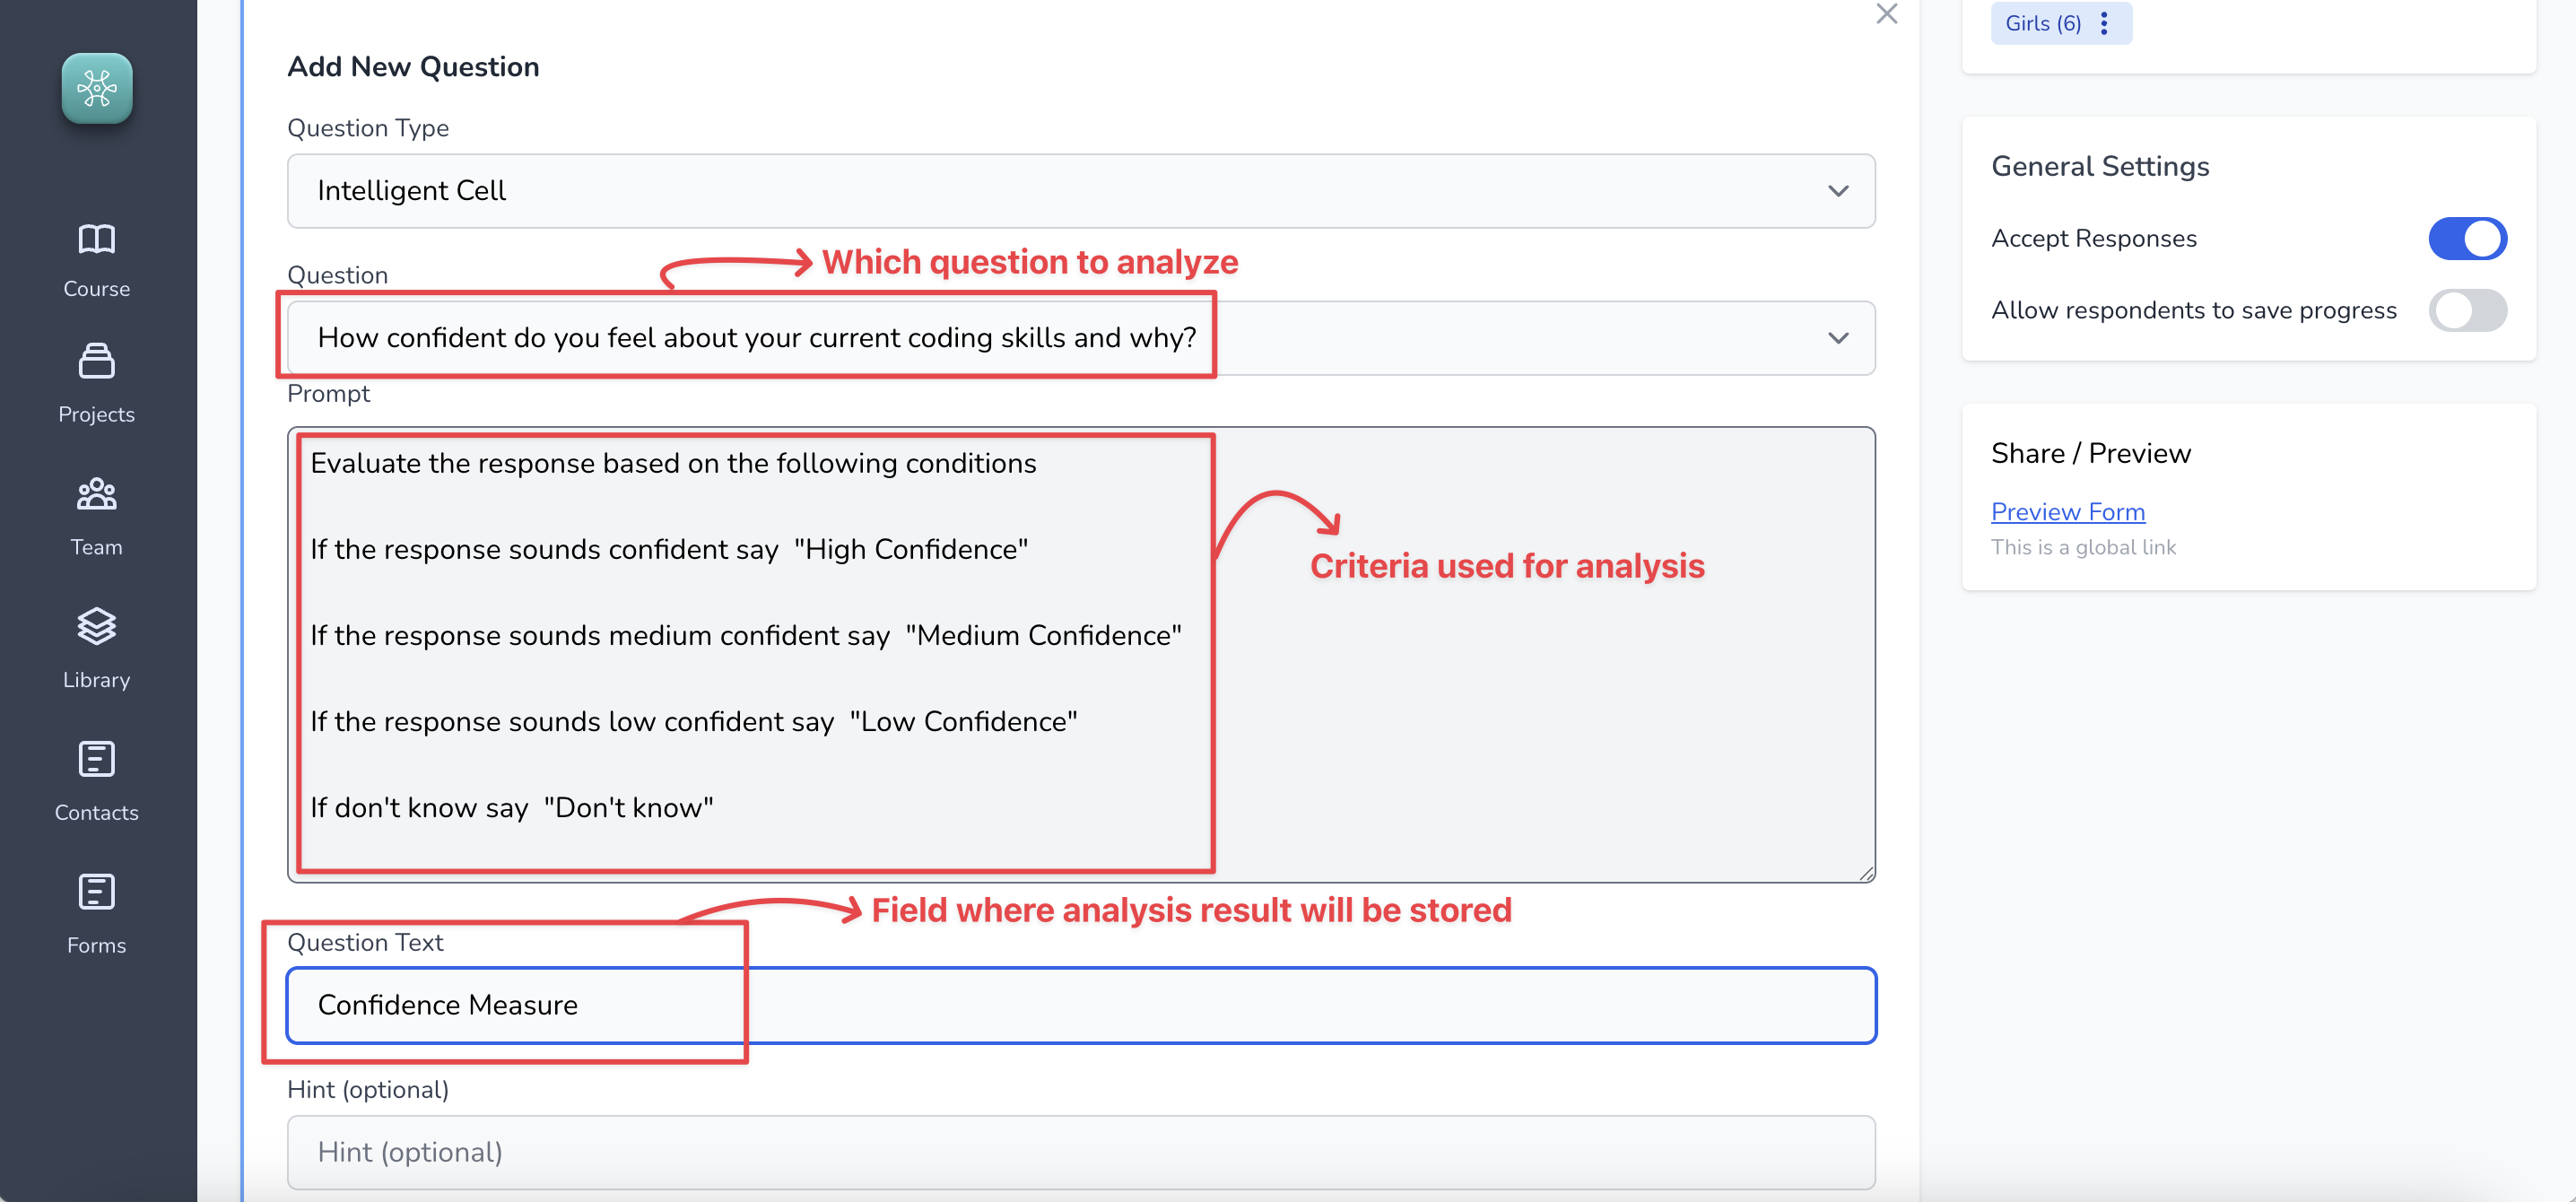
##### 1. Create an ==Intelligent Cell== Field with the following details
Add an example response such as this.
And you will see the responses being analyzed and results being populated, like so
Detailed How tos
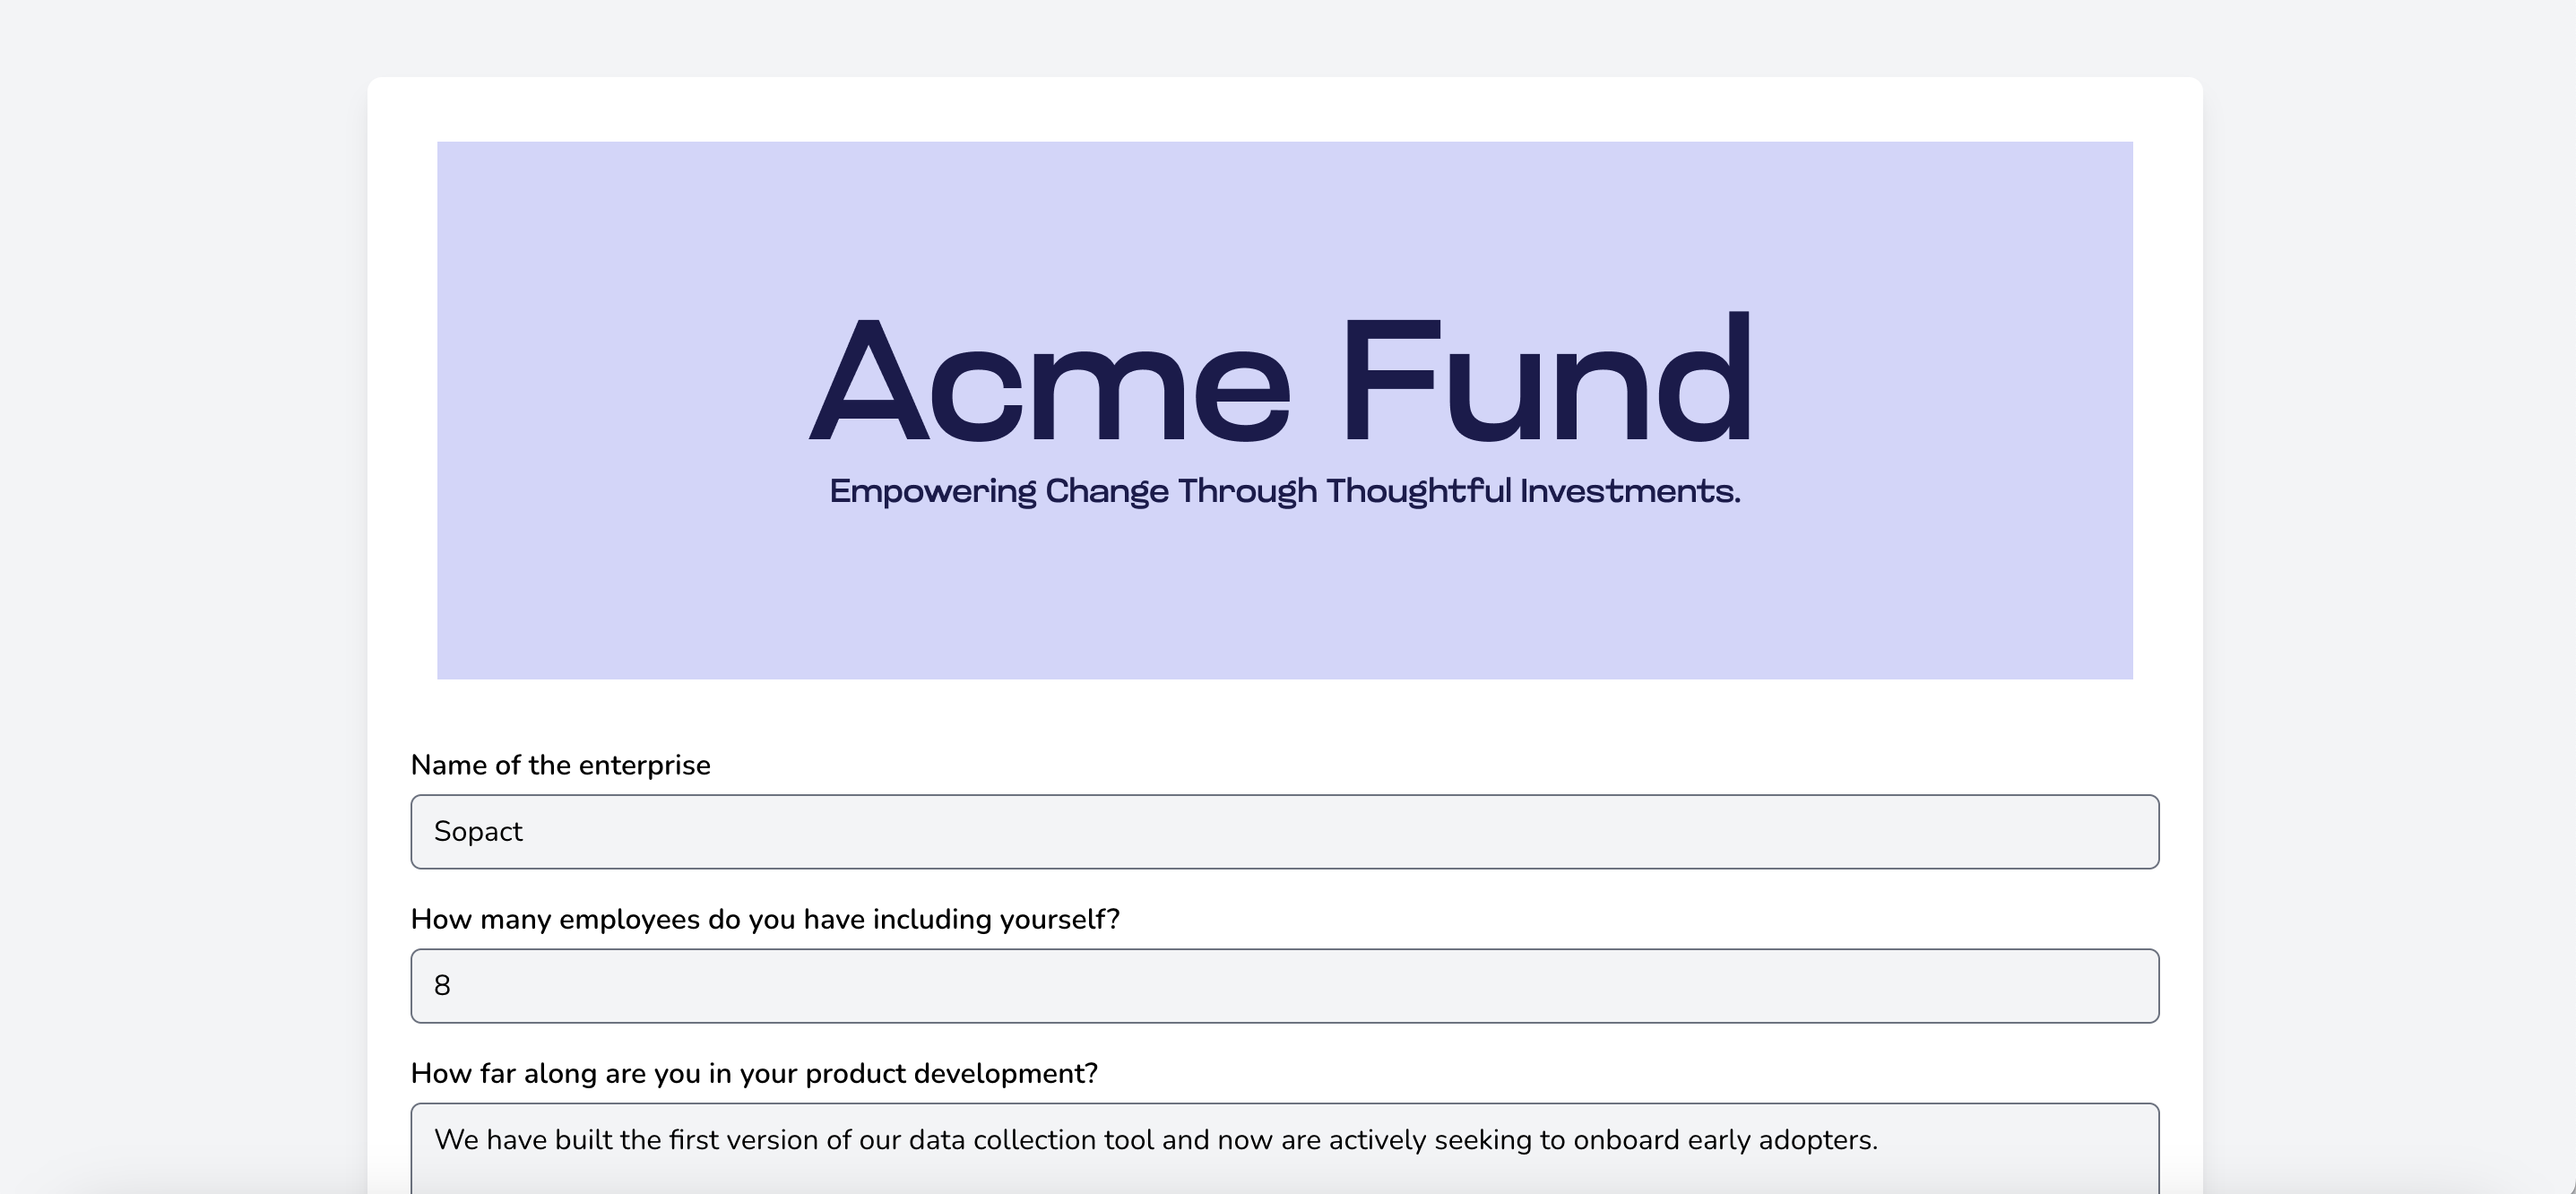
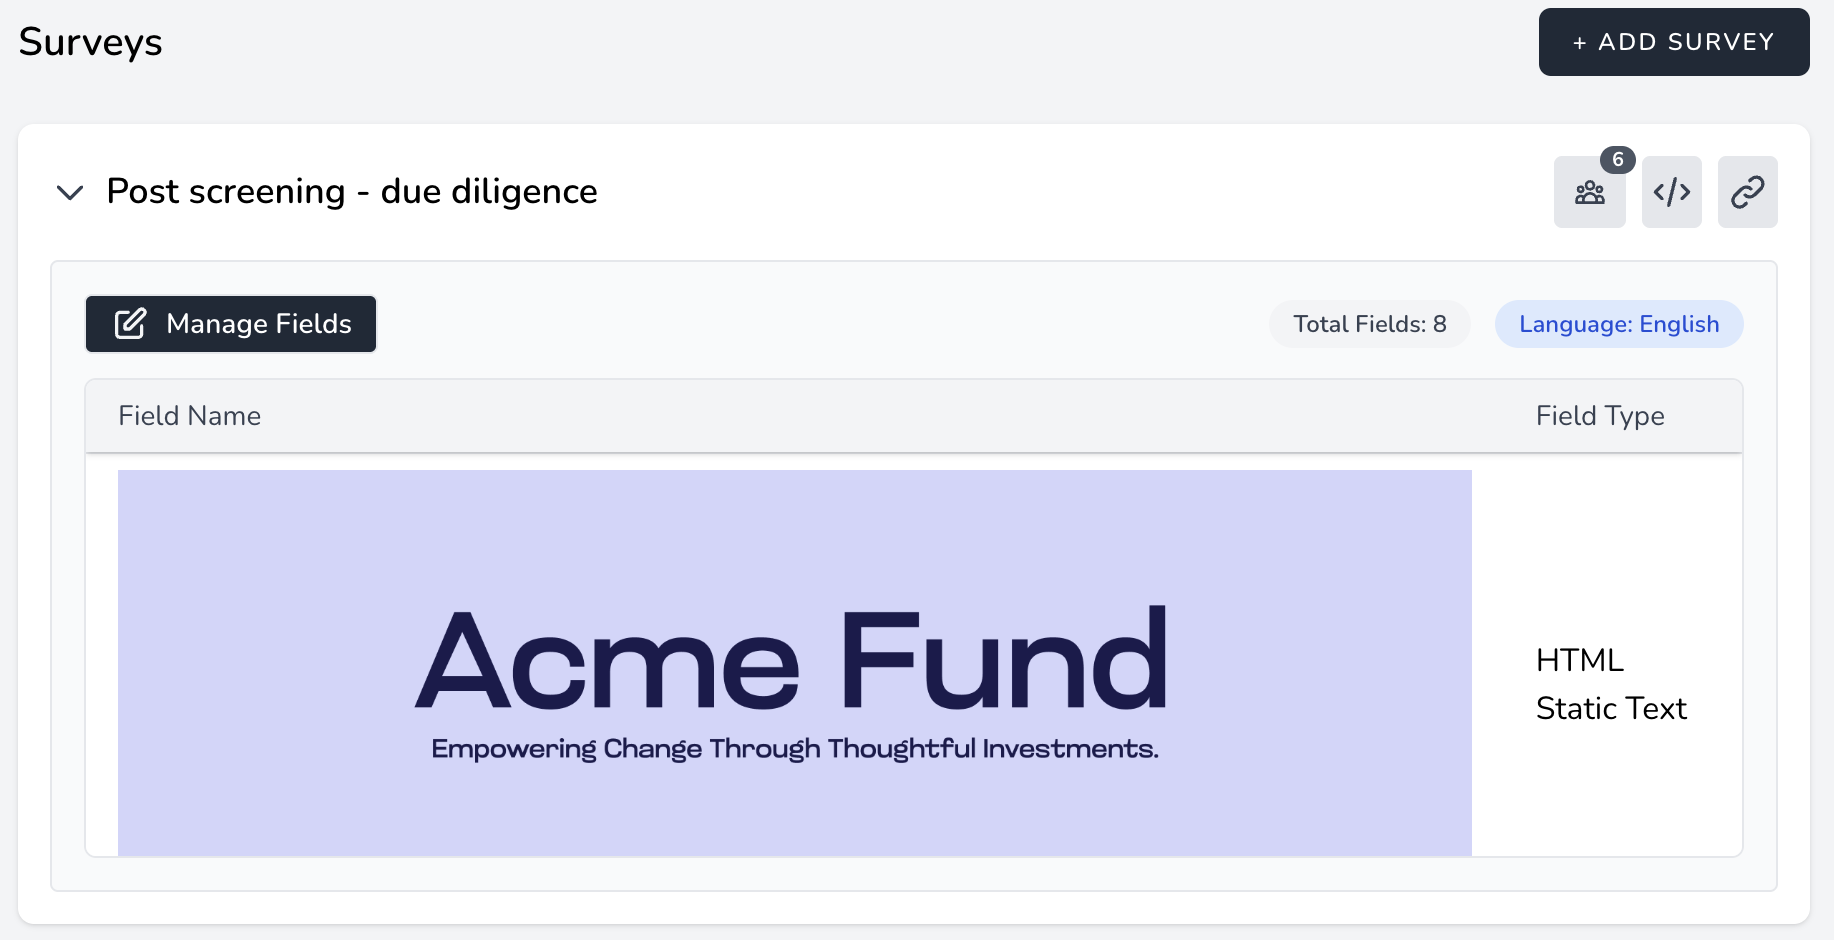
### Creating a Survey Banner
You may customize the look and feel of your survey by adding a survey banner or a title to your survey. An example survey banner:
Lets take a look at how to accomplish this.
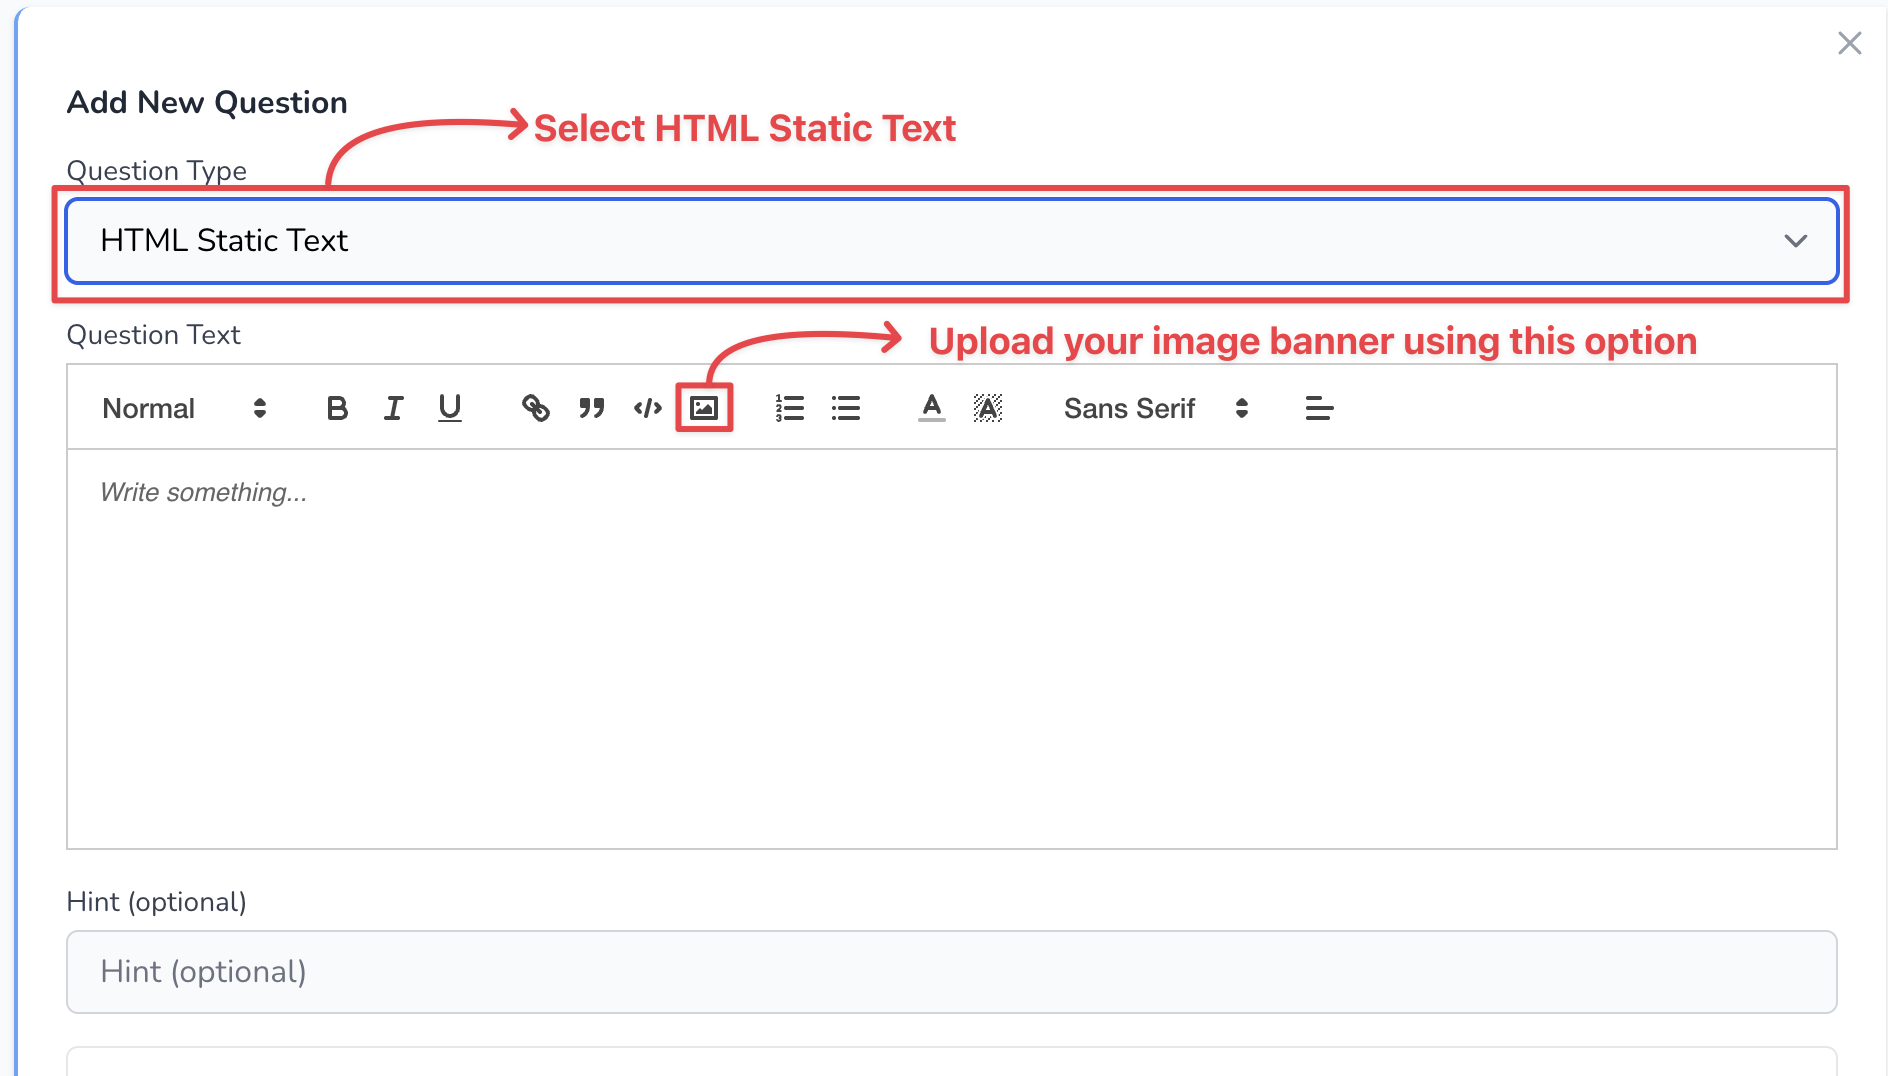
#### 1. On your survey, create a question of type ==HTML Static Text==, like so
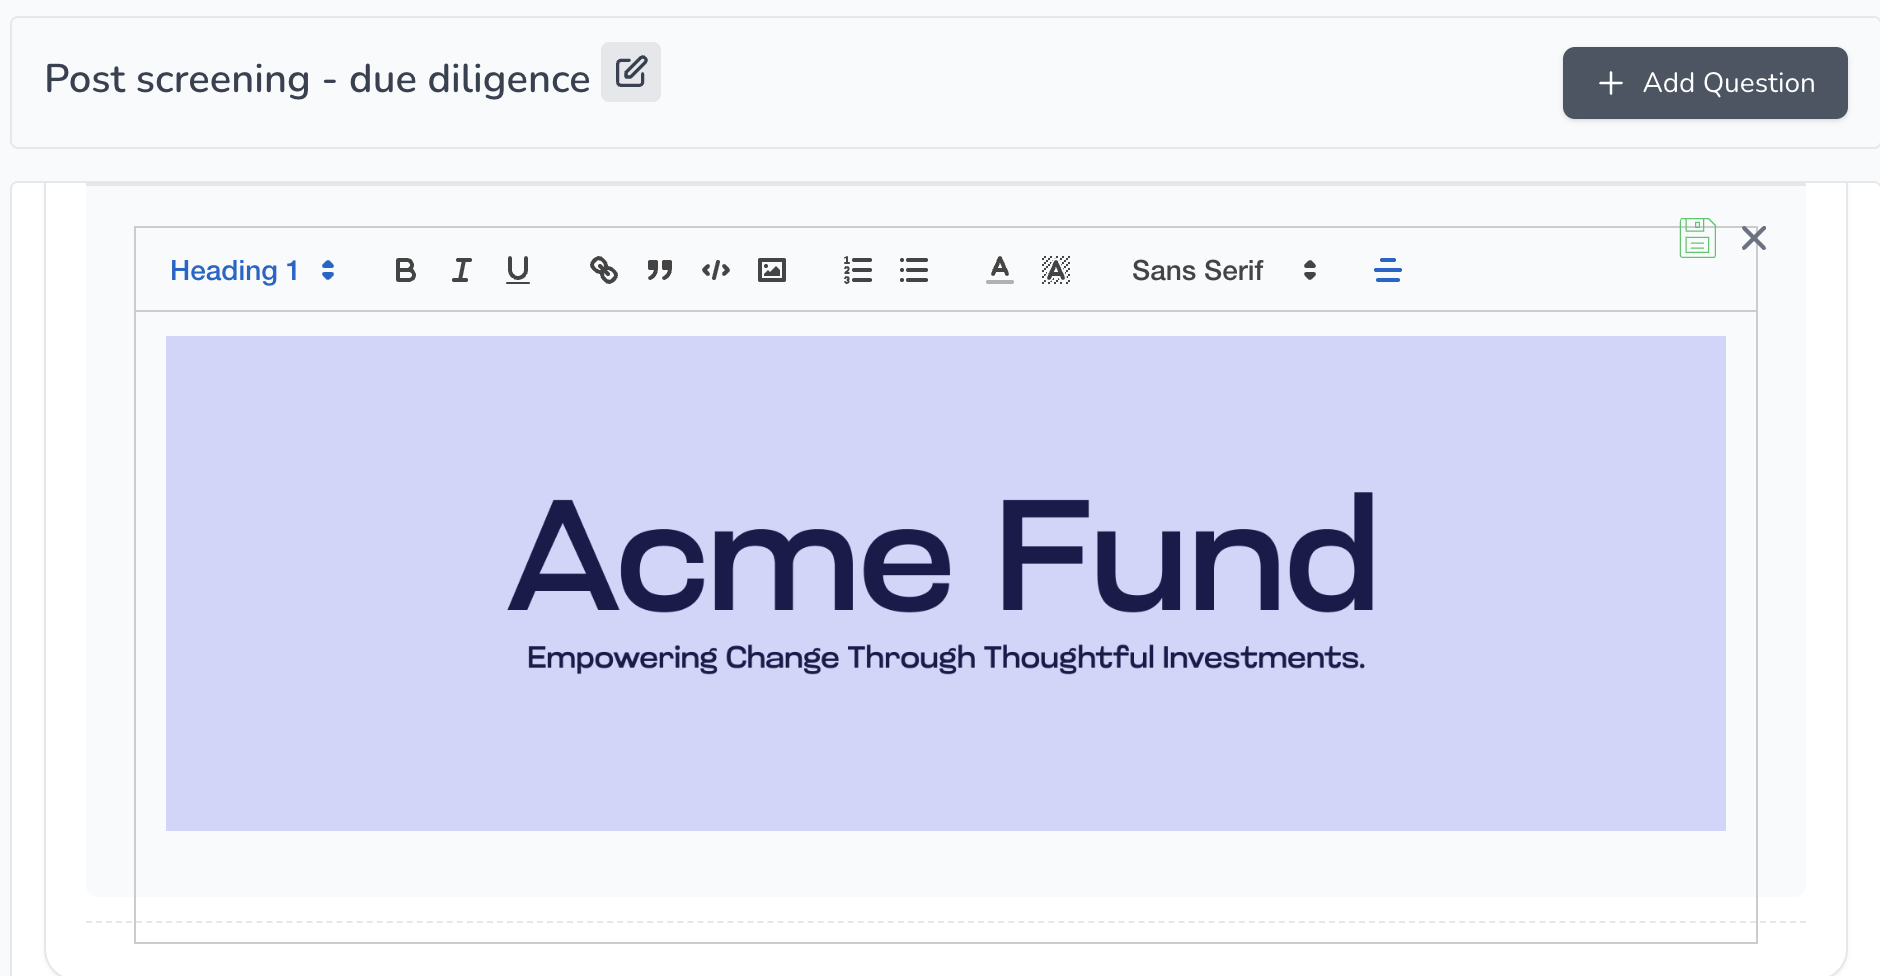
#### 2. Once you upload your image, it might look something like this
##### Note
Banner image size is very important for the look and feel to be ideal.
Please use 1892x600 size for best results.
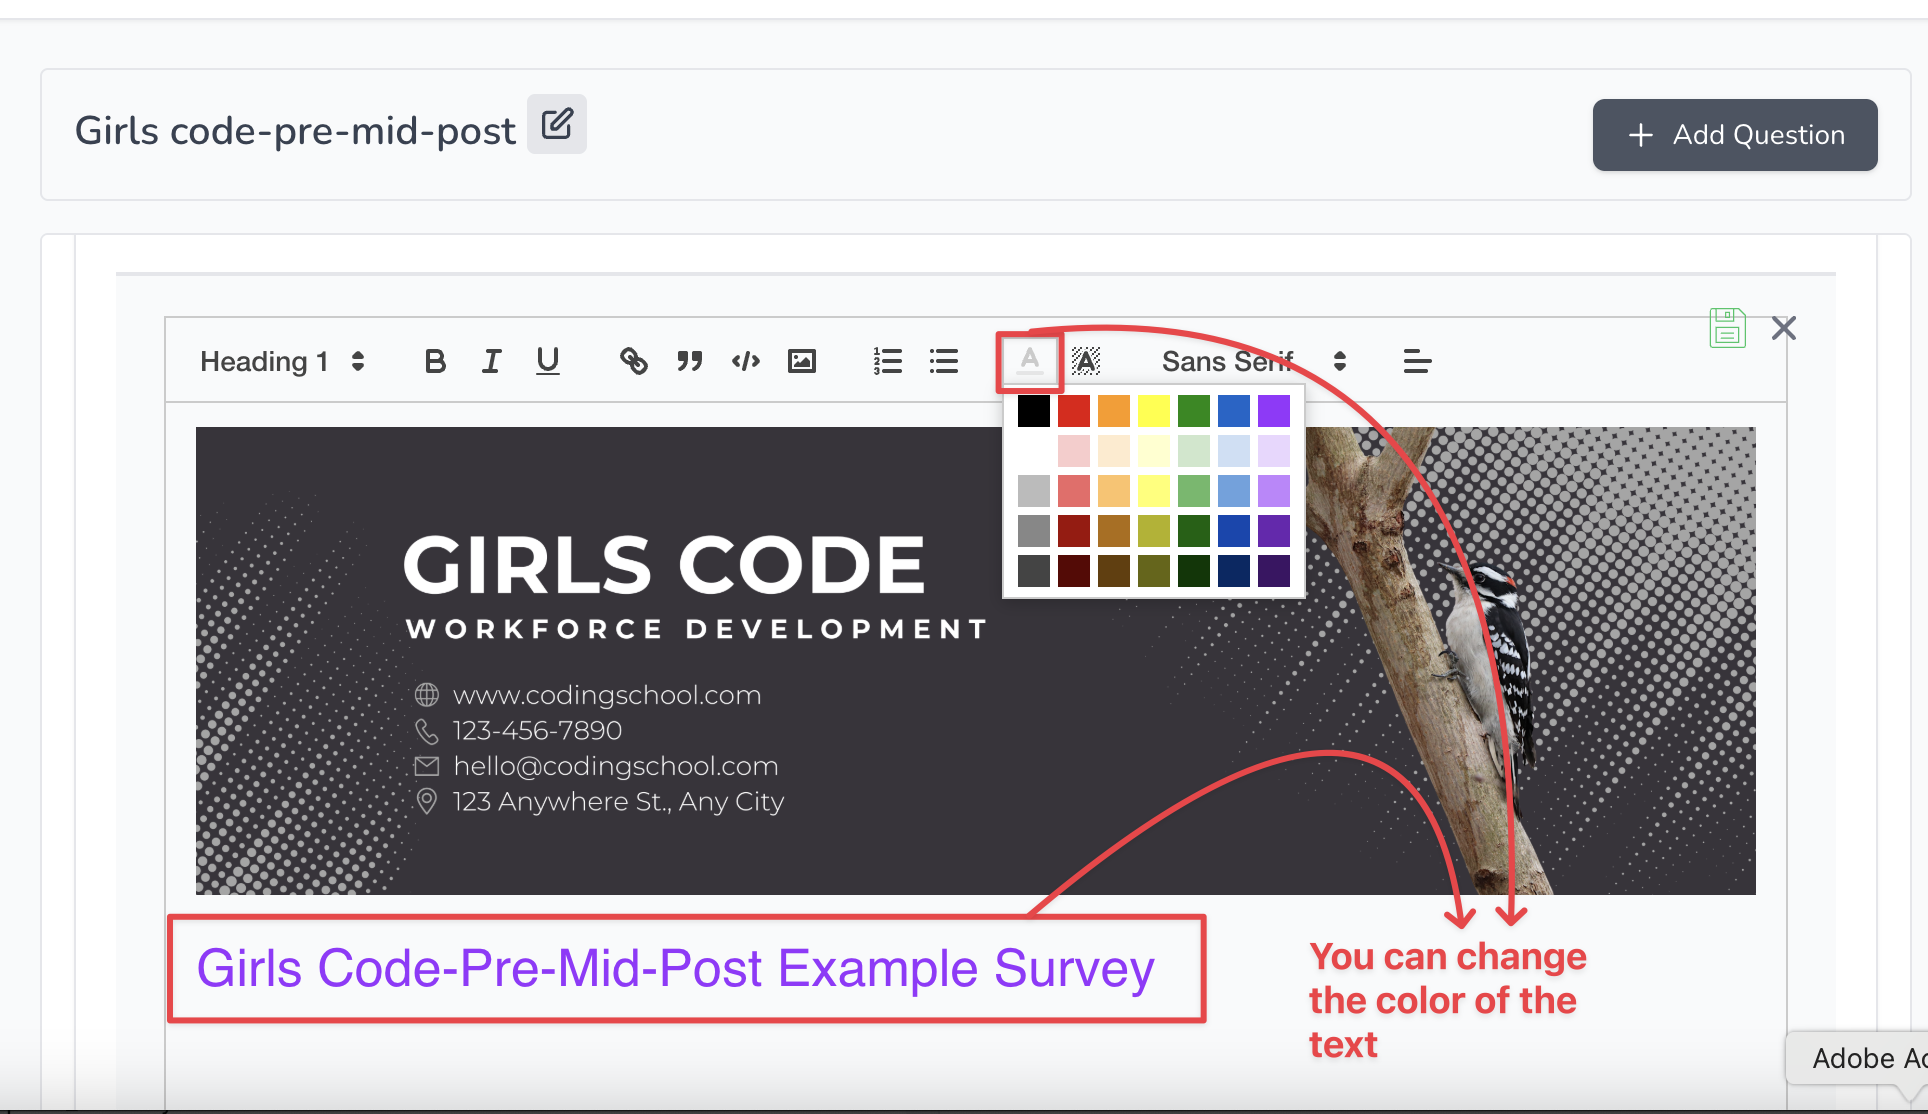
#### 3. Formatting text
You can also change the look and feel of the text you type.
For example, you could change the color and font:
### Creating questions
Creating question is straight forward.
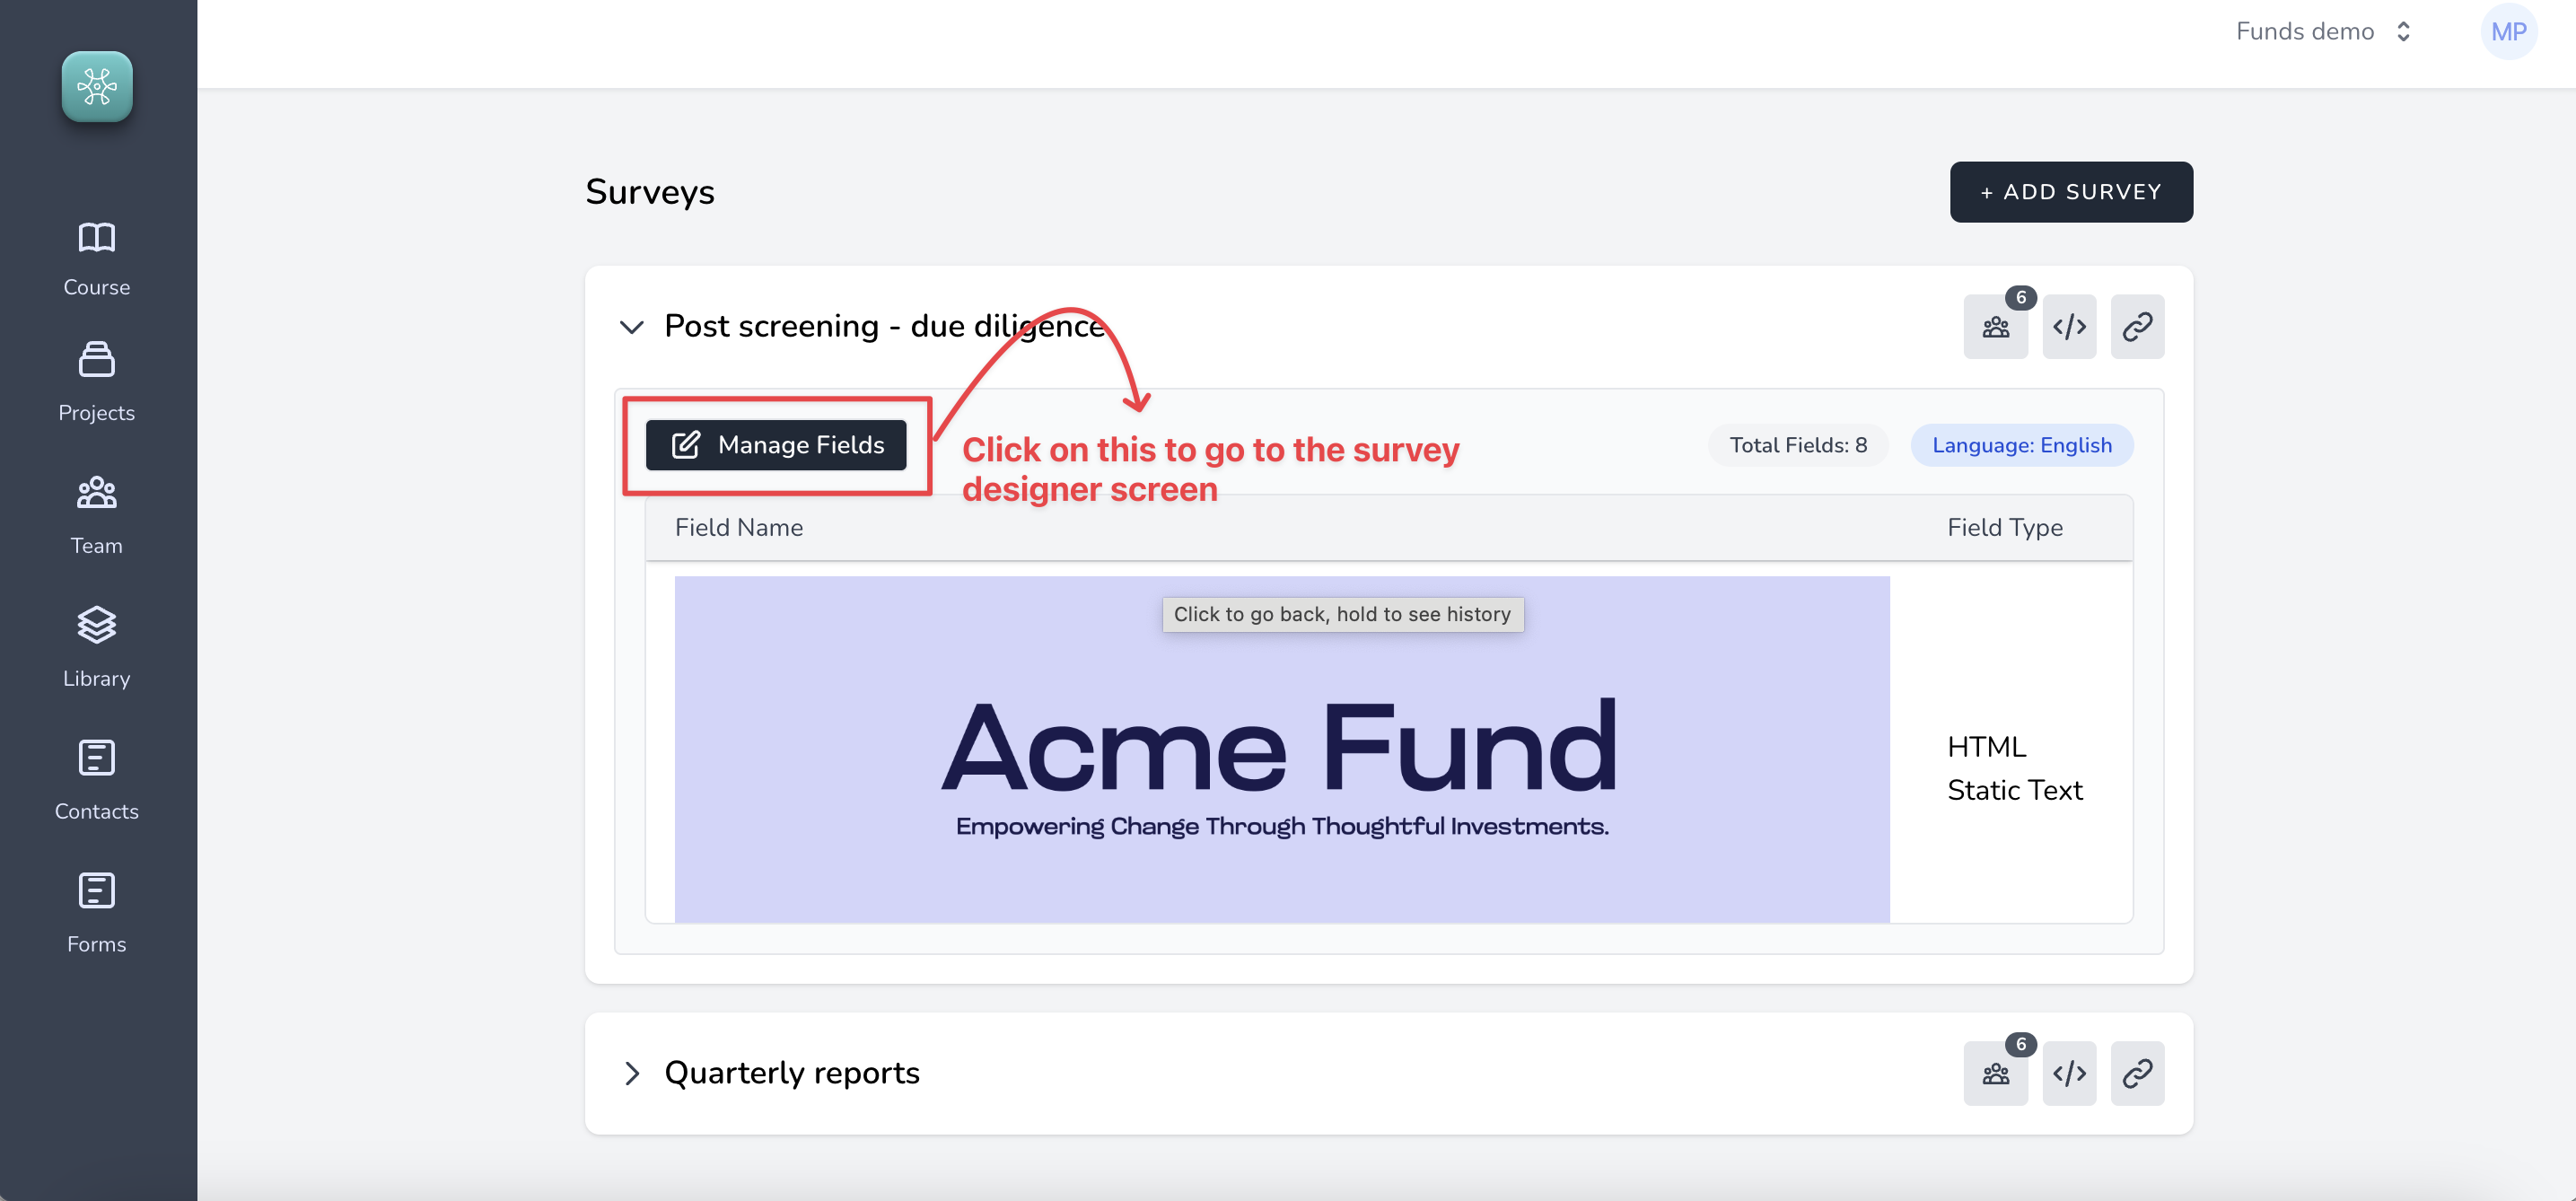
#### 1. Navigate to the designer mode on any survey by clicking on ==Manage Fields== like so
#### 2. Start adding questions with the ==Add Question== button and first selection is the type
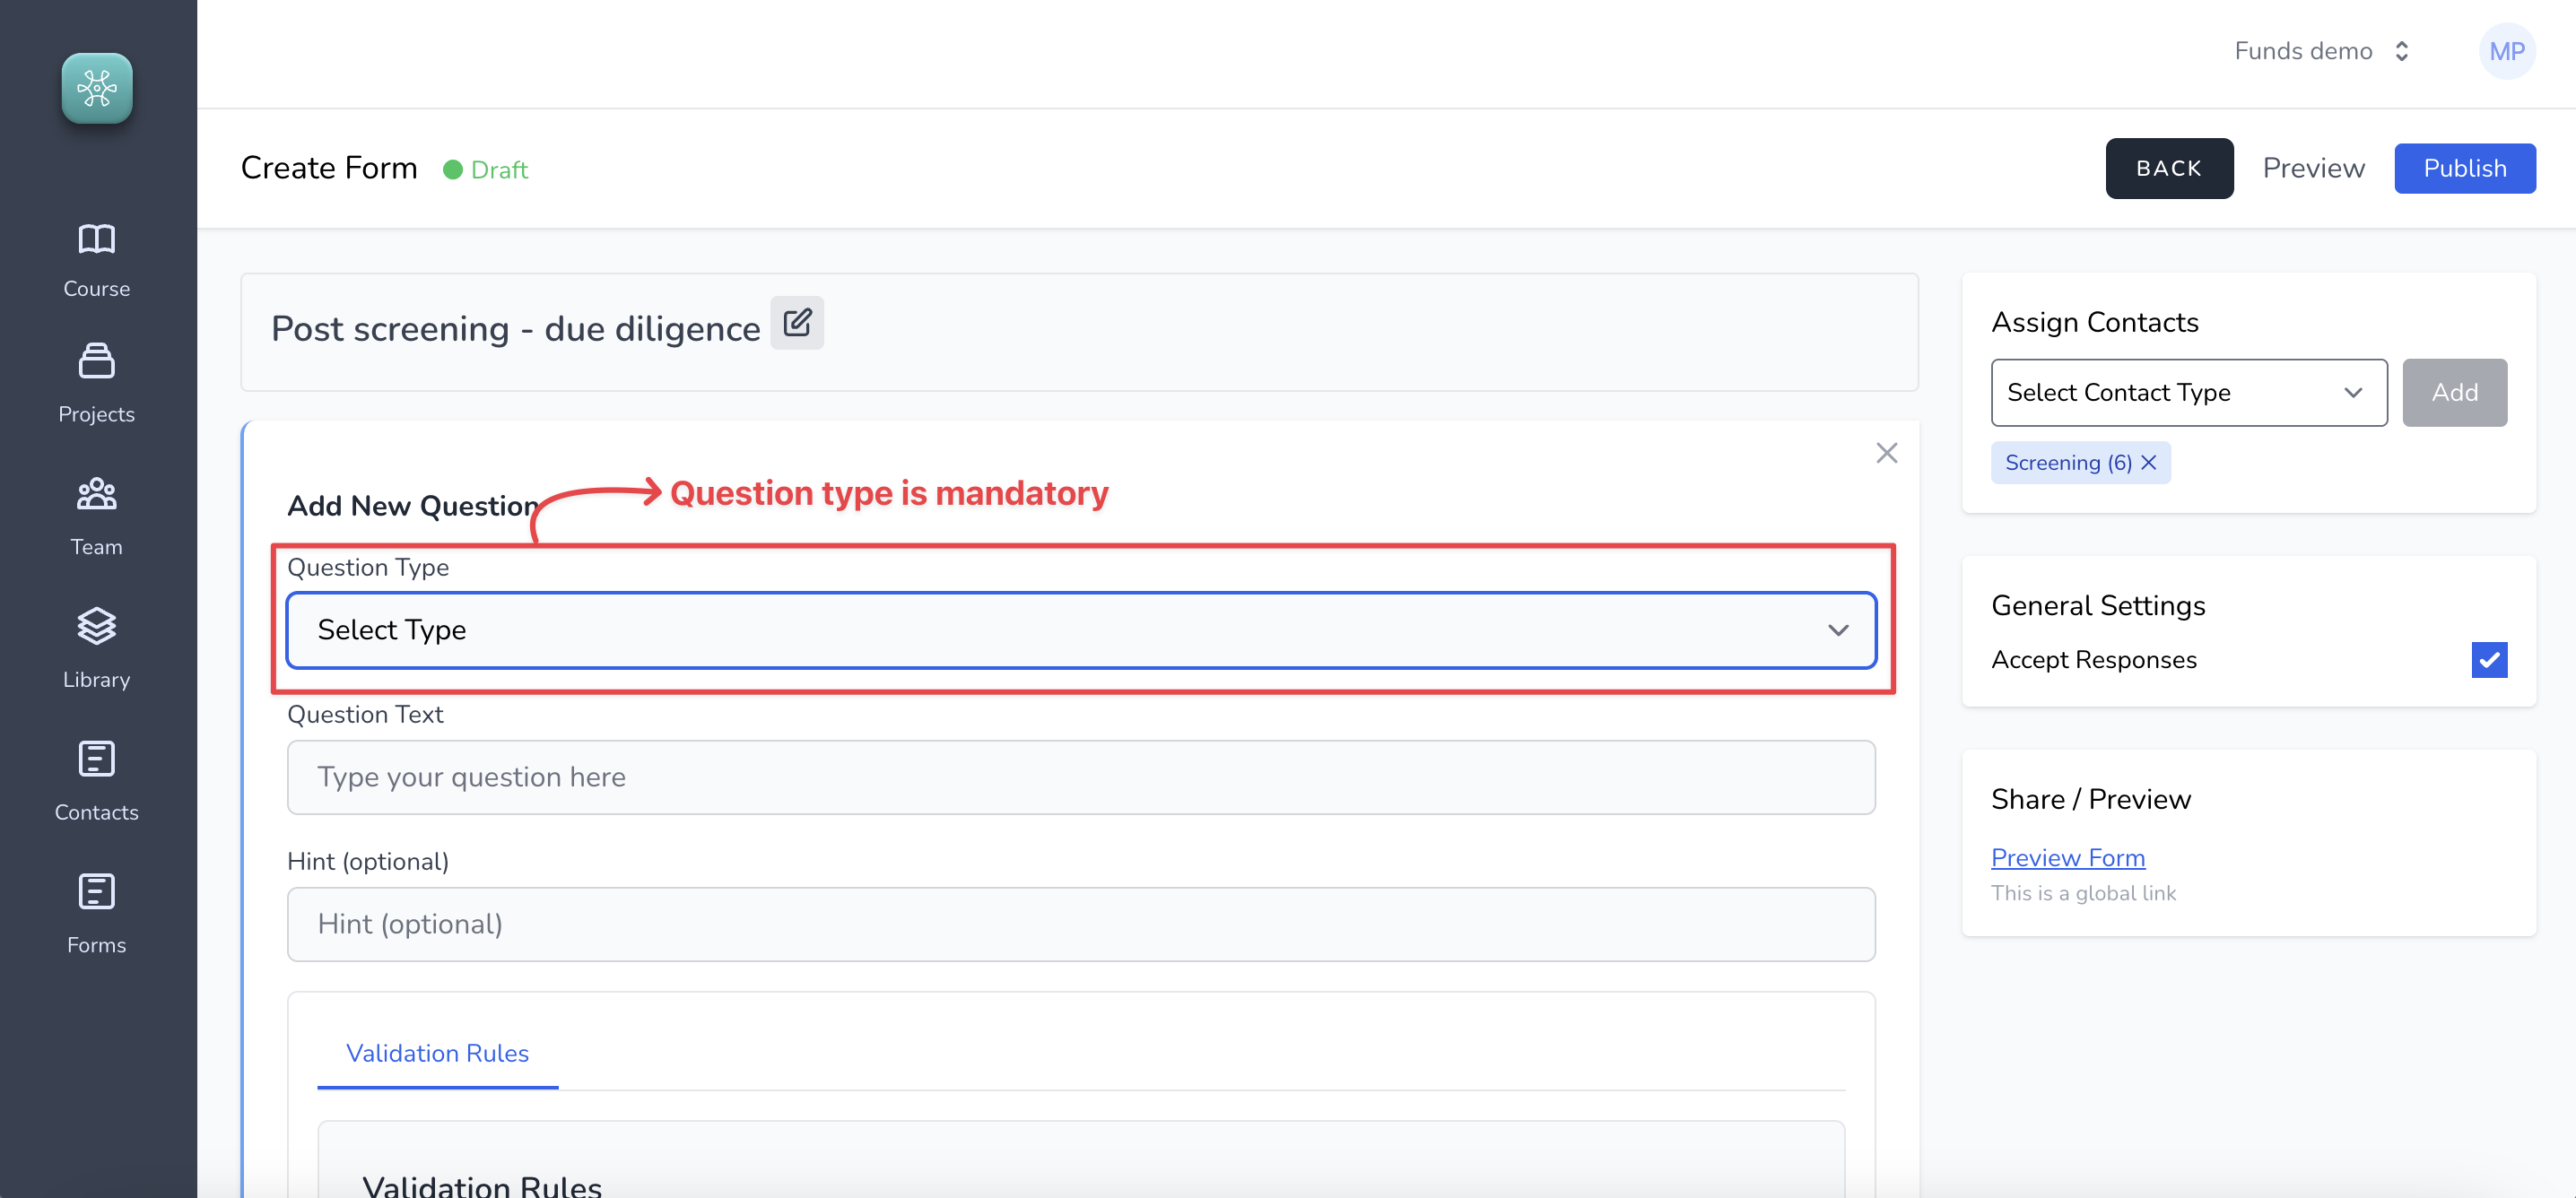
You can choose from 12 available types (as of this writing)
You can click on the preview button to look at how the survey would look on the browser.
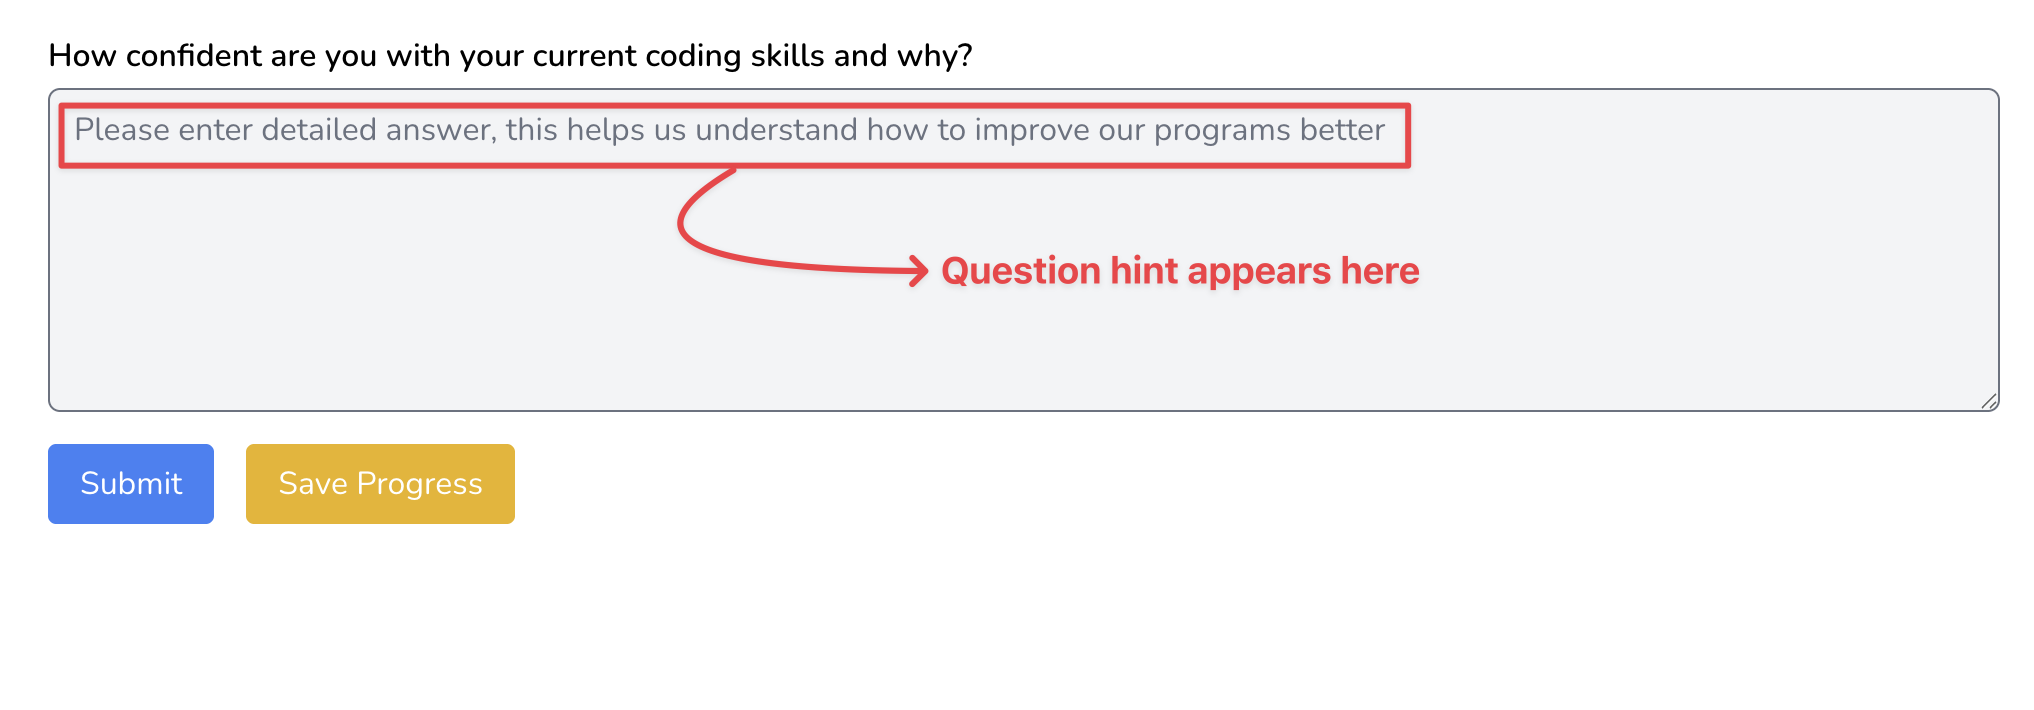
#### 3. Adding question hint
Question hints are additional pieces of information that help the survey taker to understand better how to answer certain questions. For example, on a ==Comment Field== question, adding hint would look like this
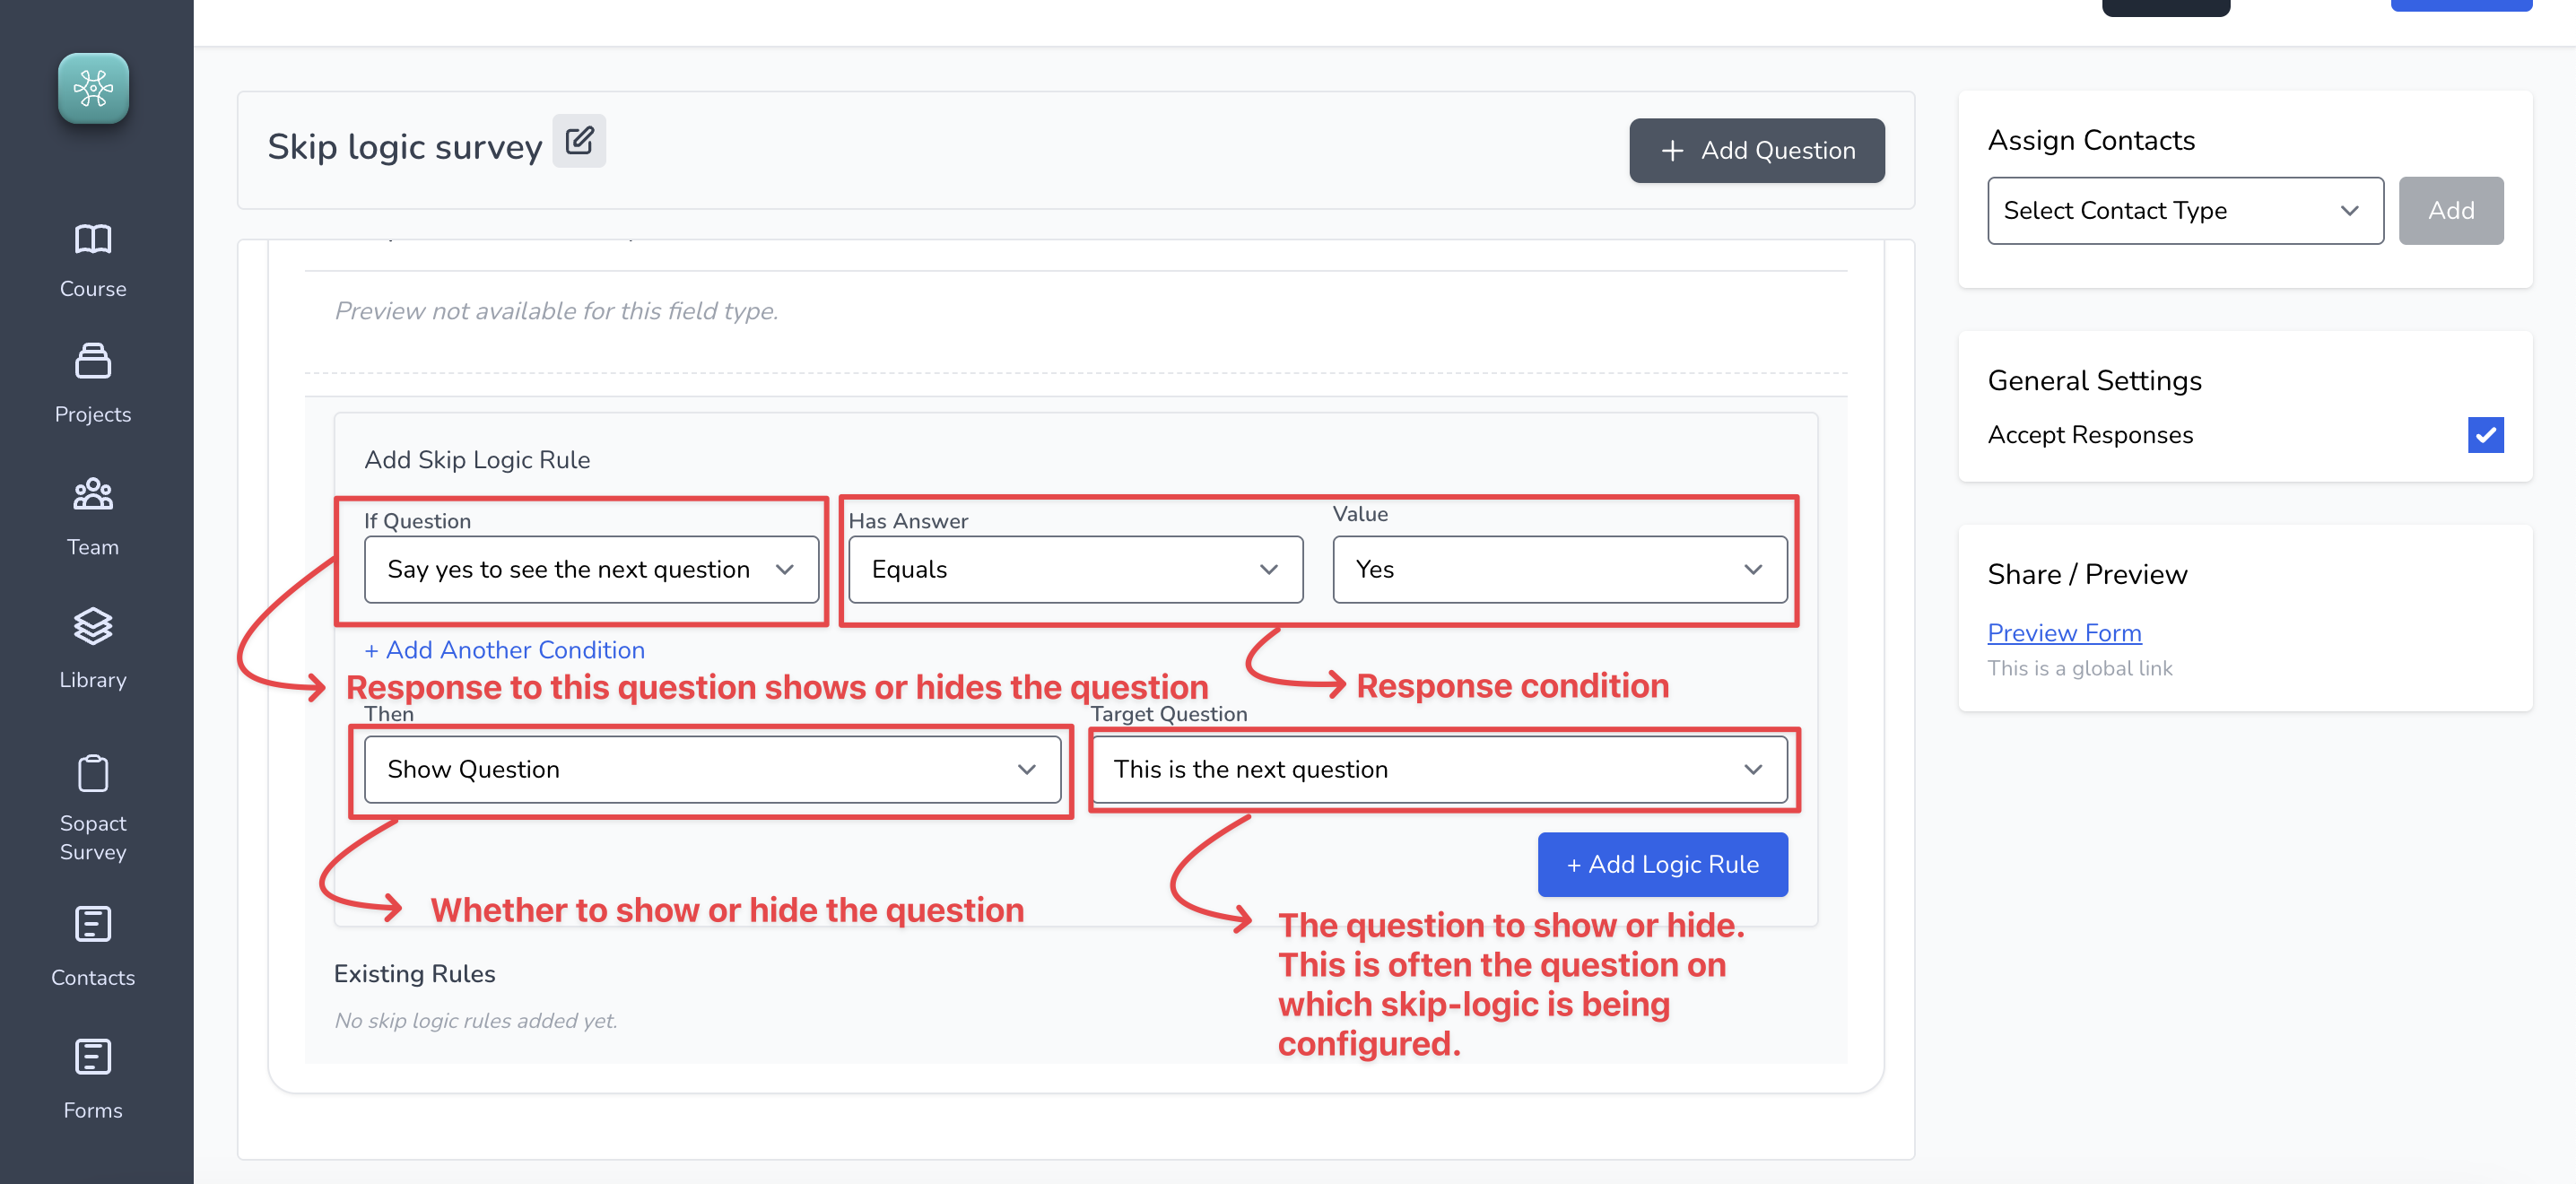
### Skip-logic Configuration
Skip-logic allows you to show or hide questions based on responses to other questions. Let us look at how to configure that for your survey.
> You need to save the question first to get the option to configure skip-logic
#### 1. To configure skip-logic on a question, click on Skip-logic (as shown below)

Then, configure the skip-logic as shown
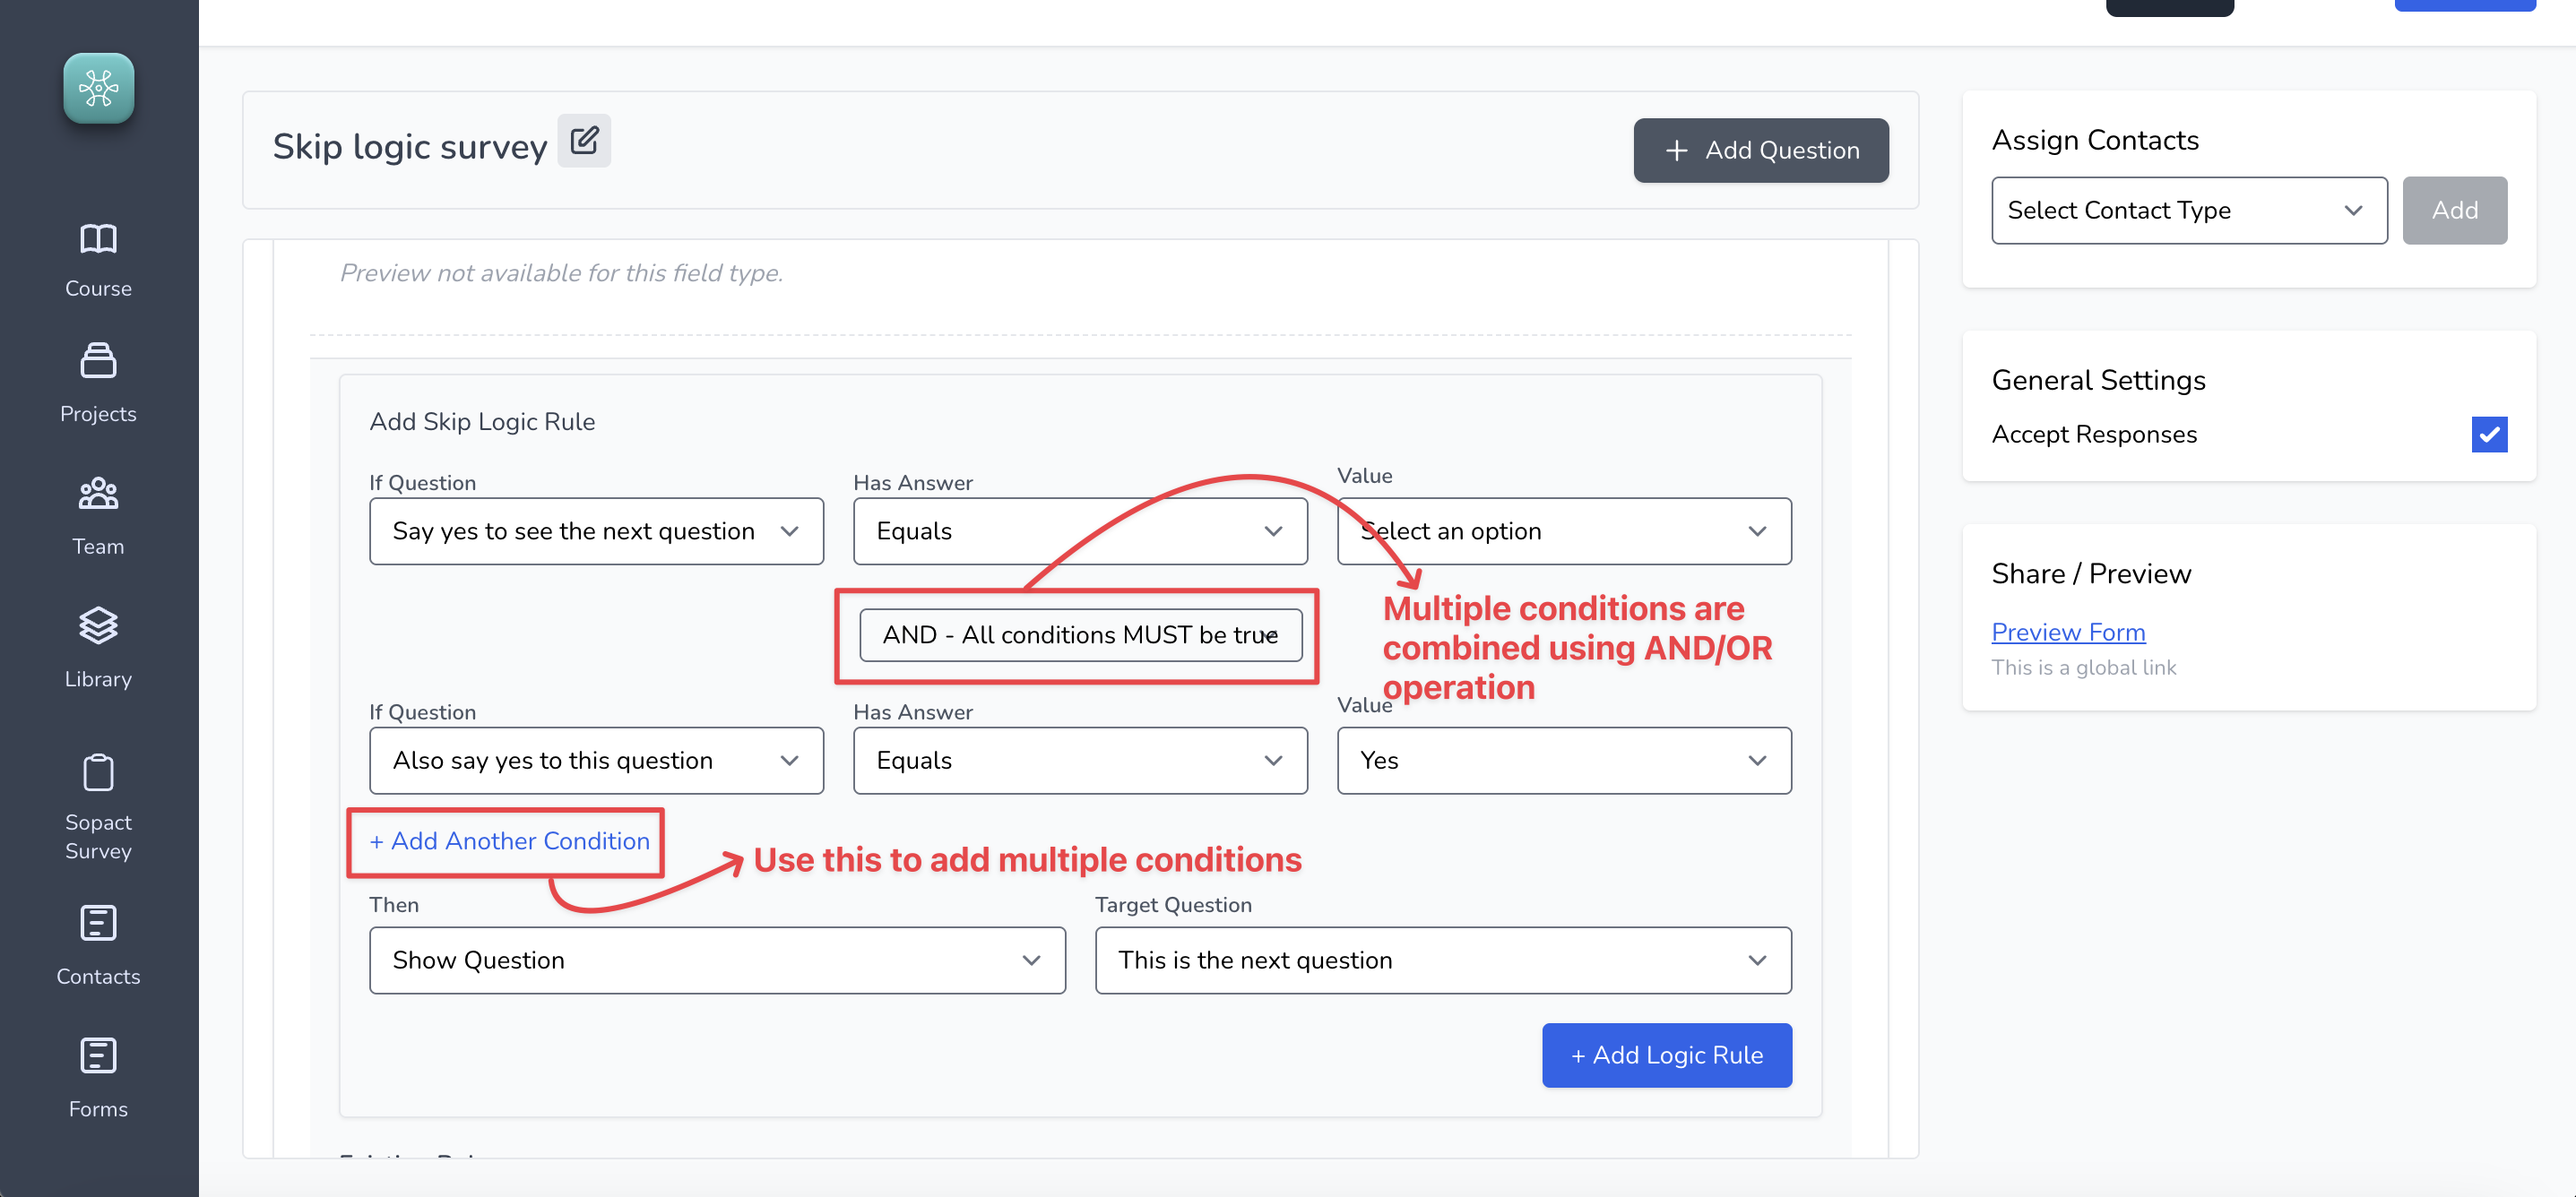
#### 2. Configuring multiple conditions with logical ==AND/OR== operators
You may use the logical AND or OR operation to combine multiple conditions together.
The image below shows the configuration.
This GIF below shows the outcome of configuring multiple skip logic with logical AND operator:
### Data validation
Data validation is a fundamental functionality that ensure clean and quality data collection. One of the big differentiators in Sopact Sense is the ability to configure advanced validation rules so you can collect the data exactly the way you want.
Let us look at how,
#### 1. Configuring basic validations
Configuring basic validations is super simple and is done at the time of the question creation. Based on the type of question different options show up.
For example:
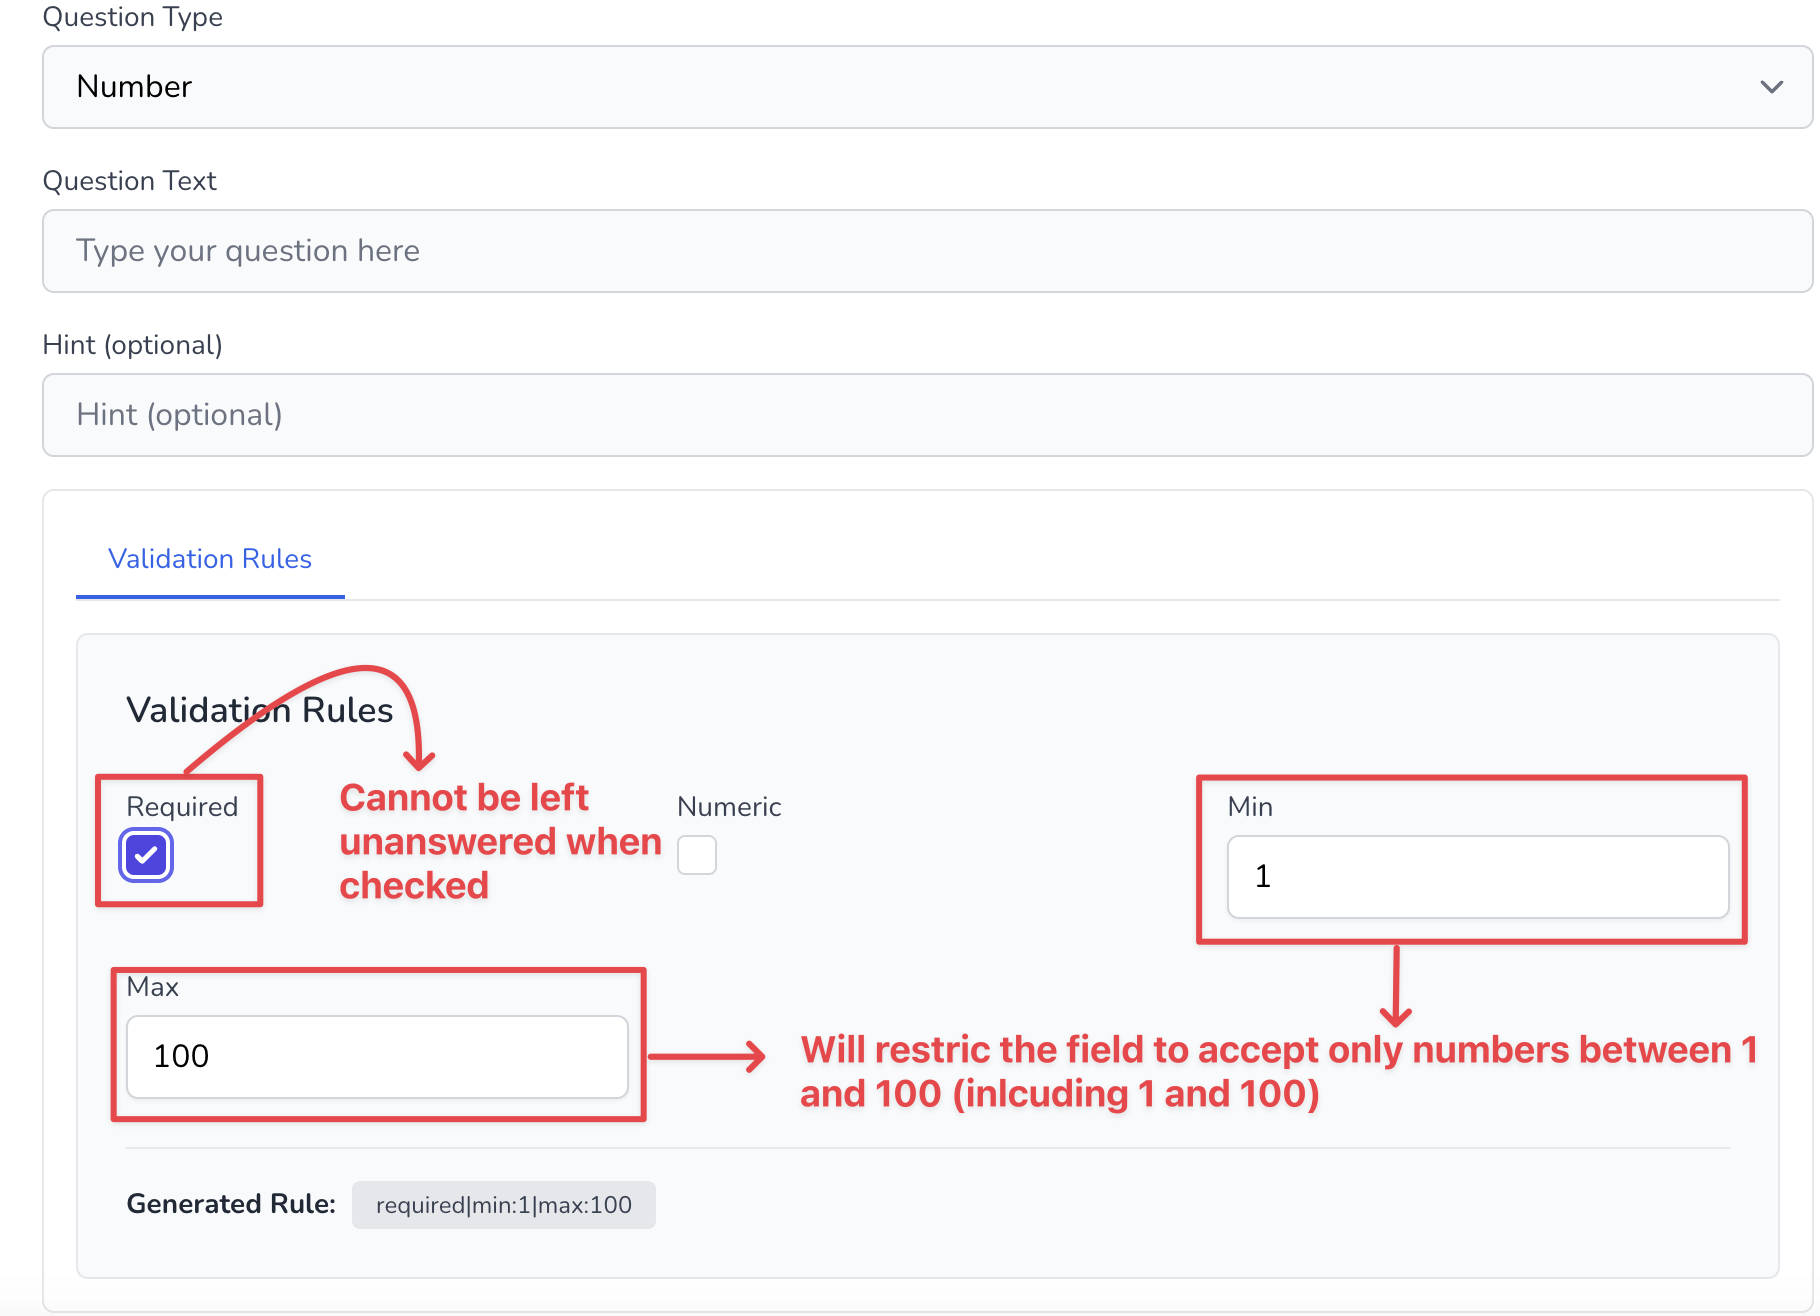
==Number field== type can have min and max values and the field itself is restricted to accept only numeric information, like so
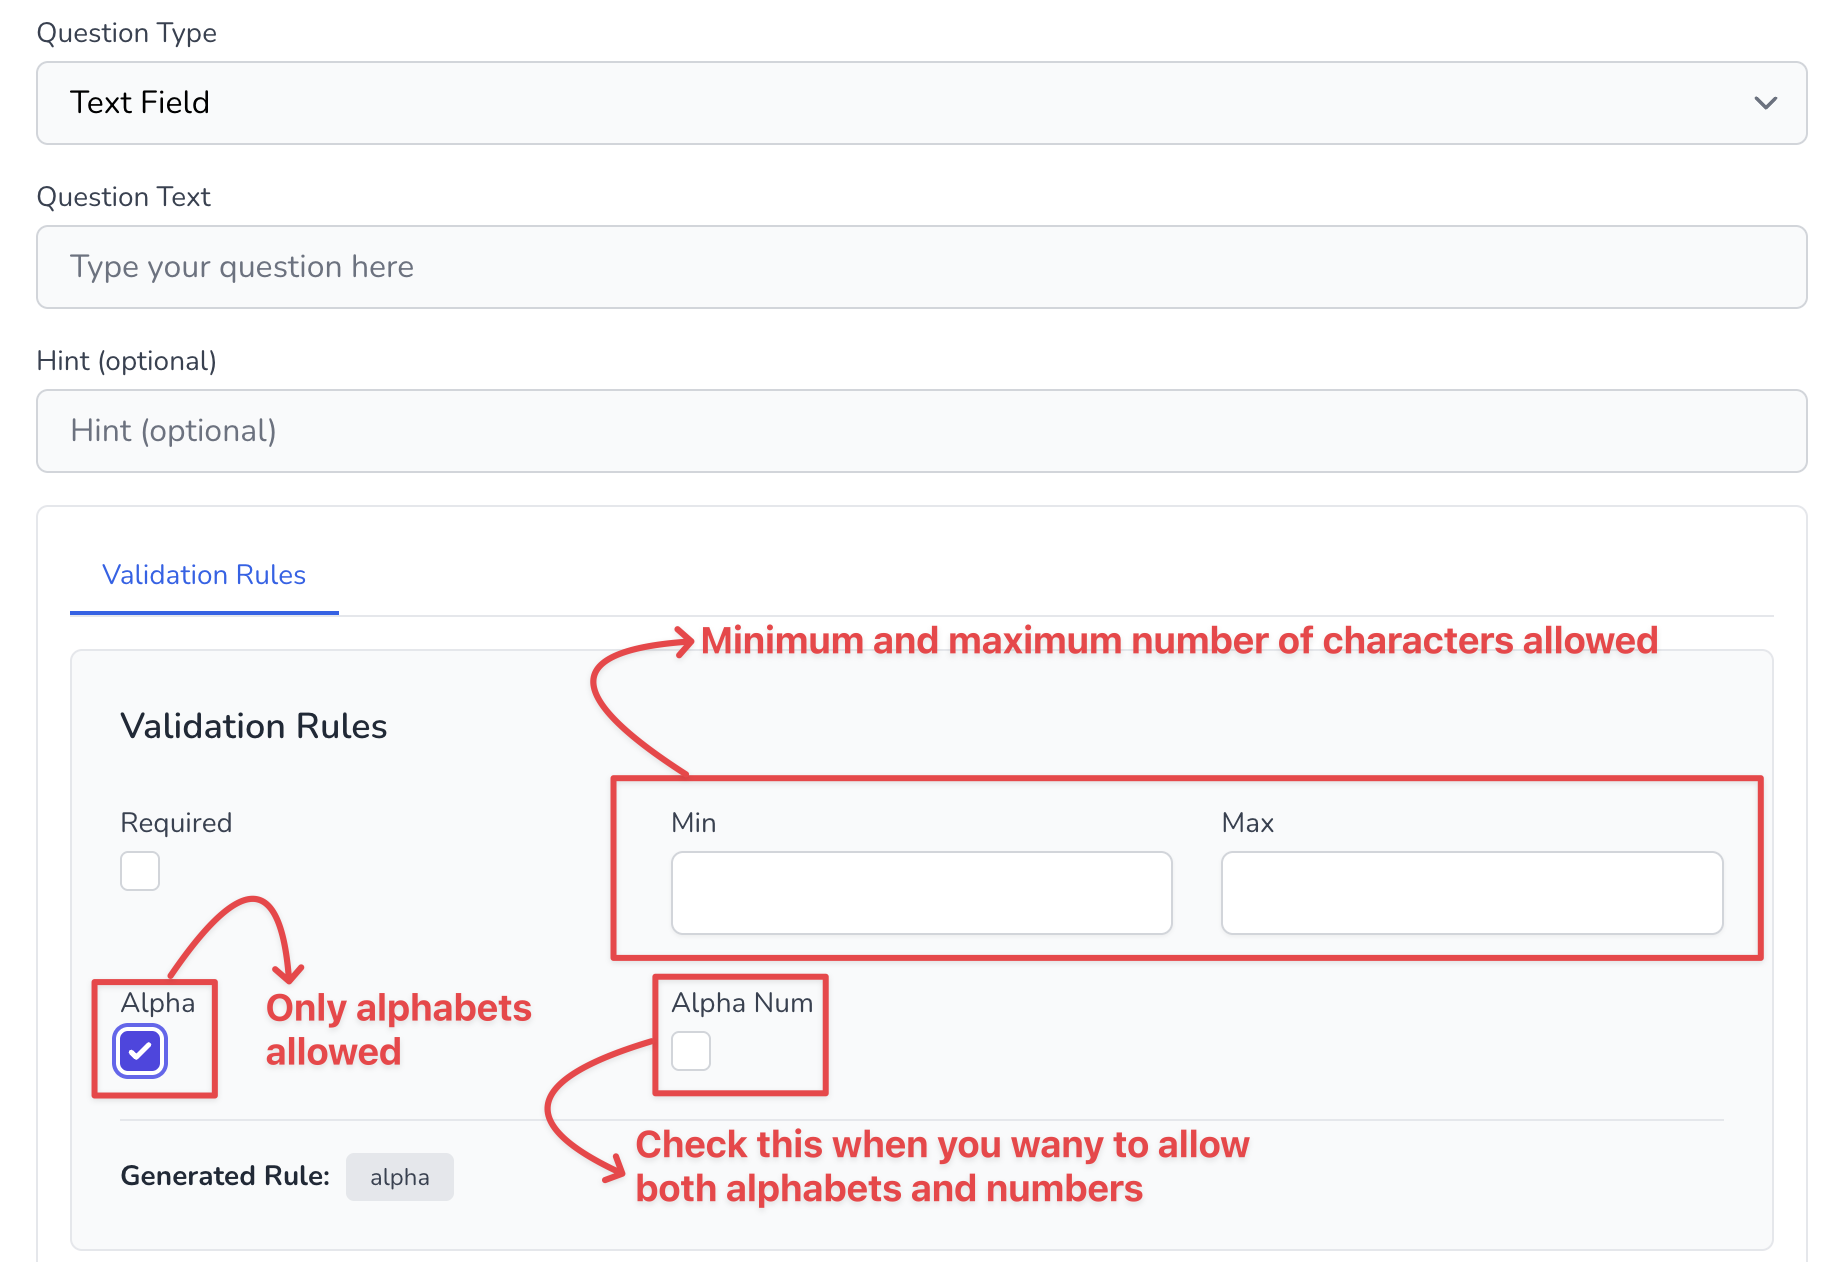
For ==TextField==, we can restrict it to accept only alphabets (for example, when asking for a person's name) or it could be alphabets and number combination. We may also restrict the number of characters allowed, like so
#### 2. Advanced validations
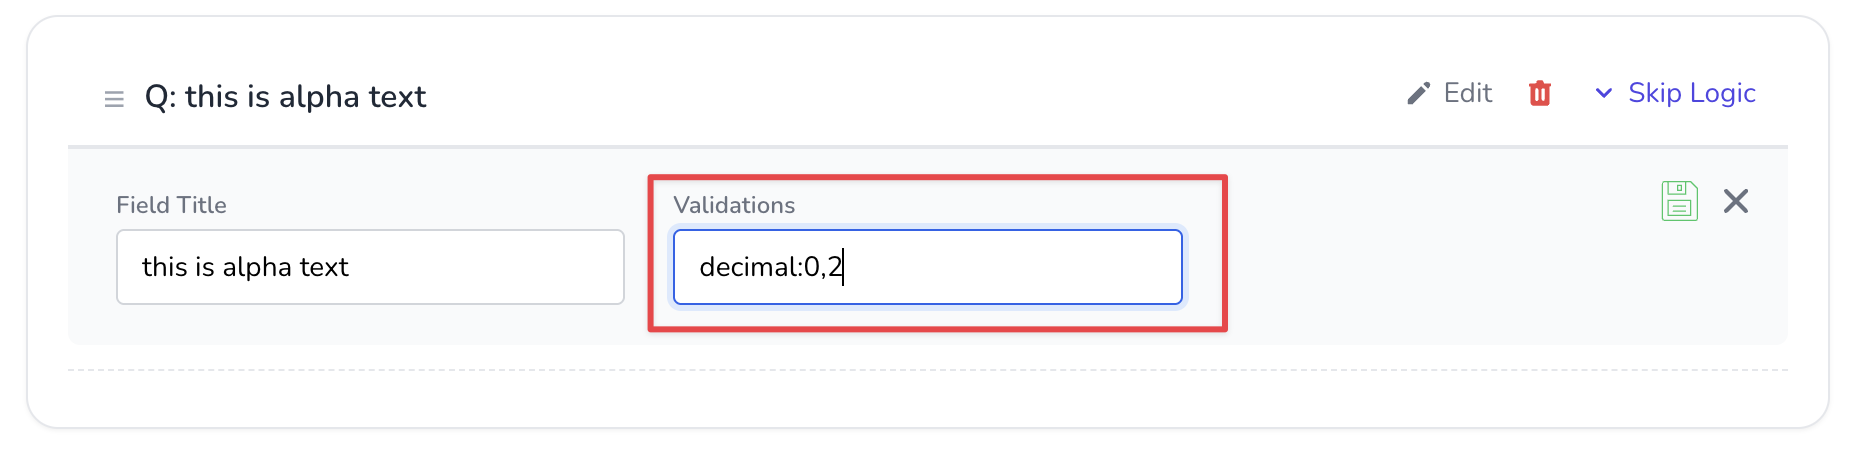
Advanced validations let us do a lot more. For example, if we want to restrict a field to be a number and accept only certain dedimal places. We can do so by using this rule
```
decimal:0,2
```
This will accept response such as
1.24
100.0
200
but not 1.37683 (==contains more than 2 decimal places==)
To use this rule, just paste it in the validation text box, like so
### Collecting data
Collecting data is super simple and fundamentally different in Sopact Sense. Typically when we run a survey for data collection, the same link gets used that is used by the survey taker to provide data. In Sopact Sense, this is different. Every survey taker gets a unique link to provide data and this is the core ability that helps organizations collect clean data that can be corrected at any point, thanks to the unique link per record.
#### 1. Collecting and correcting data on Contacts
If you followed the [quick implementation guide](https://docs.sopact.com/2/sopact-sense/21/4-steps-quick-implementation), then you already know how each submission on the Contact form has a unique id generated and gets a unique link. This is the very link that can be used to correct data in the future.
For example,
This link can be used to correct and update the information shown above. This link is unique per record.
#### 2. Collecting and correcting data on Surveys
There are two ways to collect data on a survey.
==Using the global link==
This link is like a typical form or a survey. Anyone with the link and enter their response on the questions. Obviously, this limits our capability to ensure clean quality data since avoid duplicates cannot be ensured and data correction also becomes a challenge since the data points cannot be uniquely tied to the people who responded to the survey.
To use the global link, just copy the survey preview link and starte collecting data, like so

==Using unique links through **Relationship**==
Go through Step 3 of 4 step quick implementation to understand the concept of relationship.
Once you have relationship established between Contacts and Survey you can then open the Survey data grid and copy the unique links to start collecting data. Every contact gets a unique link on the related surveys so collecting and correcting data becomes a really easy process.
For example,
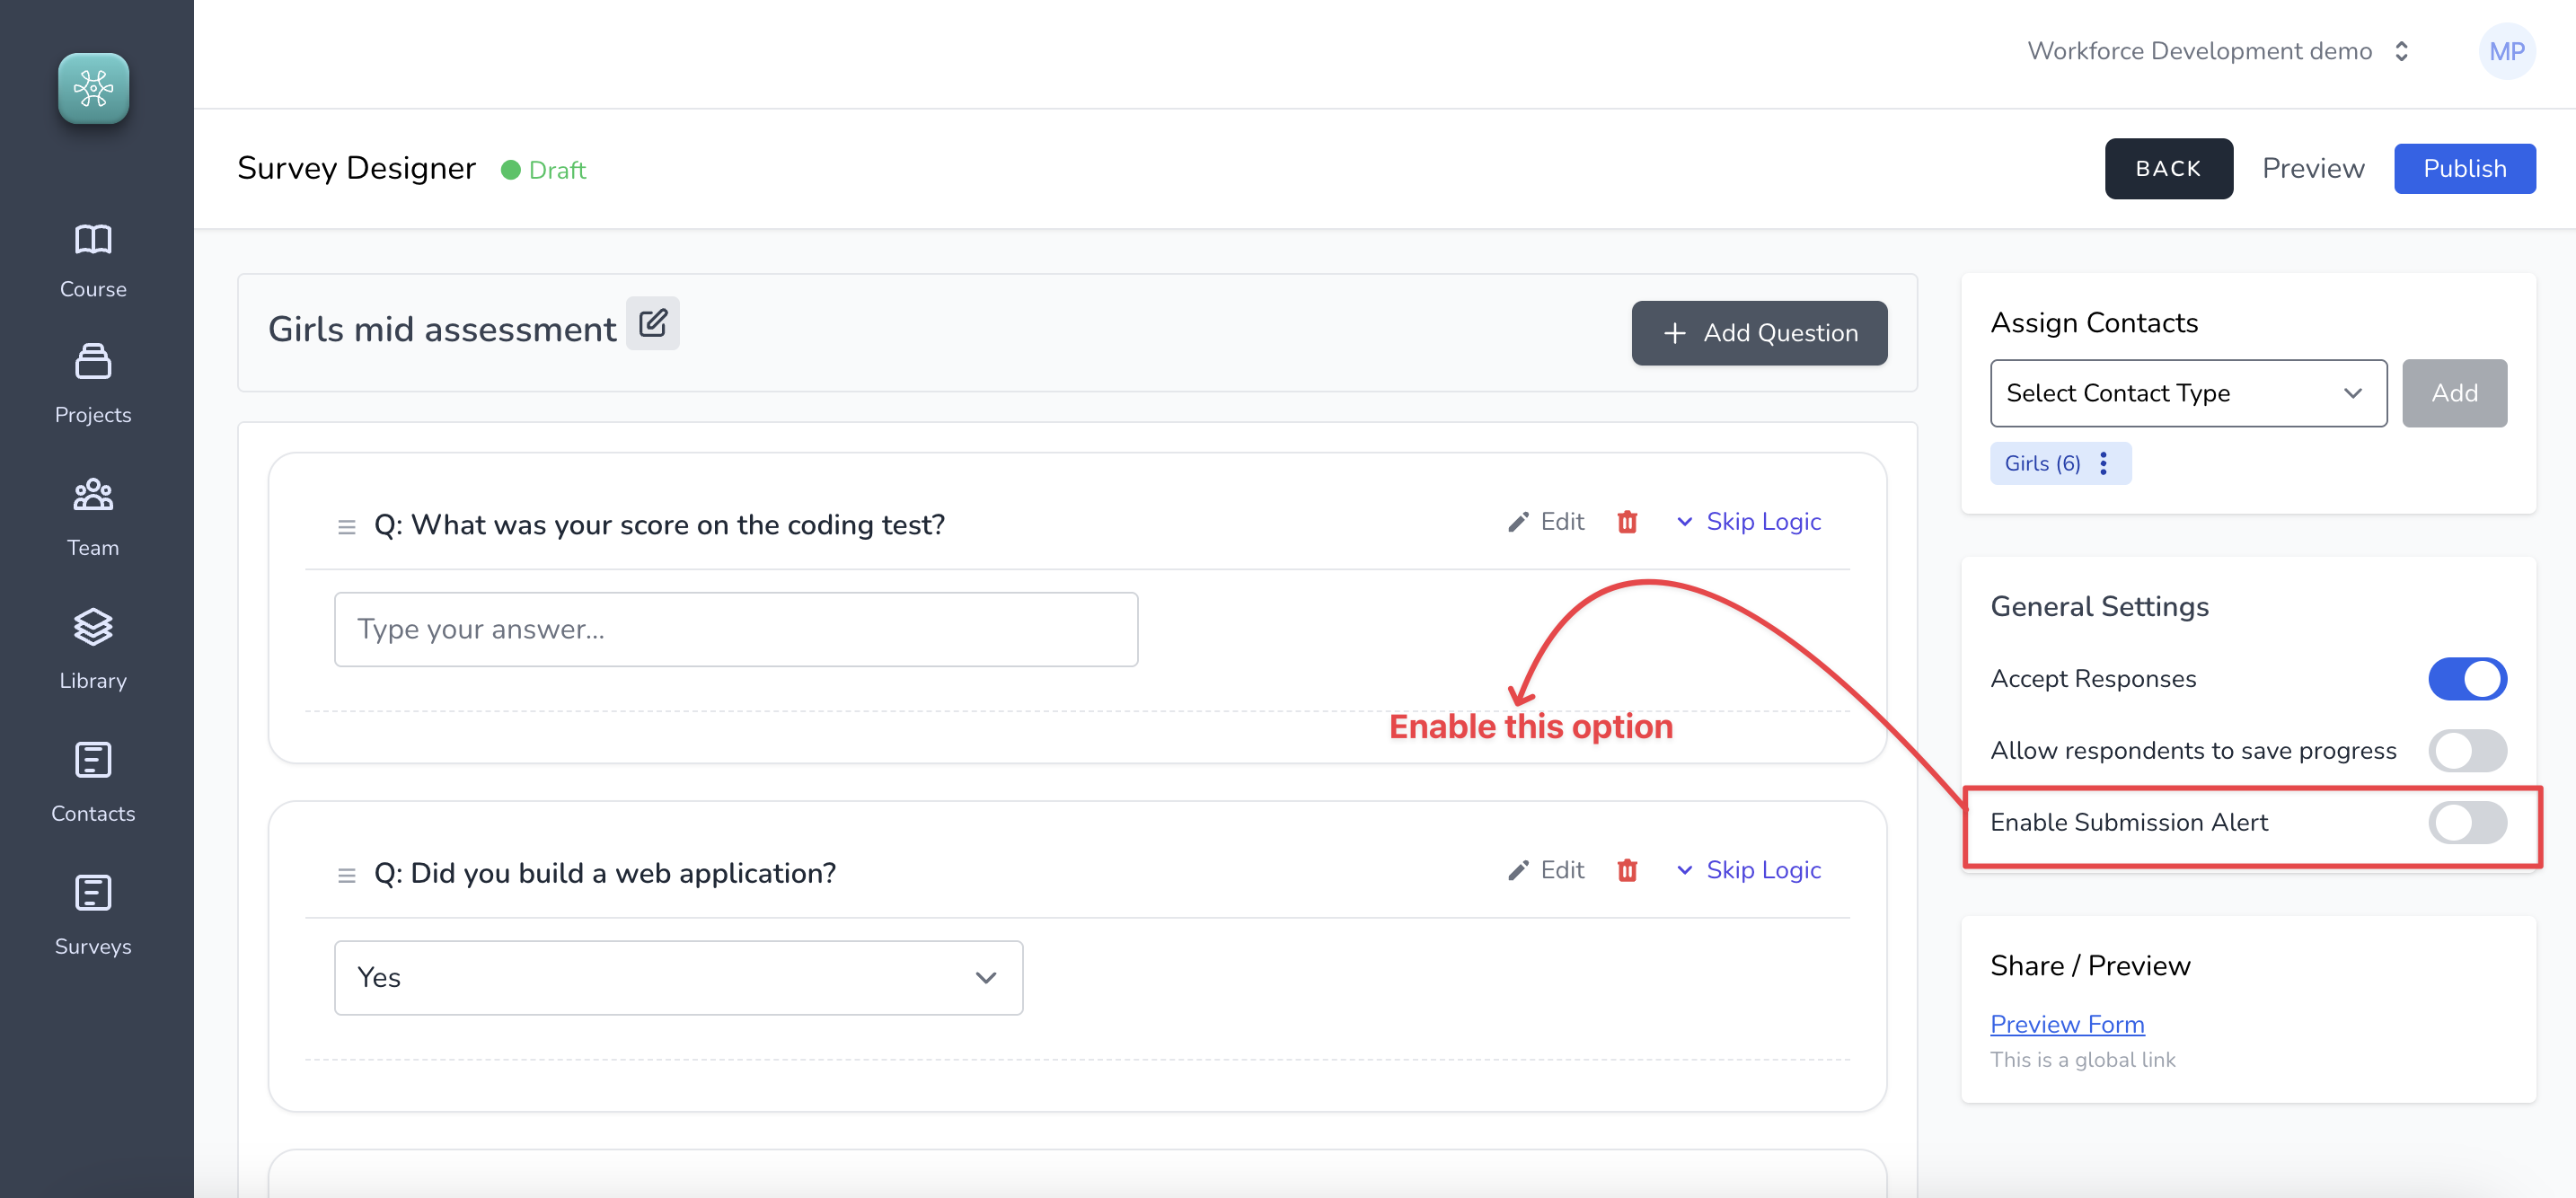
### Submission alerts
You can setup surveys to get alerts directly in your email inbox when someone submits information. Not only will you get an email notification of submission, you will also receive all the responses added by the survey taker.
#### 1. Got to the survey designer and enable "Submission alert"
#### 2. Add email addresses and Save
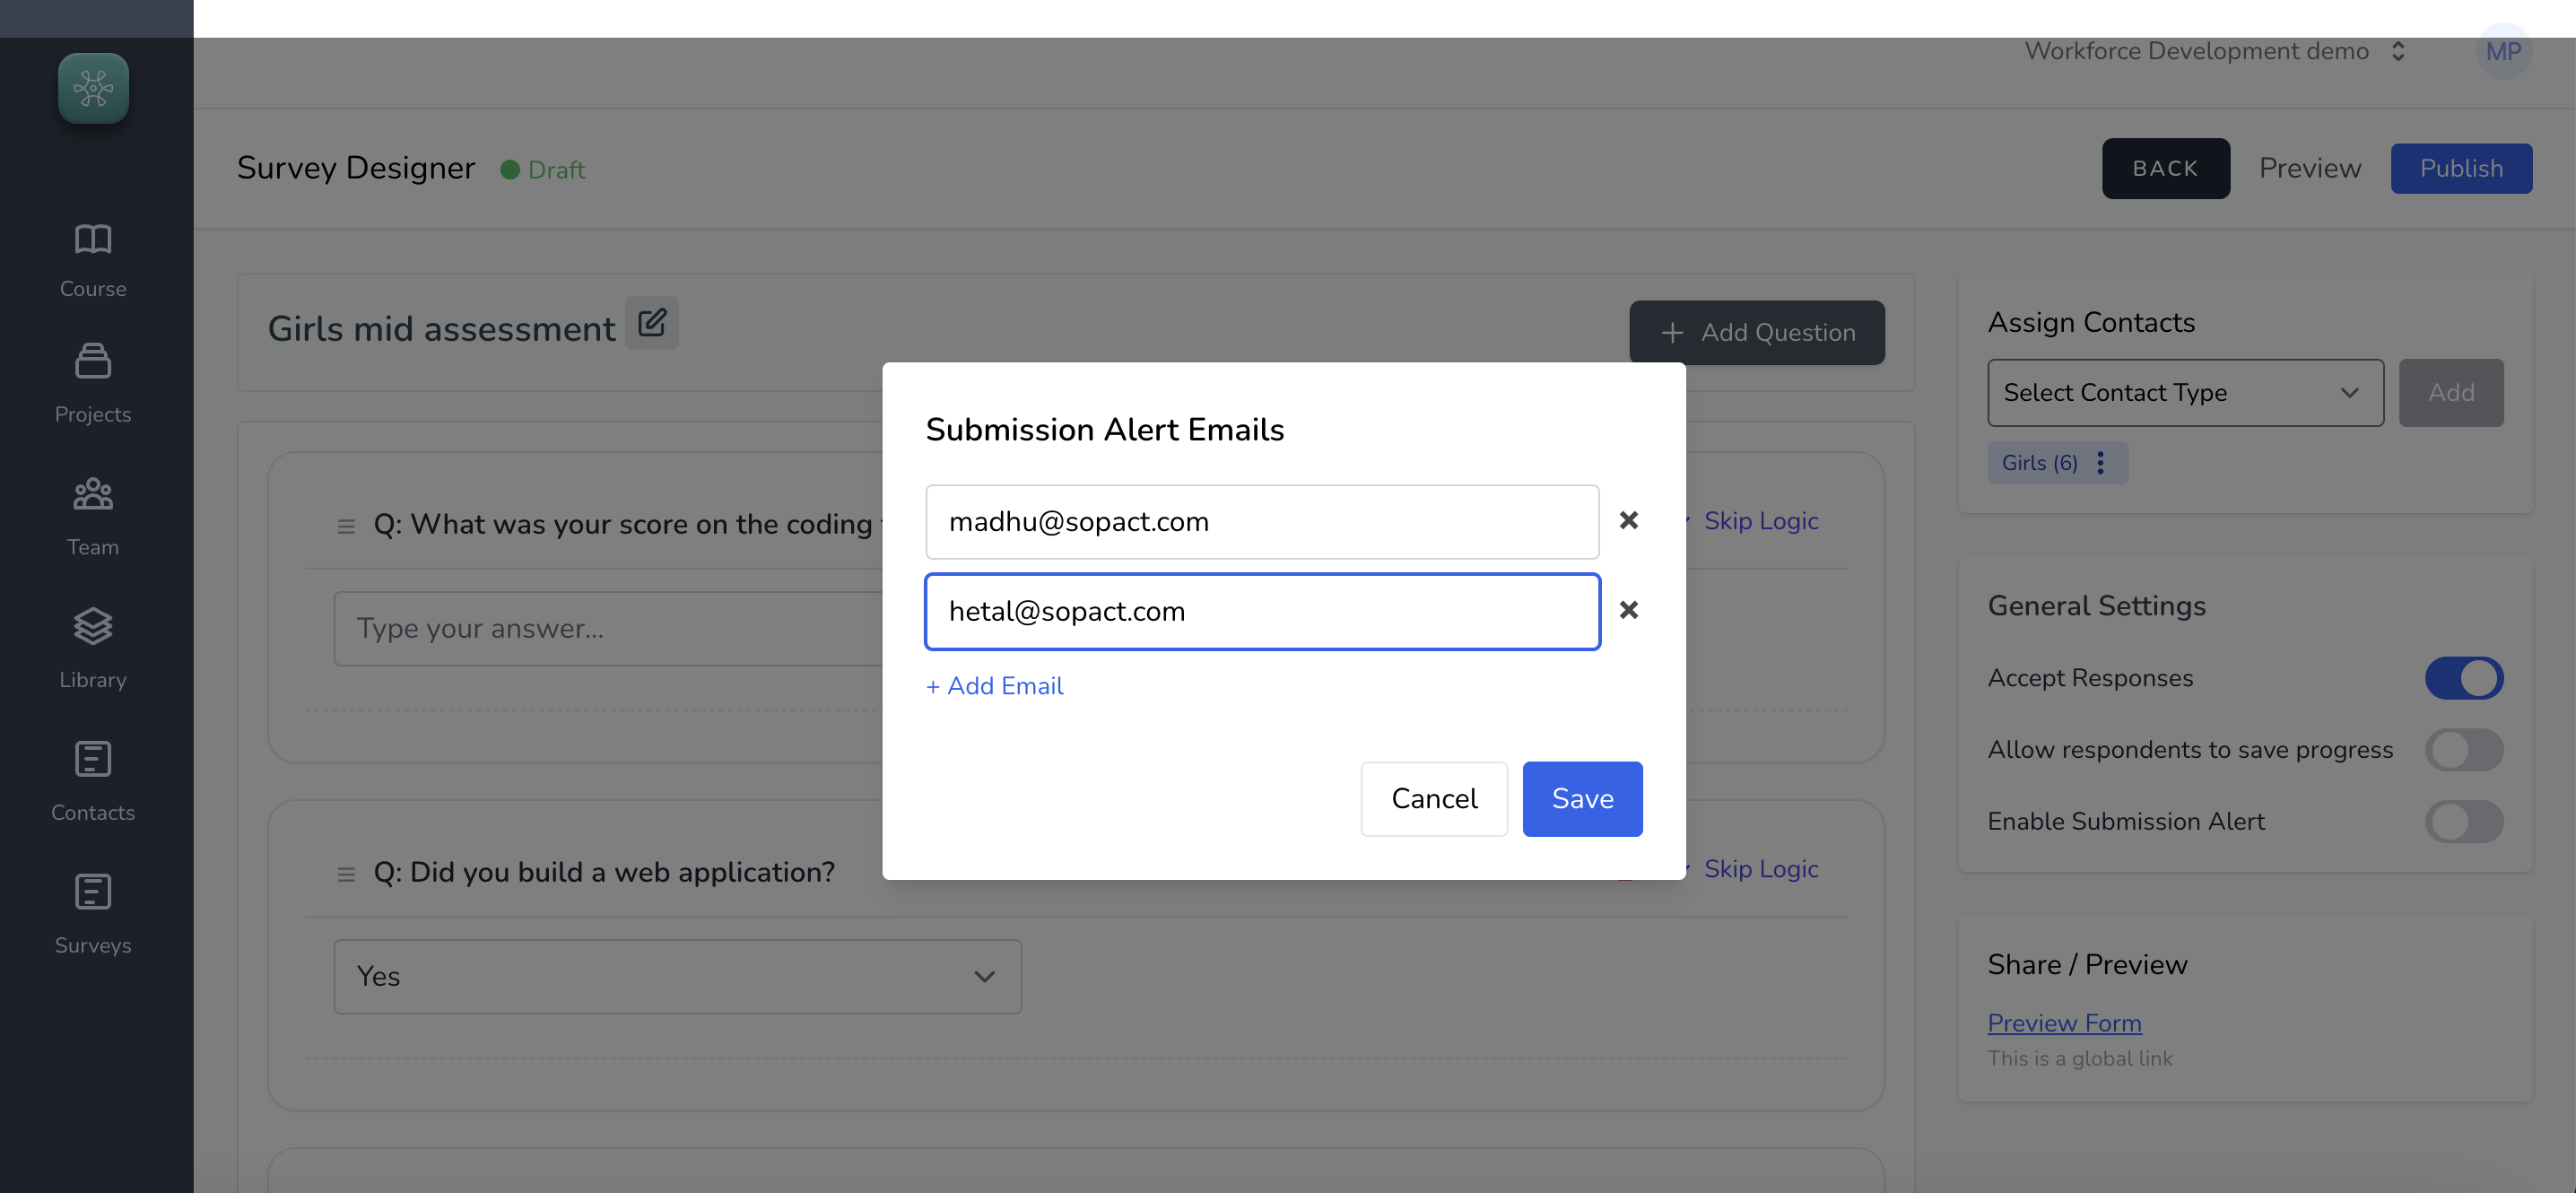
Multiple email addresses can be added as shown in the image.
### Embedding Contacts form and Surveys
If you manage your own website, embedding forms is super easy. However, if you don't manage your website directly, you might need some help getting the embedded forms to work.
#### 1. Embedding Contacts form
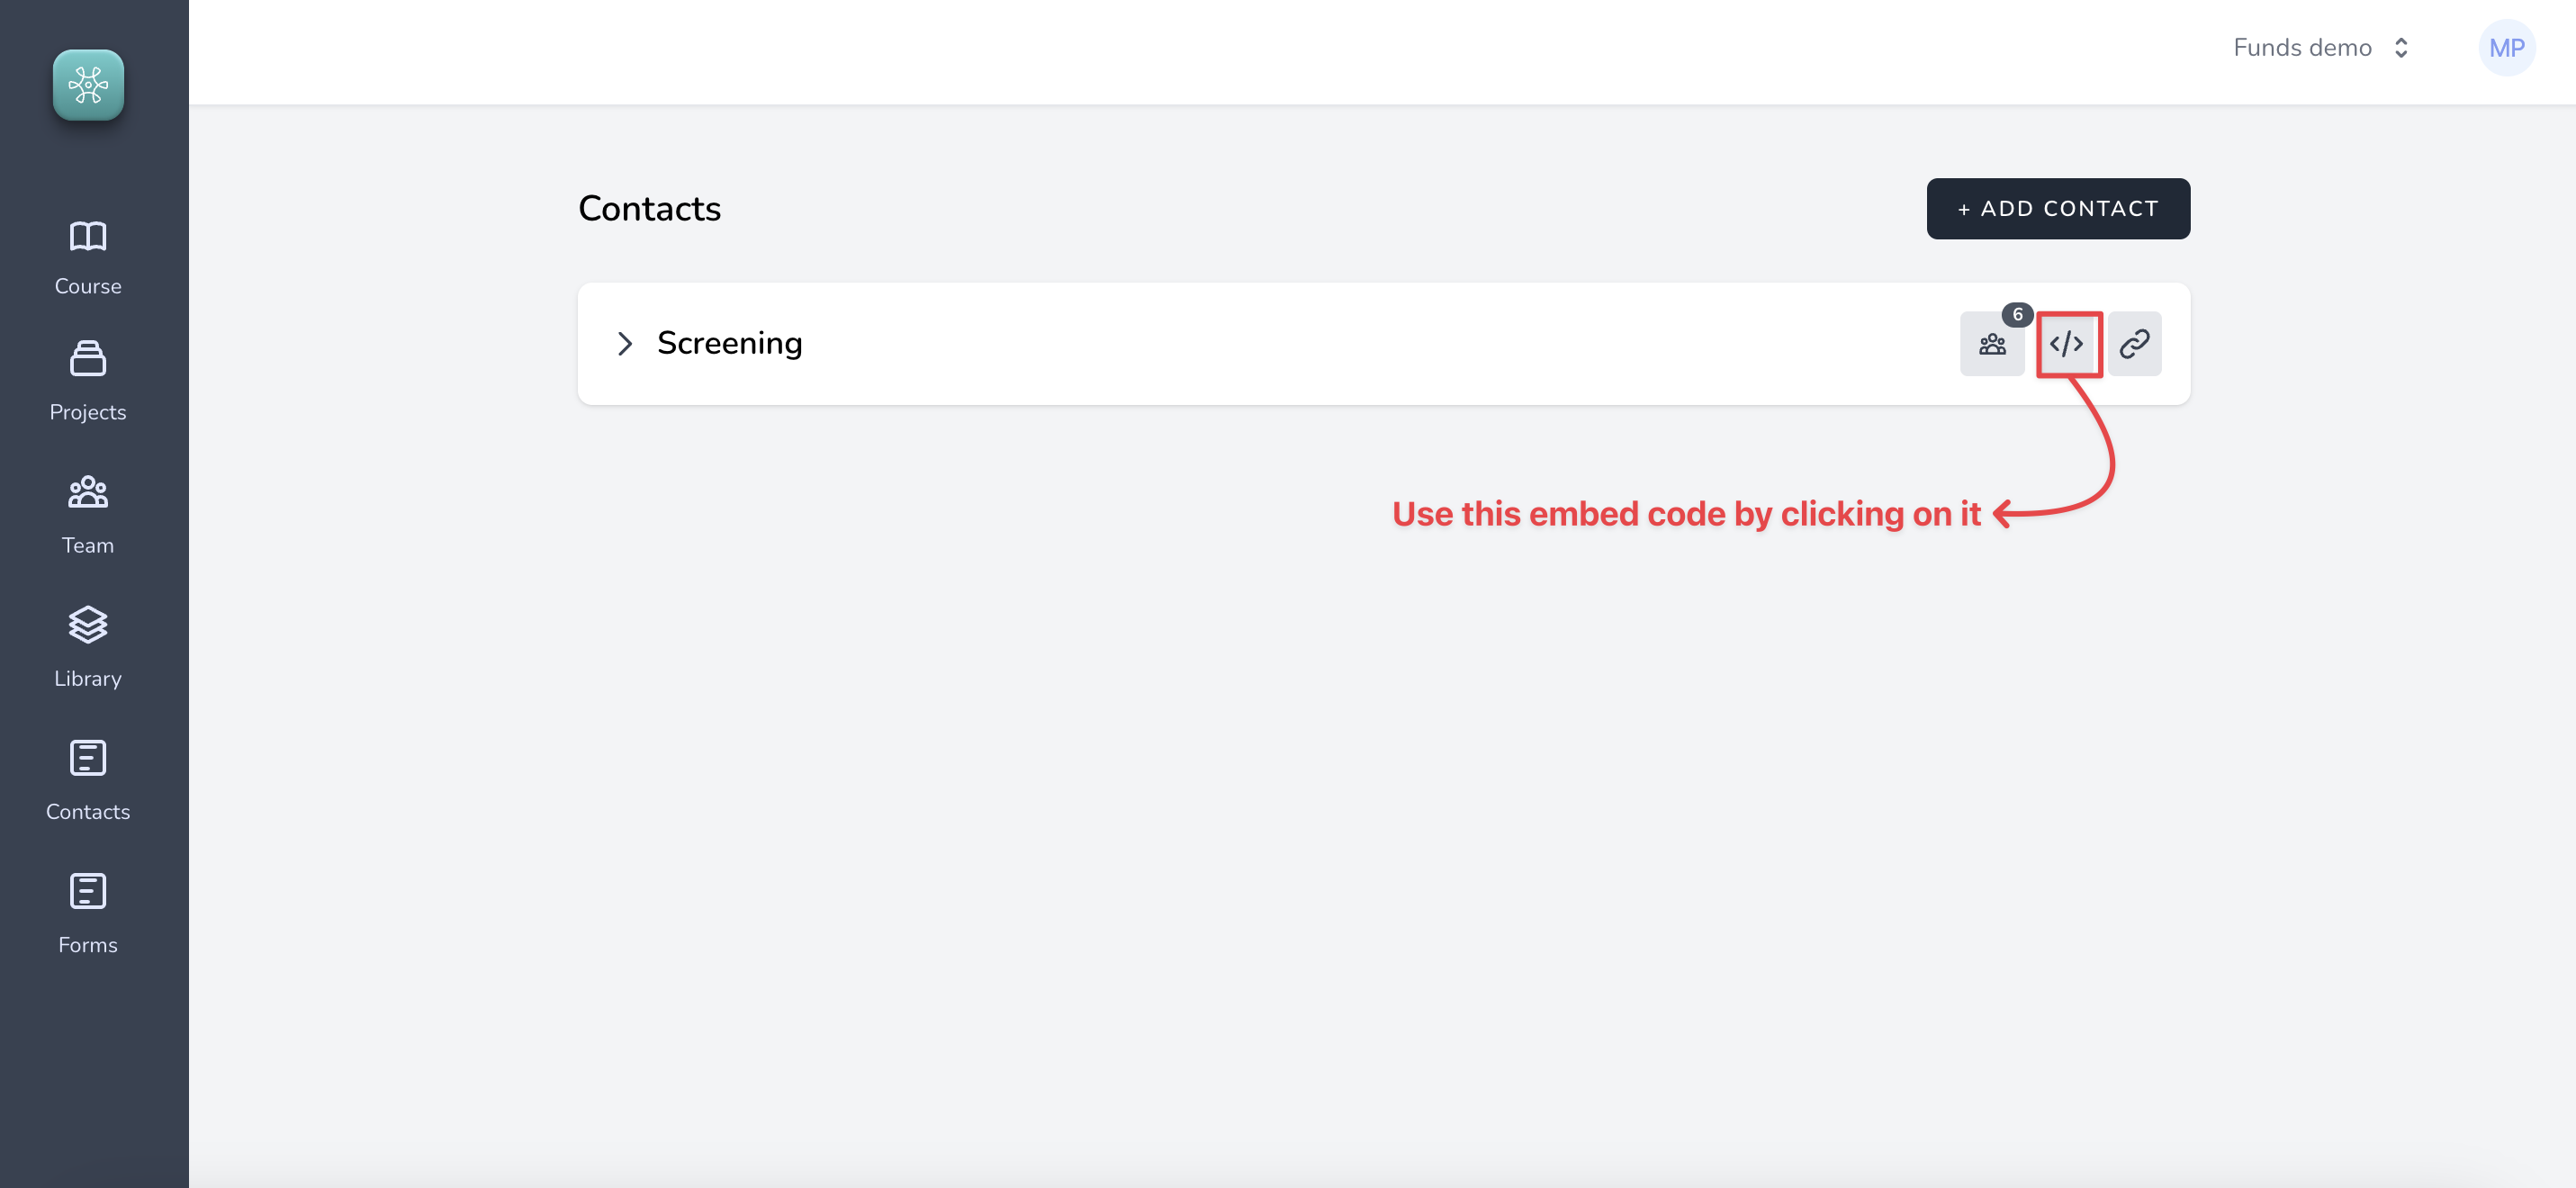
The code might look something like this
```
```
#### 2. Embedding Surveys
Navigate to the list of surveys and click on corresponding embed code icon.
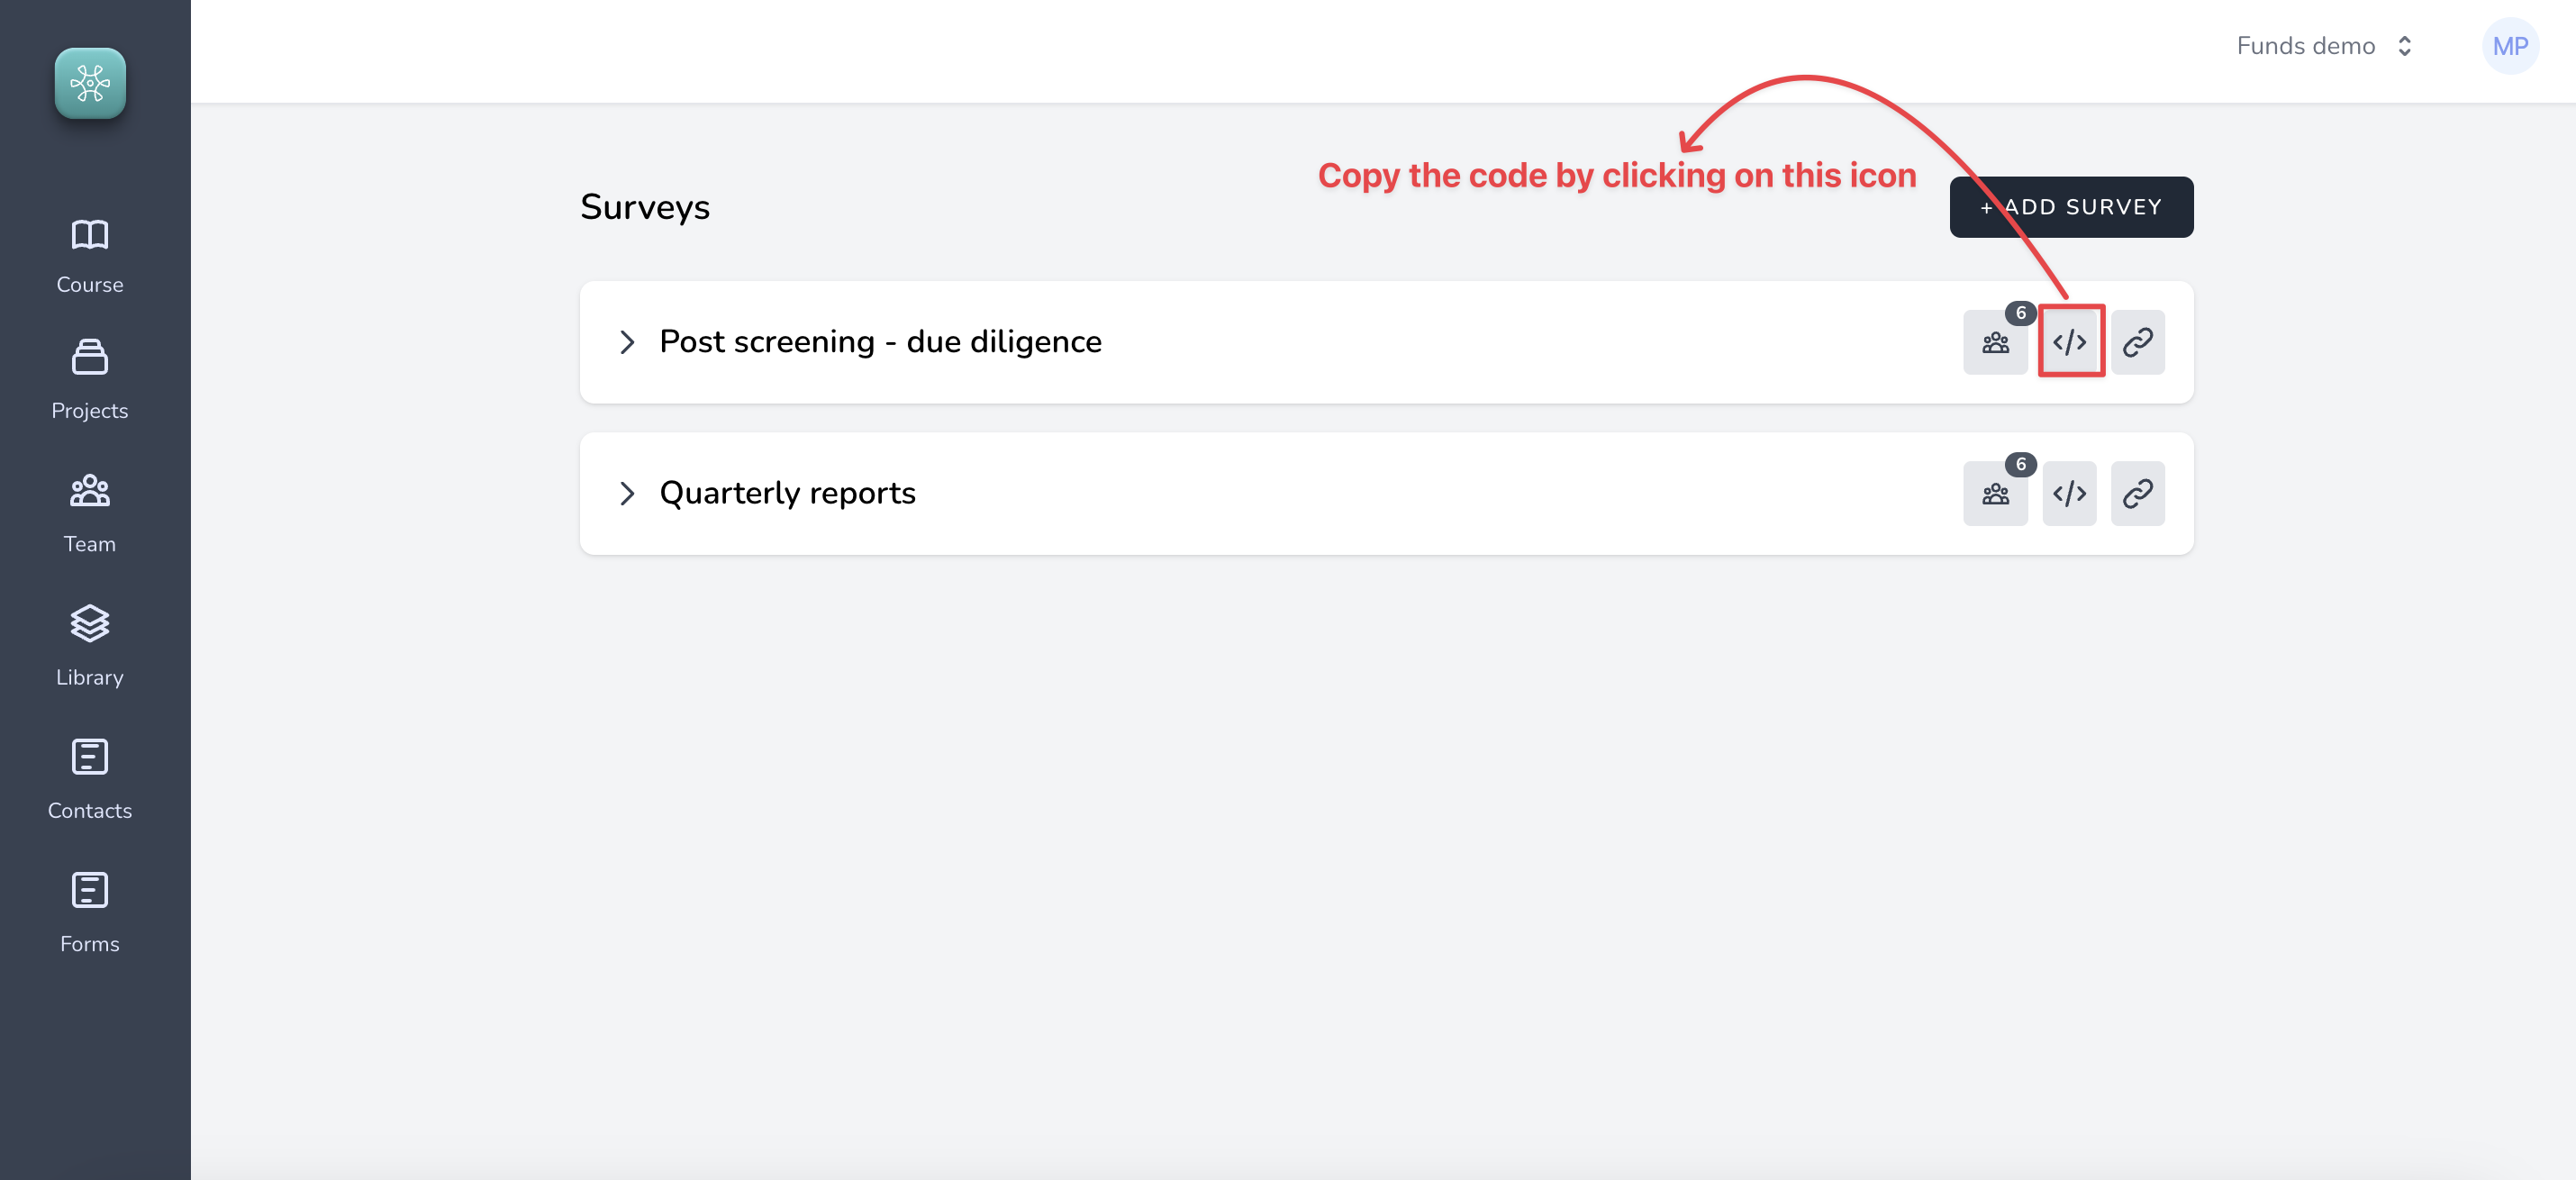
The code will look something like this which can then be pasted into your website.
```
```
### Allowing survey takers to save progress
Surveys can be configured to allow survey takers to save the progress of their data entry so they can continue later. This is very helpful in longer data collection forms.
#### 1. Go to the survey designer screen, by clicking on ==Manage Fields==
#### 2. Enable the option to save progress
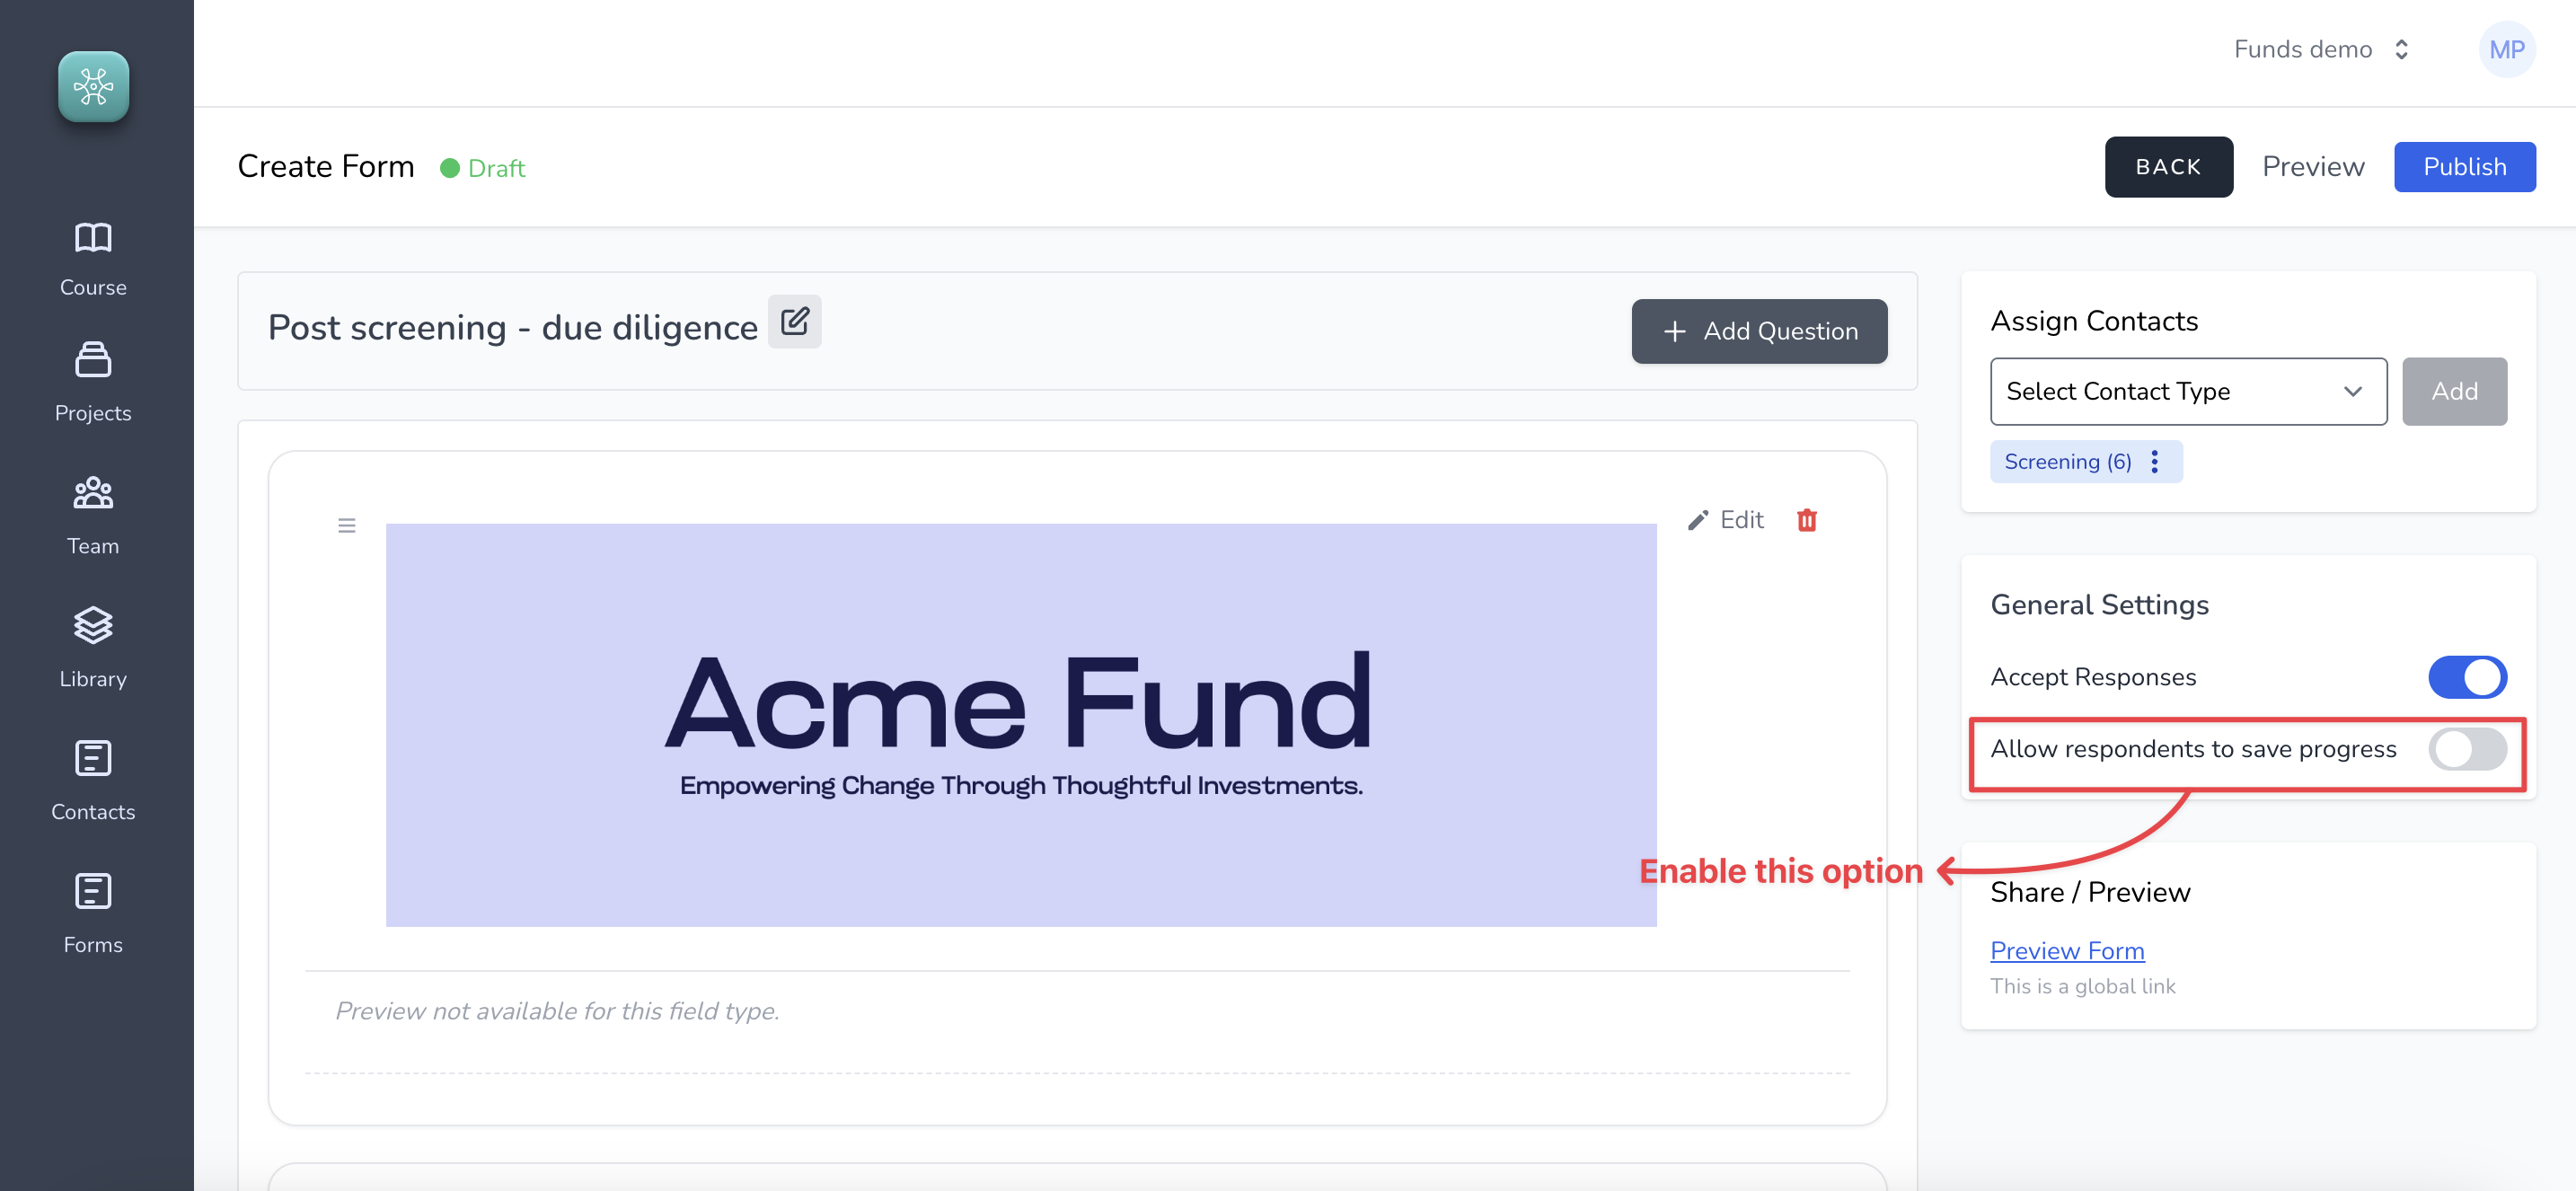
You should start seeing this option on the surveys
Intelligent Suite
# Introduction
Intelligent suite is set of AI powered features on Sopact Sense that helps us do a varieft of things with our data. From implementing custom methodology to evaluate responses collected to building designer quality reports from the data collected, it does it all.
In the next four sections we will look at each of these features in detail:
1. Intelligent Cell
2. Intelligent Row
3. Intelligent Column
4. Intelligent Grid
# Intelligent Cell
Intelligent Cell is used to analyze a specific data point collected on the survey. Imagine a google sheet or an excel, a cell here refers to a single data point on the data grid. Inmtelligent Cell allows us to analyze a single cell and the results of the analysis is put in a separate column (on a cell right next to the cell that is being analyzed).
For example, look at the image below:

Confidence Measure is the Intelligent Cell that extracted the confidence measure from the open ended response.
# Intelligent Row
Intelligent Row is a field type omn the survey that allows us to create beautiful analysis and reporting instantly per row of information collected on the survey.
For example,
[Here is an example report.](https://sense.sopact.com/ir/1a2dccdb-6ea4-5dbb-8ce6-c2d48977221a)
Steps to create an Intelligent Row
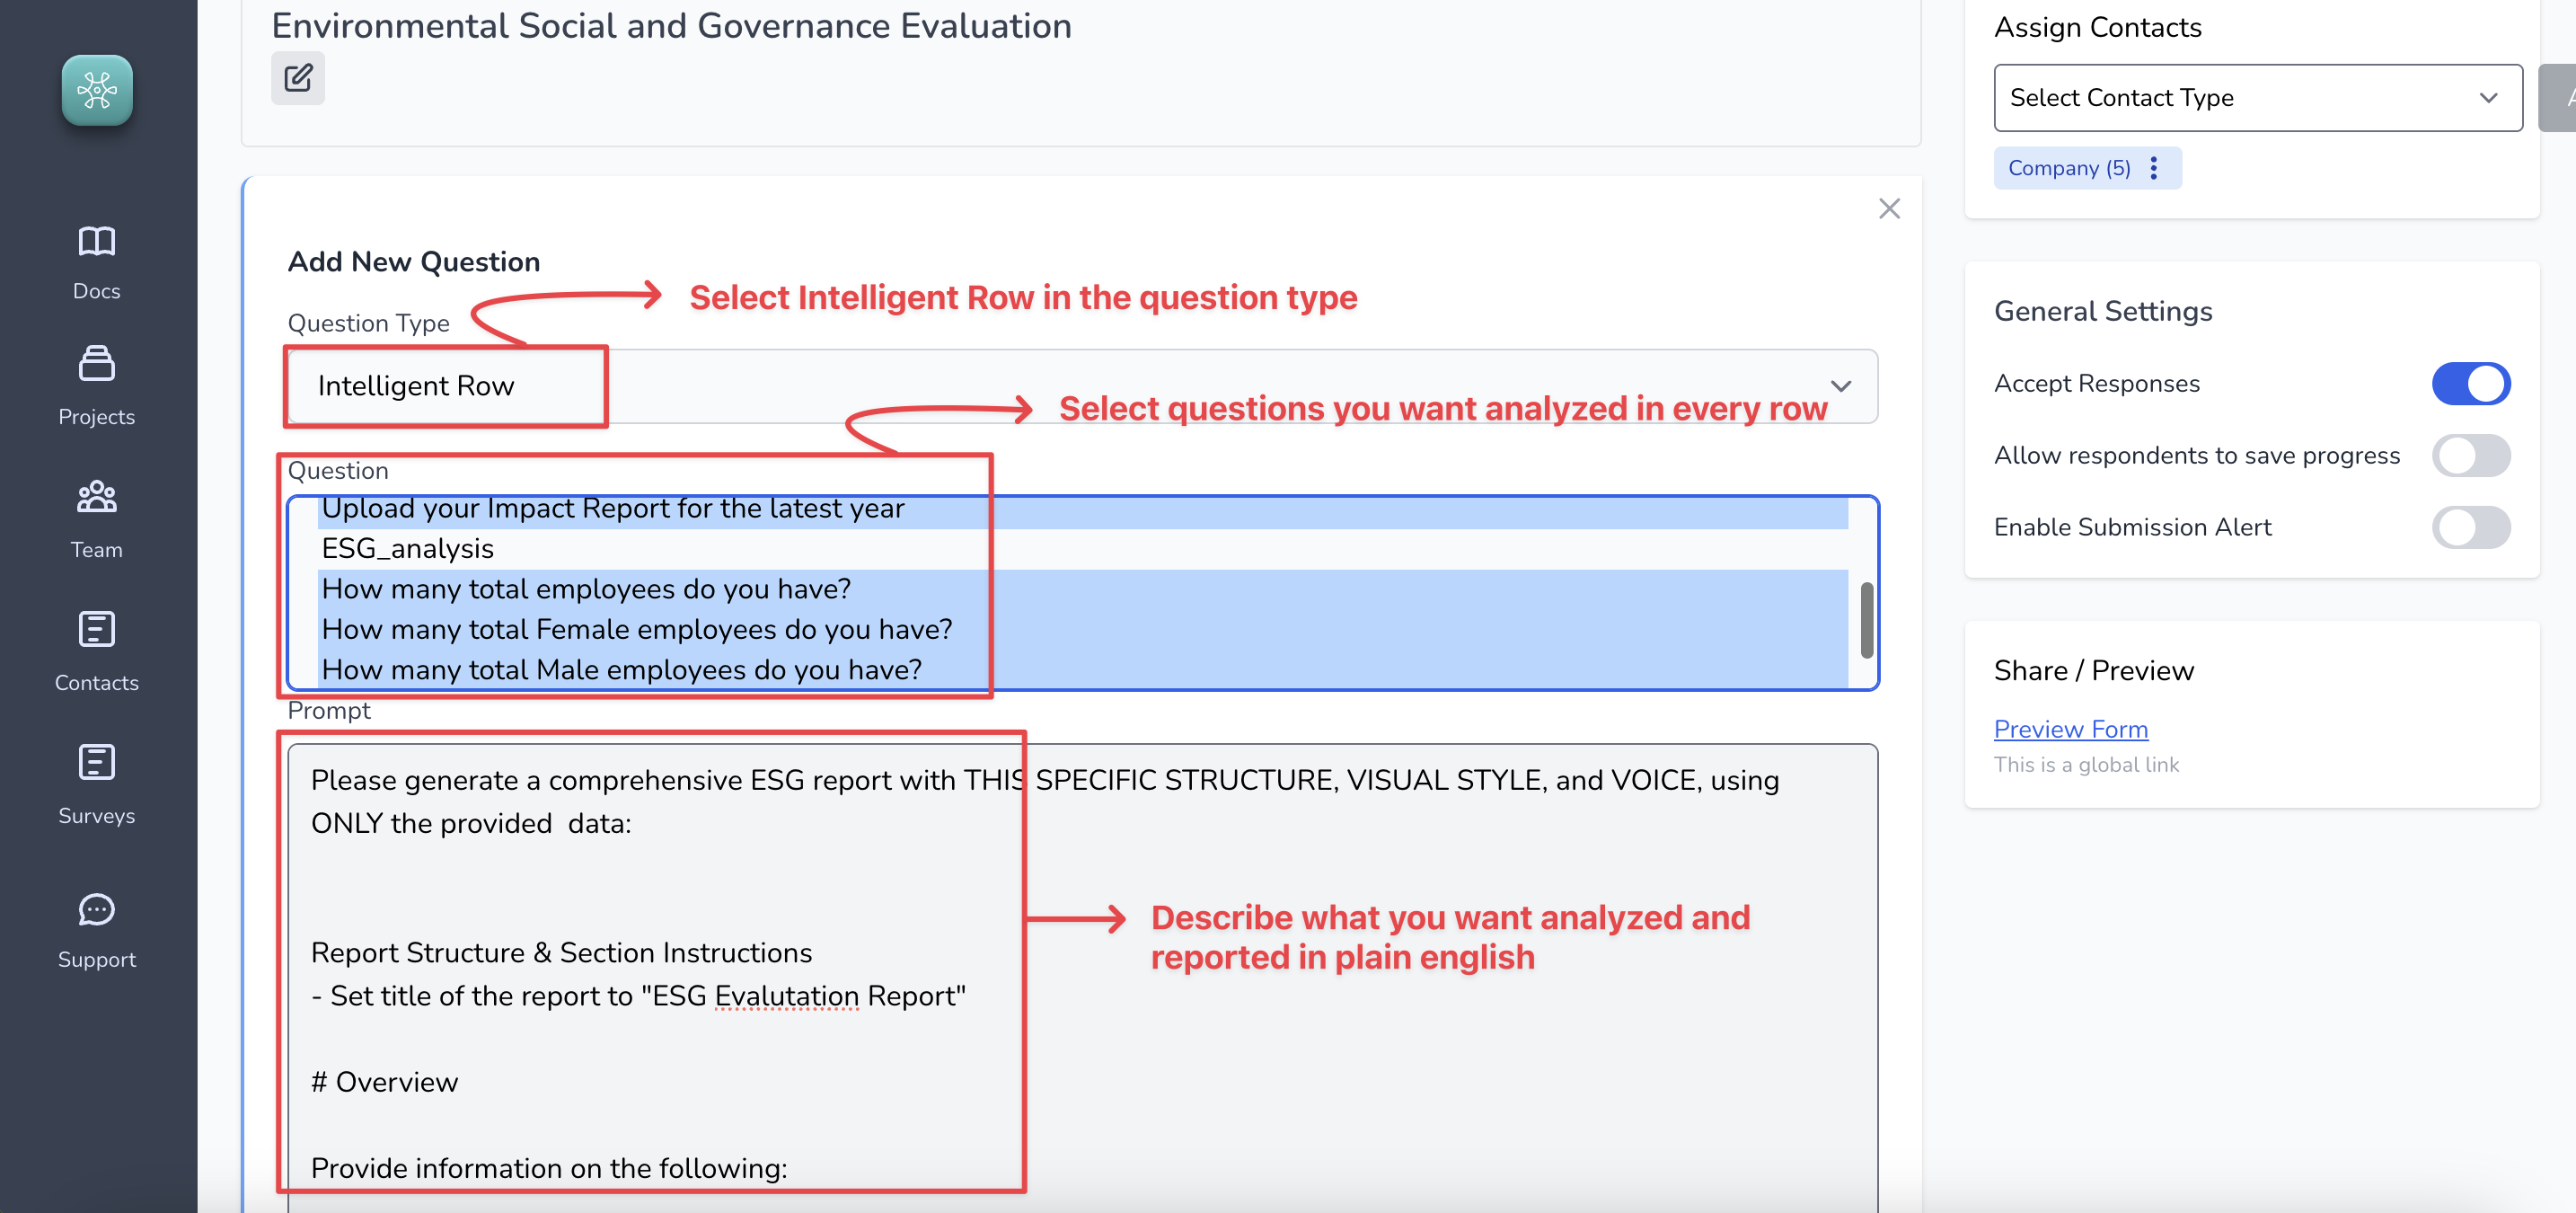
#### 1. Go to Survey Designer and create a question of type "Intelligent Row"
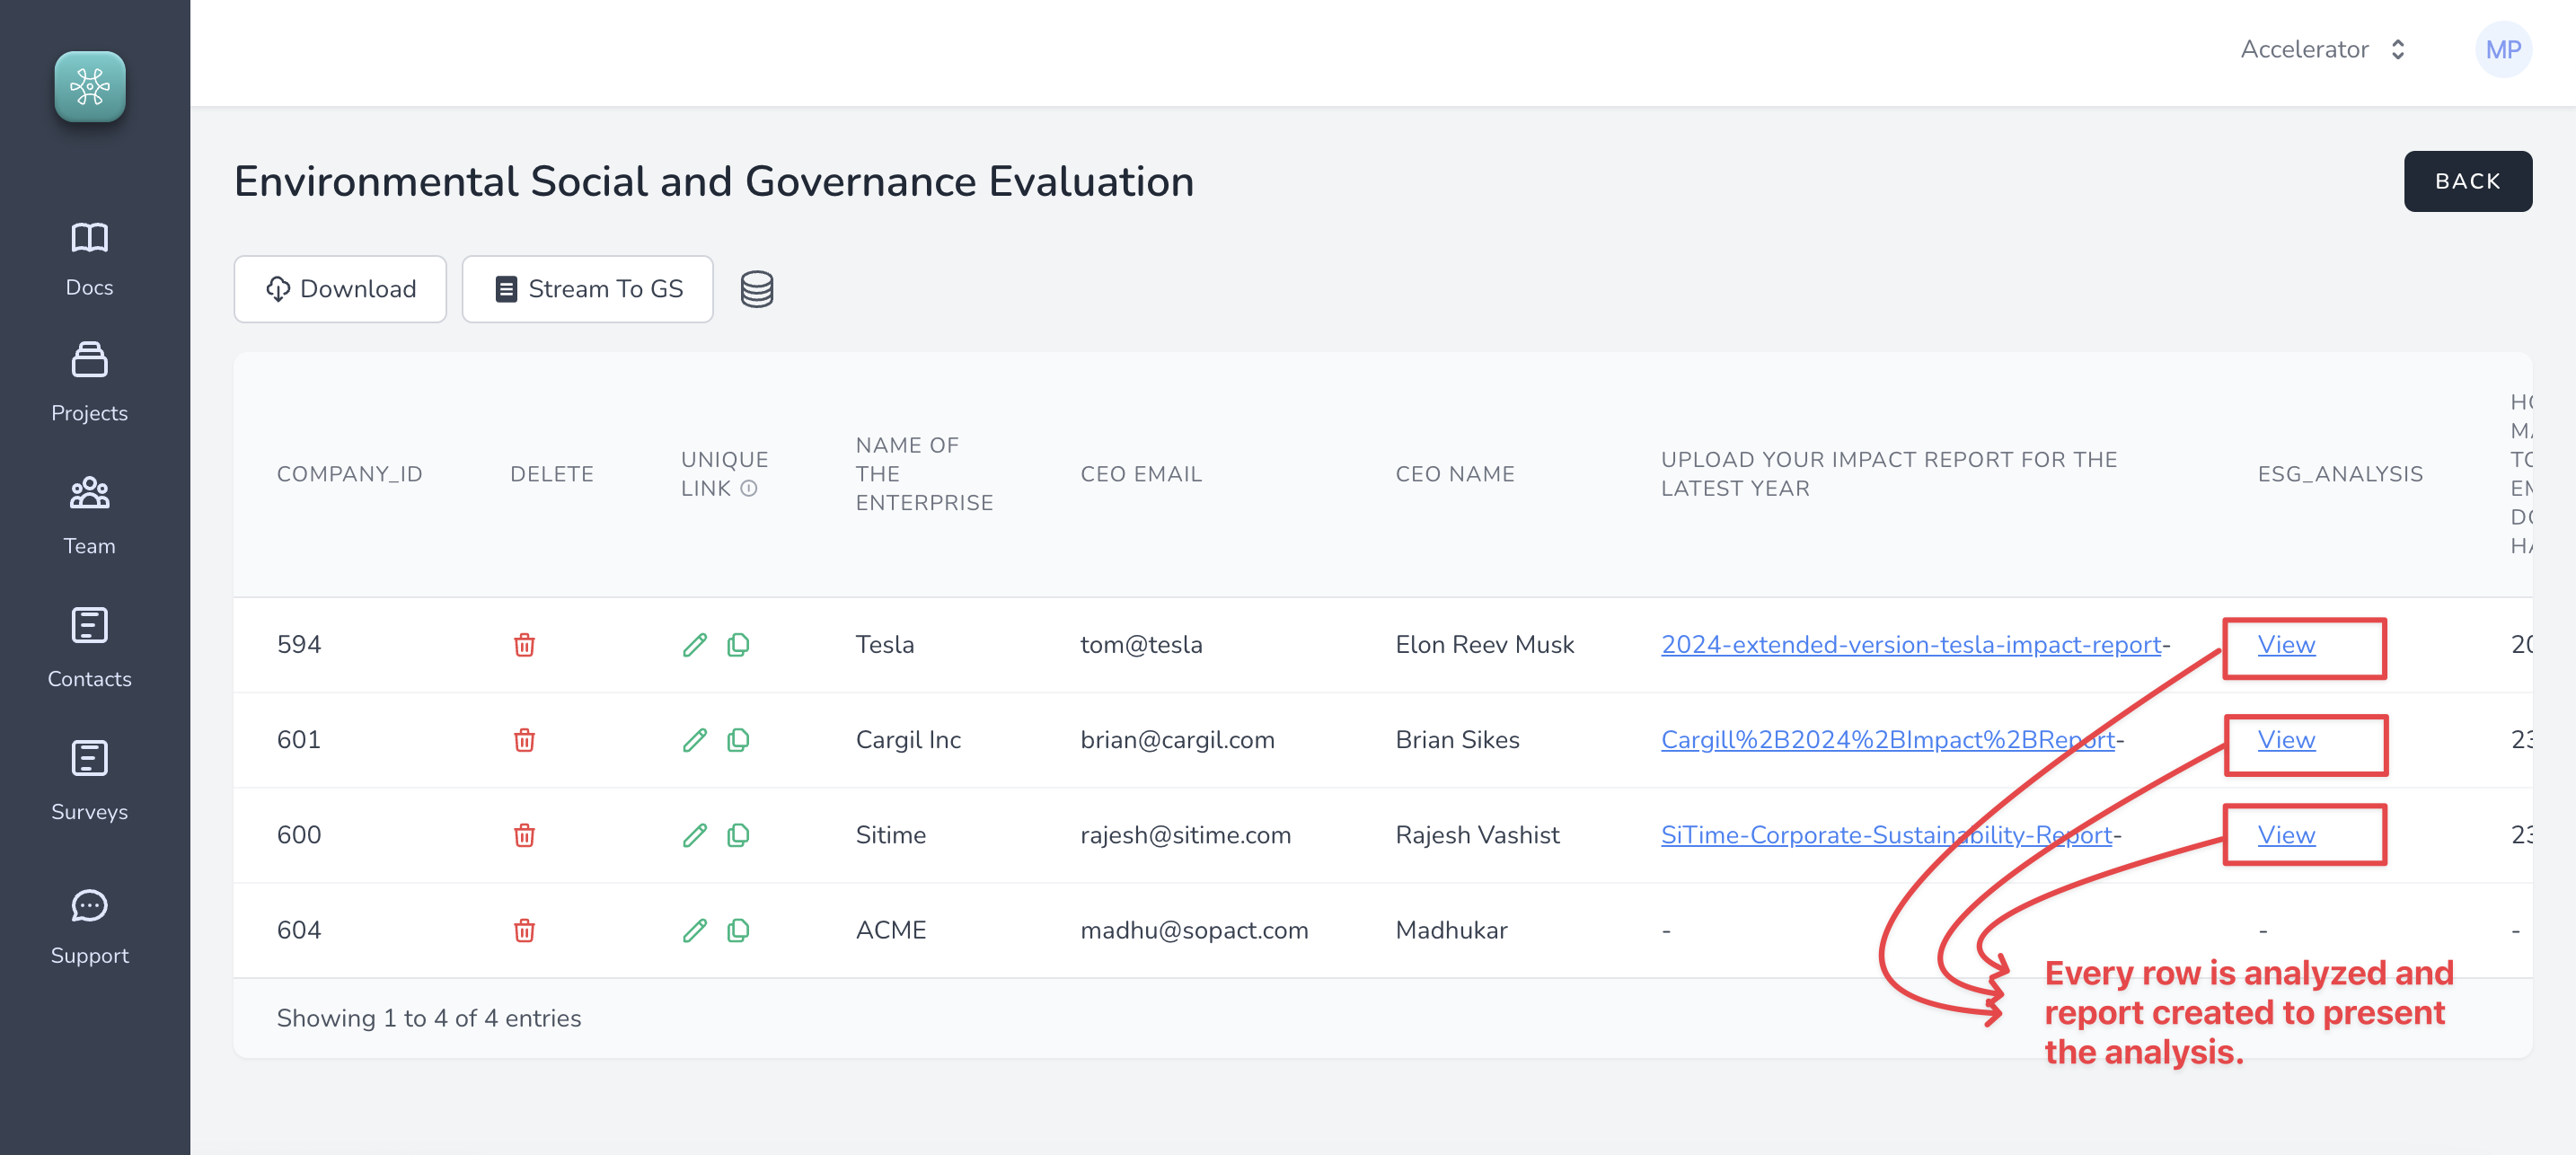
#### 2. Start collecting data on the survey and reports get built automatically
The reports can be accessed using the links on the grid (as shown above)
Thats it!
# Intelligent Columns
Intelligent Columns allow us to select one or more questions from the survey or contact fields to derive insights from the data.
For example:
Using Intelligent columns we could find corrrelations between two questions on a survey. In the below example report, we are fiding correlatiob between
1. Students building web applications and
2. Confidence in their own technical skill set
[Correlation example](https://sense.sopact.com/ic/edee9a00-2bf5-4eb5-a770-b78204a95165)
## Steps to use Intelligent Column
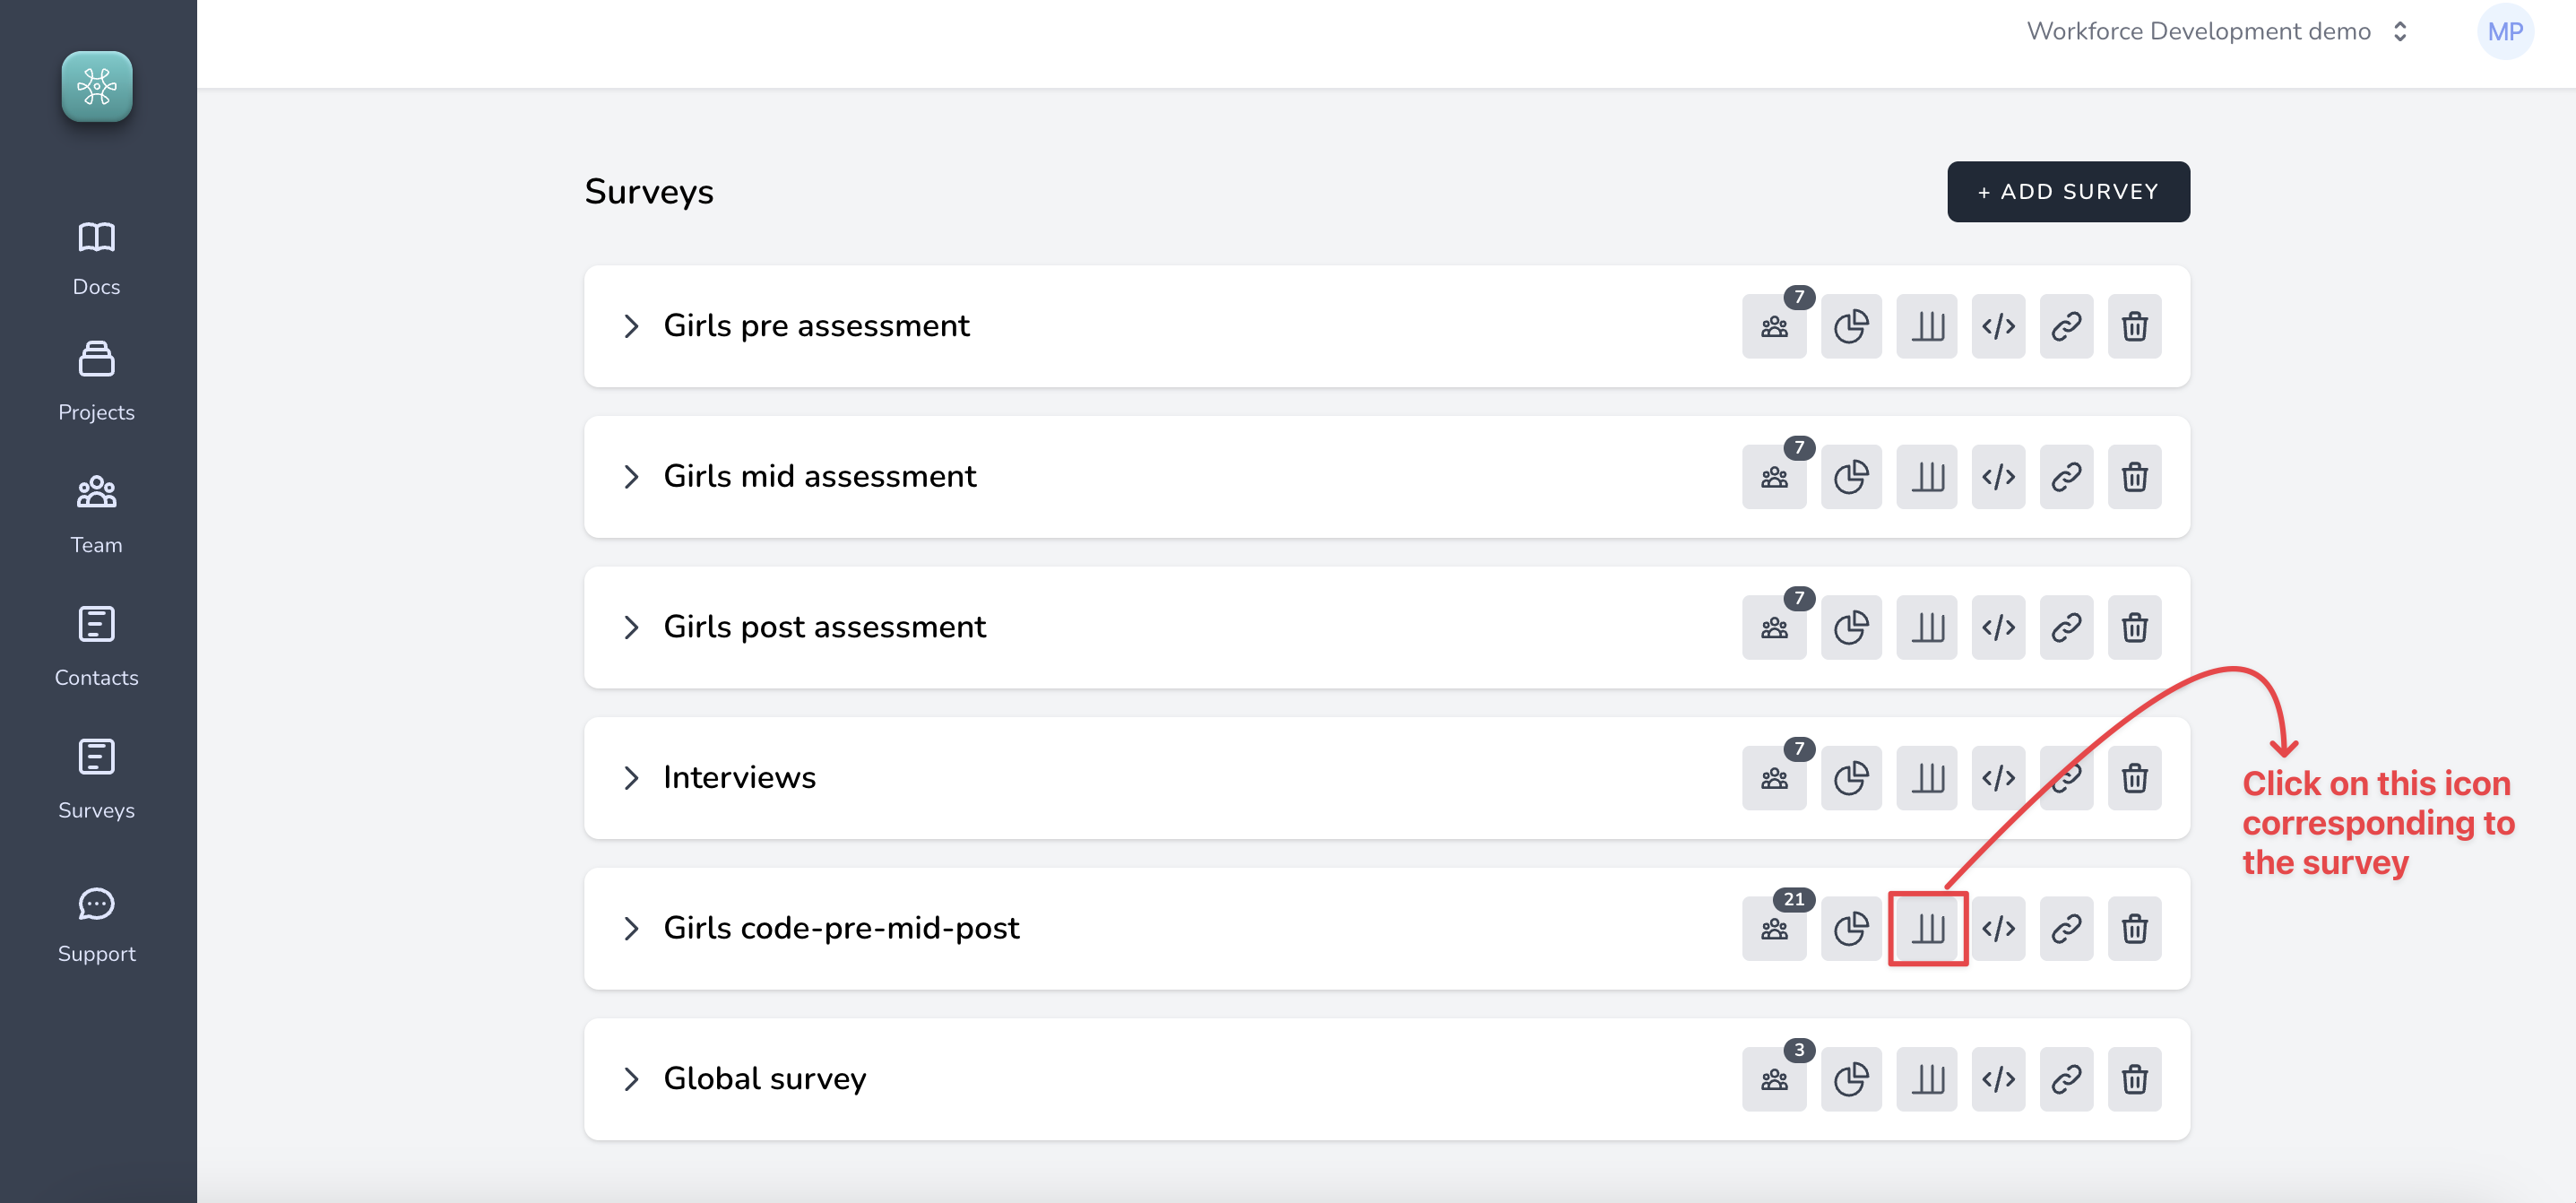
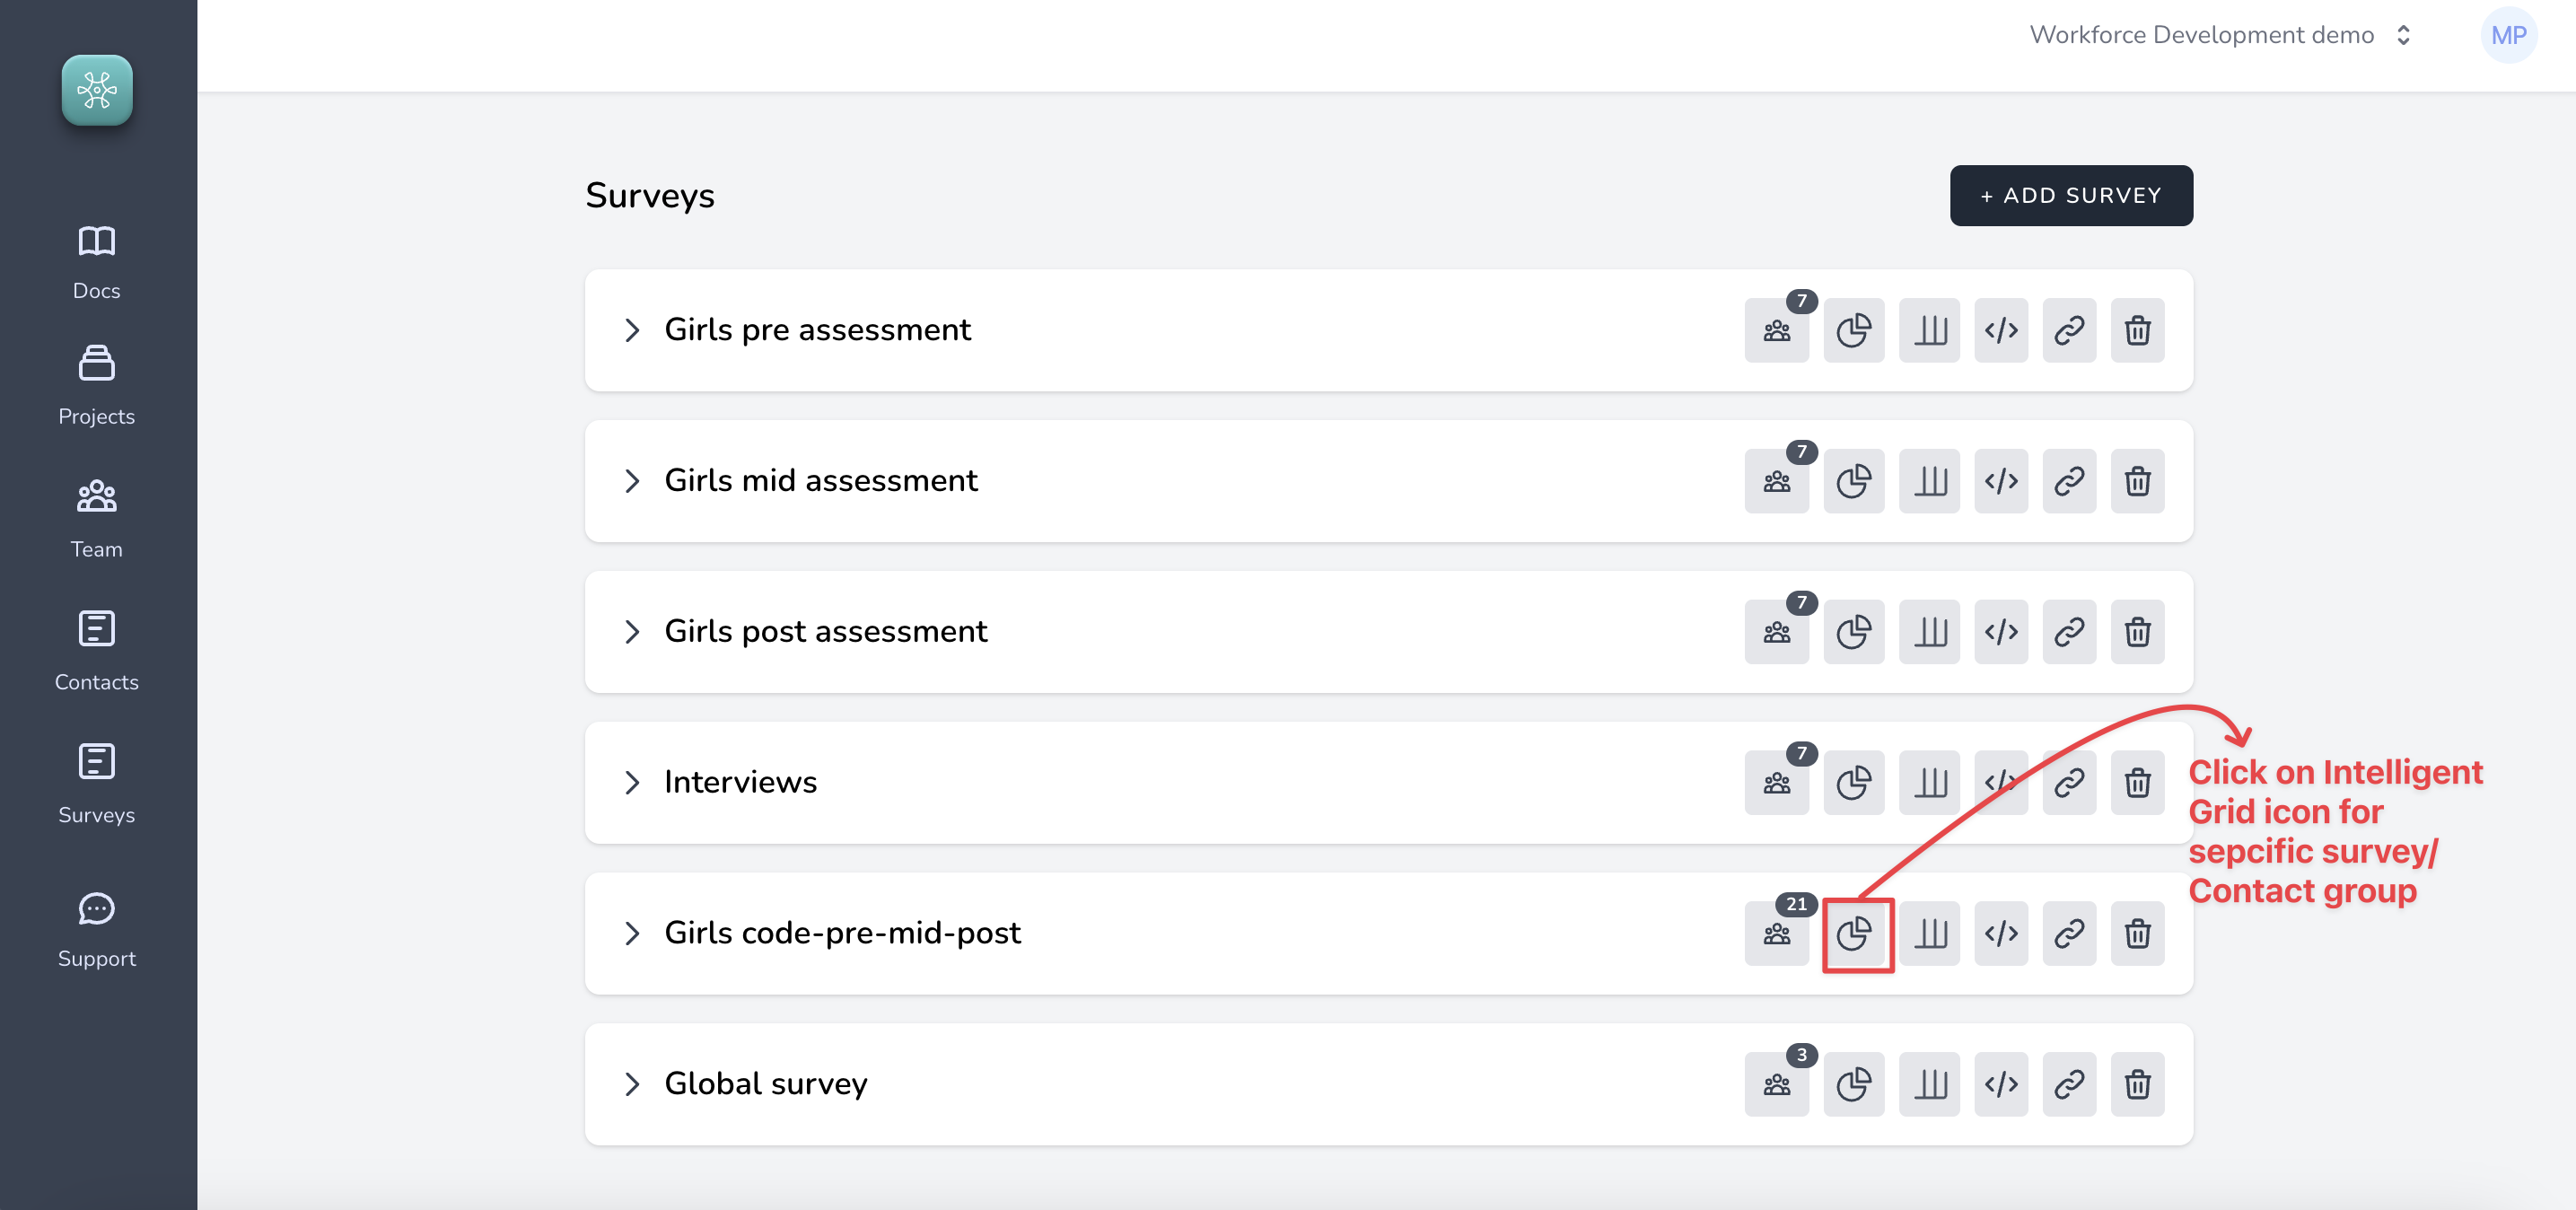
#### 1. Go to list of surveys and click on "Intelligent Column" icon for specific survey, like so
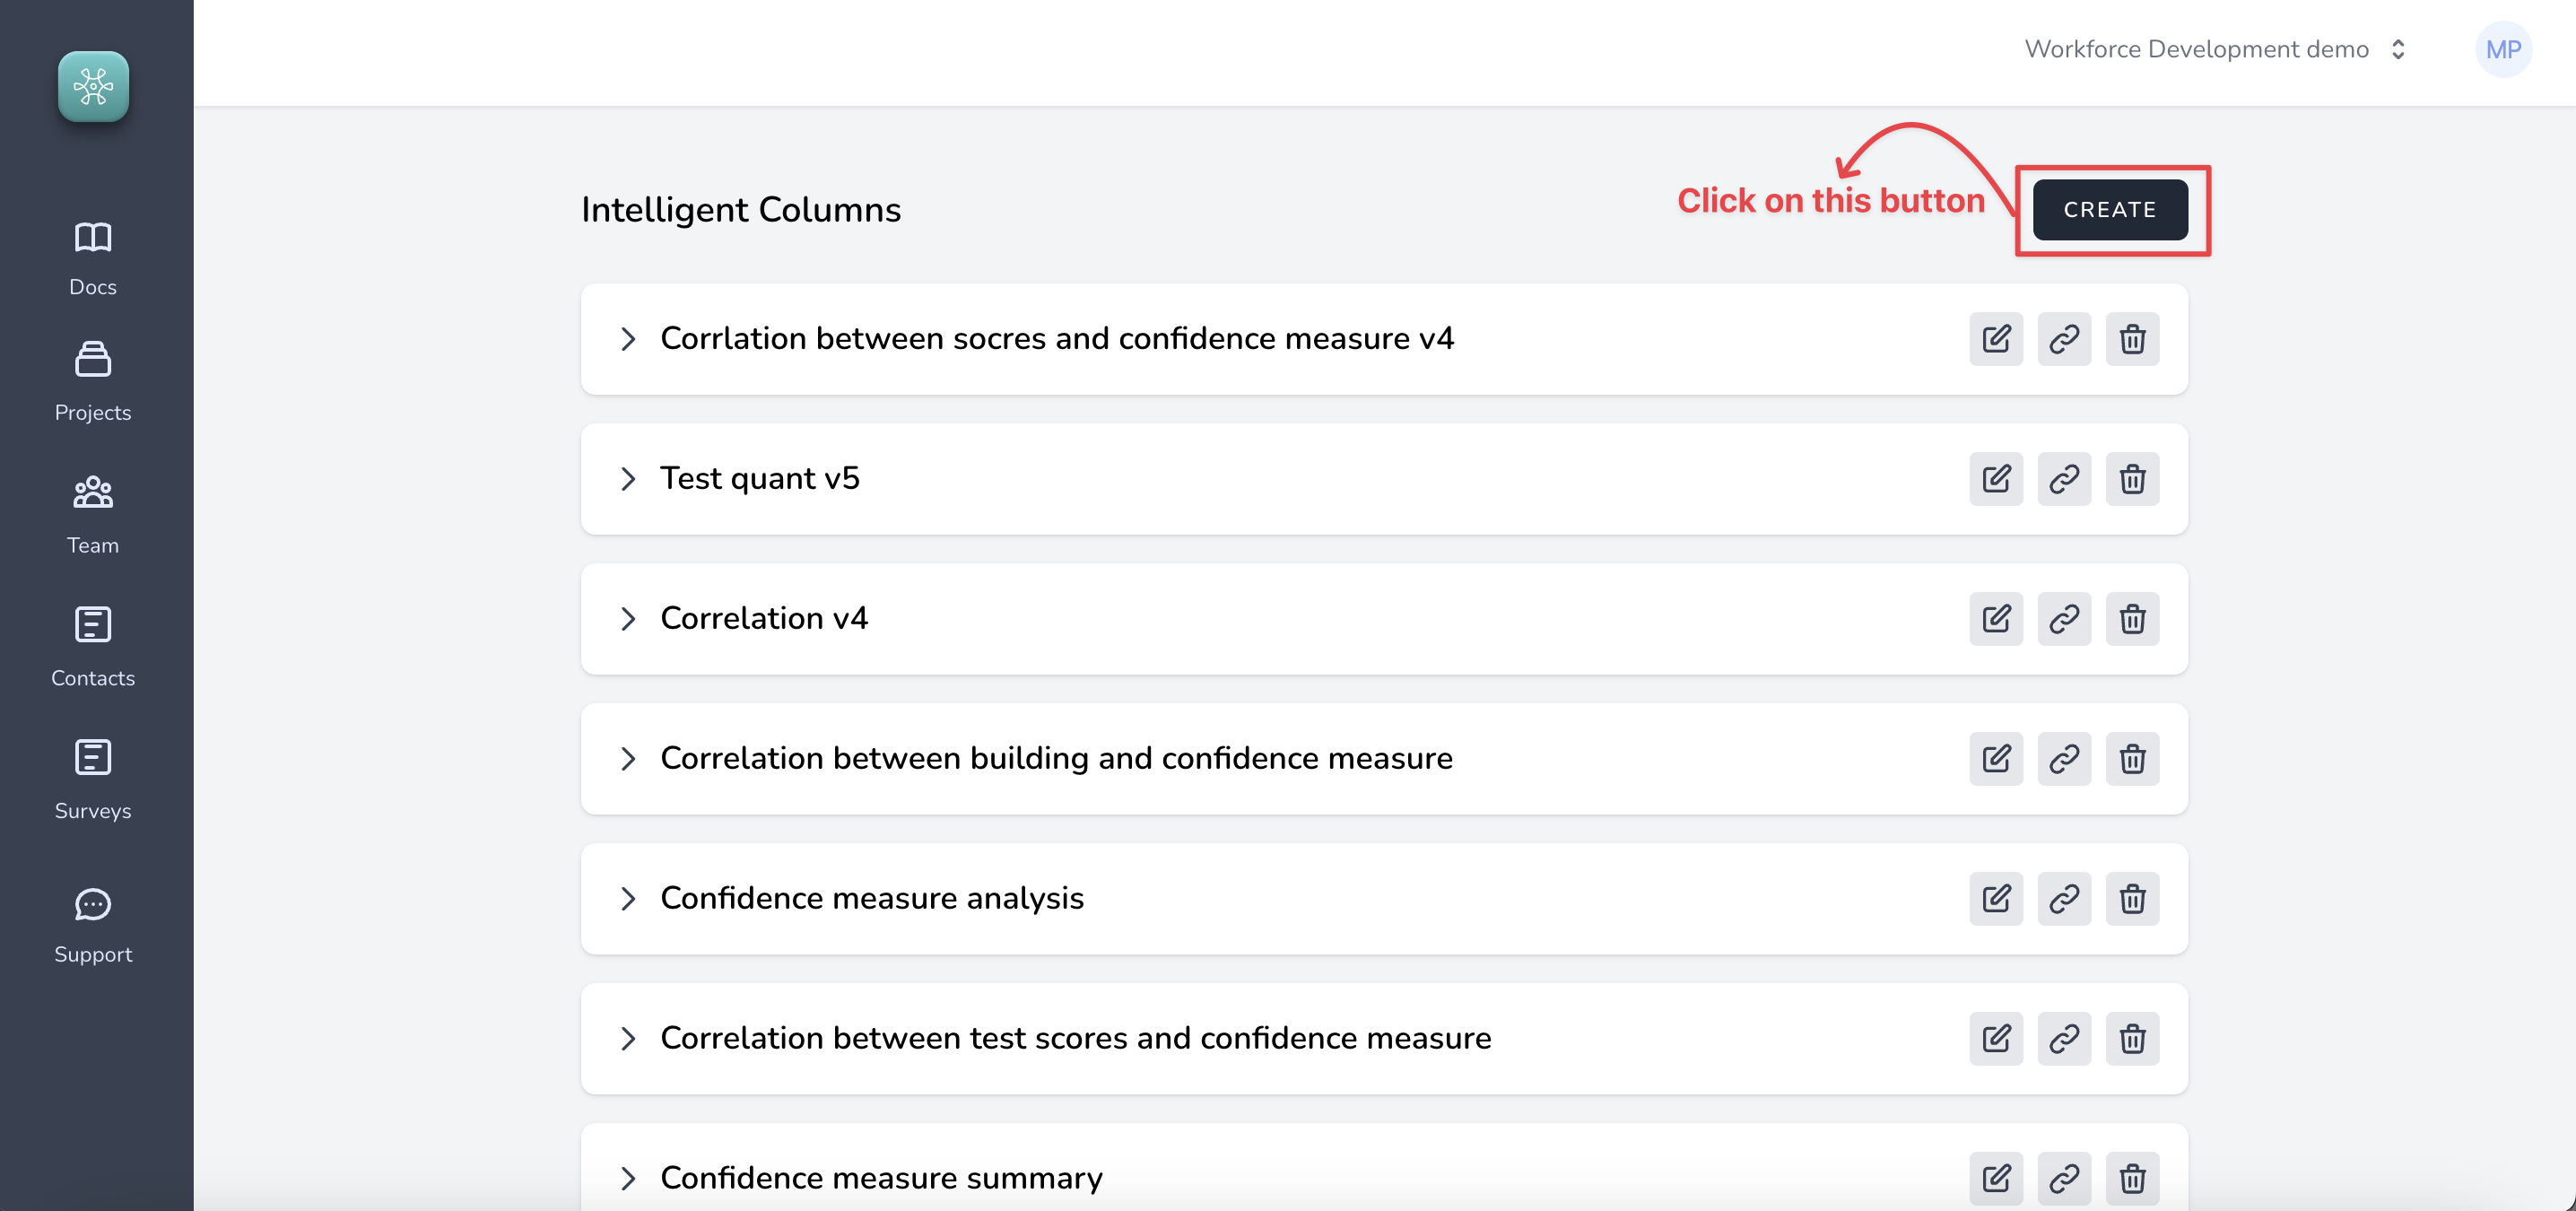
#### 2. Click on the Create button
#### 3. Select questions, enter prompt and click on "Test Run"
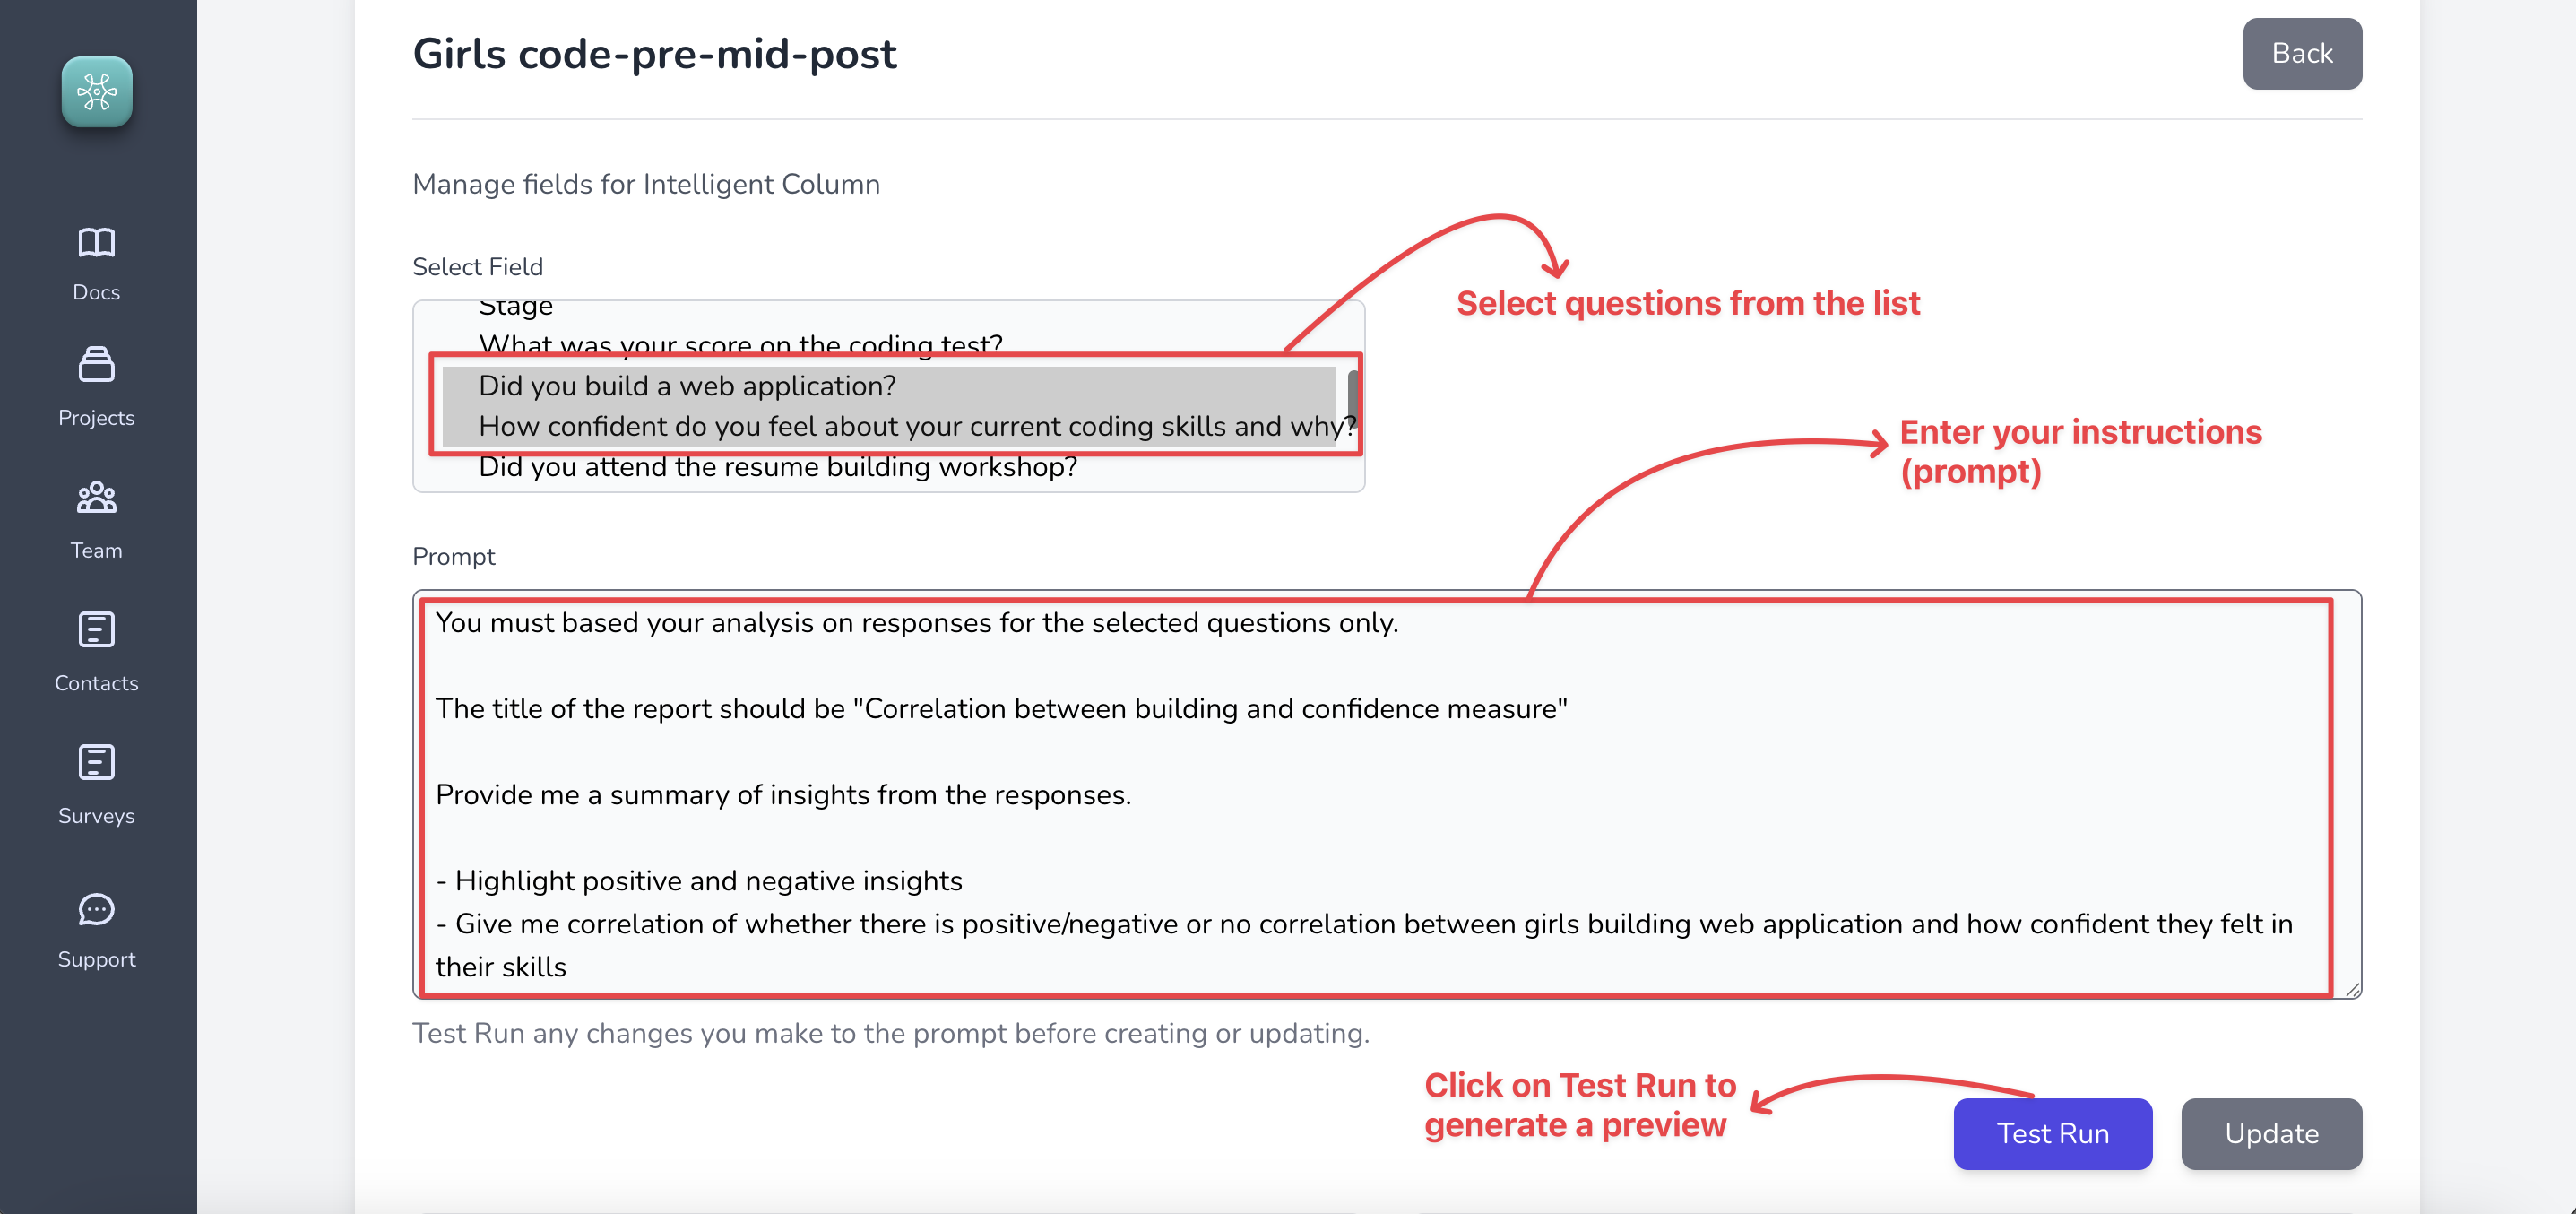
You may modify the prompts based on the changes you need in your report multiple times until you arrive at a report that you like!
> The same feature is also available in the Contact groups.
# Intelligent Grid
These are similar to Intelligent Columns, but let us generate a complete designer quality report from the entire data collected on a survey.
For instance,
[Here is an example](https://sense.sopact.com/ig/81461672-74ca-47a7-94de-1ddb77487b42) from our platform that uses the entire data to generate and present insights from girls code example dataset.
You can generate reports in multiple languages just by modifying the instructions (prompt).
[Here is an example report in Portuguese](https://sense.sopact.com/ig/d81465e6-9c72-4ee9-bf8b-08ca519f1259) from the same dataset.
## Steps to create full analysis and report using Intelligent Grid
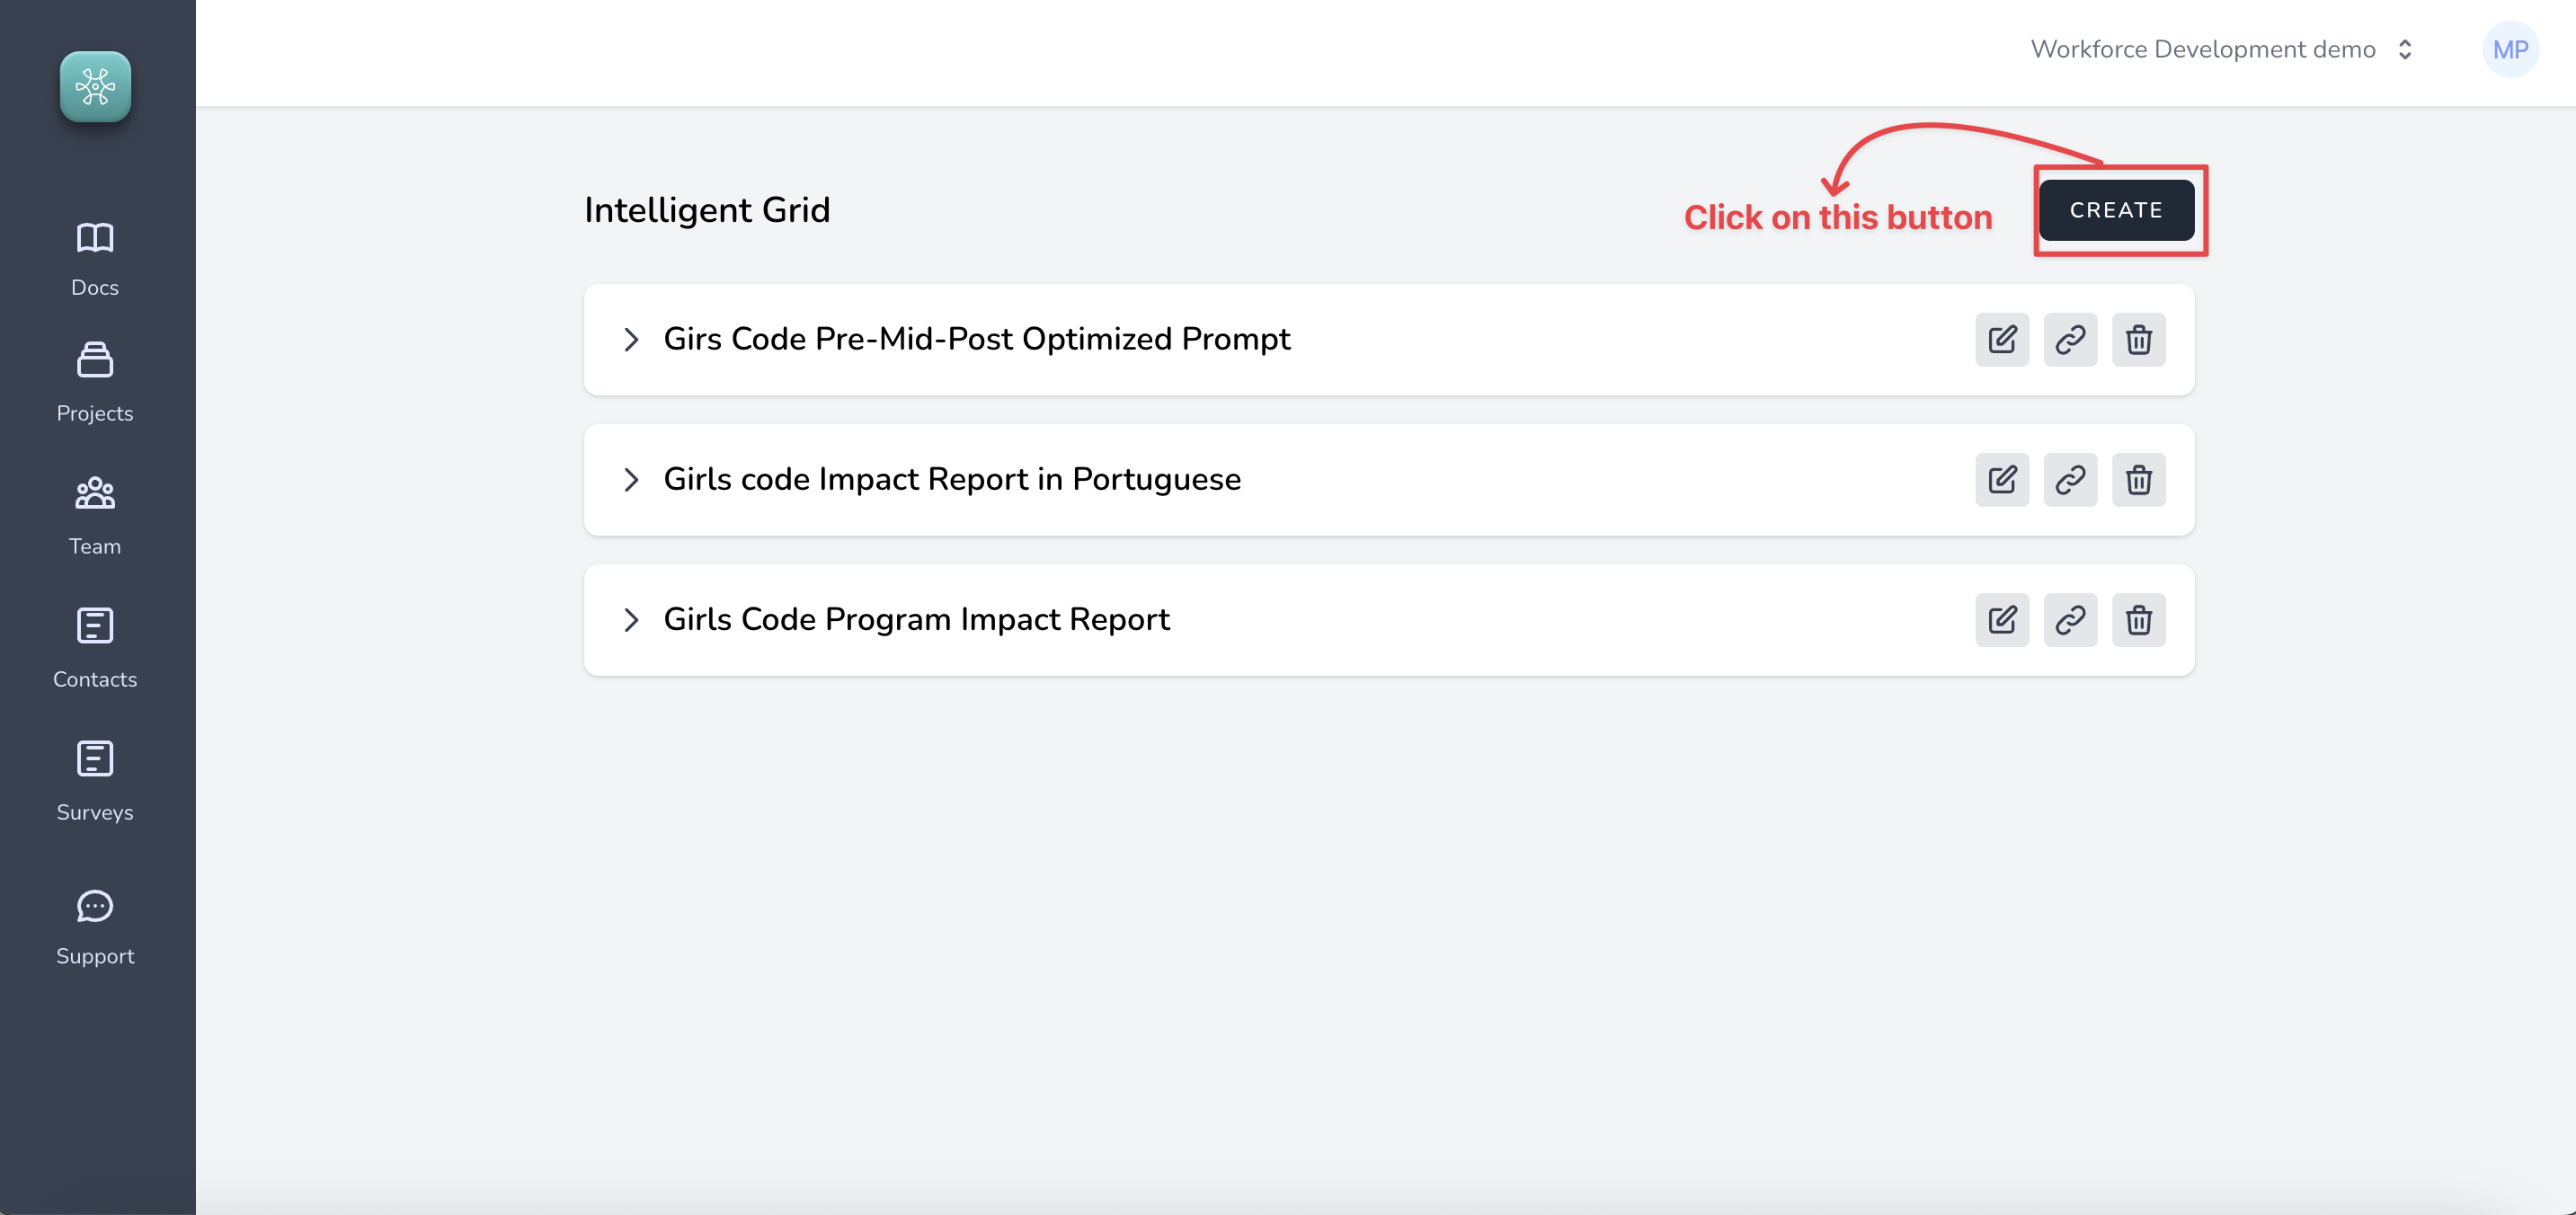
#### 1. Go to list of surveys and click on "Intelligent Grid" icon for specific survey, like so
#### 2. Click on the Create button
#### 3. Enter instructions (prompt) and click on "Test Run"

You may modify the prompts based on the changes you need in your report multiple times until you arrive at a report that you like!
> The same feature is also available in the Contact groups.
### Extracting insights from open-ended responses and documents
If you collect a lot of data on open-ended responses and collect documents as part of your data collection strategy, Sopact Sense has excellent AI capabilities in the form of ==Intelligent Cell== that will save you hundreds of hours going through the data manually.
This is not to say that it would replace a human being, it will be your companion that will do quite a bit of heavy lifting and help you do the analysis in much less time than usual.
Let us see how to extract insights from text data using ==Intelligent Cell==.
#### 1. Insights from open-ended Comment Field
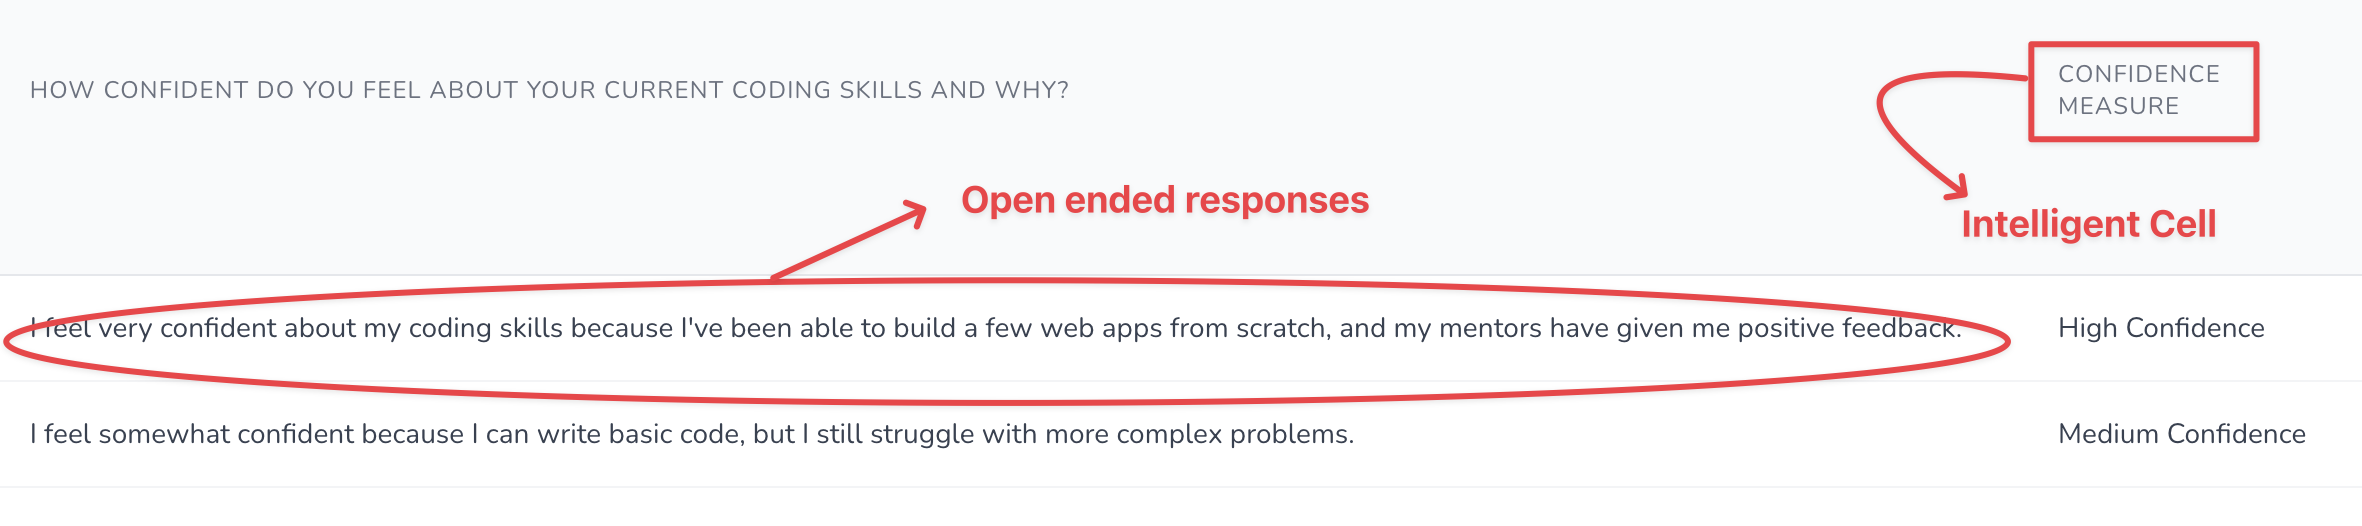
Create an Intelligent field that processes the responses in another Comment Field based on the criteria you give. For example, we can extract Confidence Measure from the following open ended feedback on the survey:
==How confident do you feel about your current coding skills and why?==
The result will show up in the grid (like so)
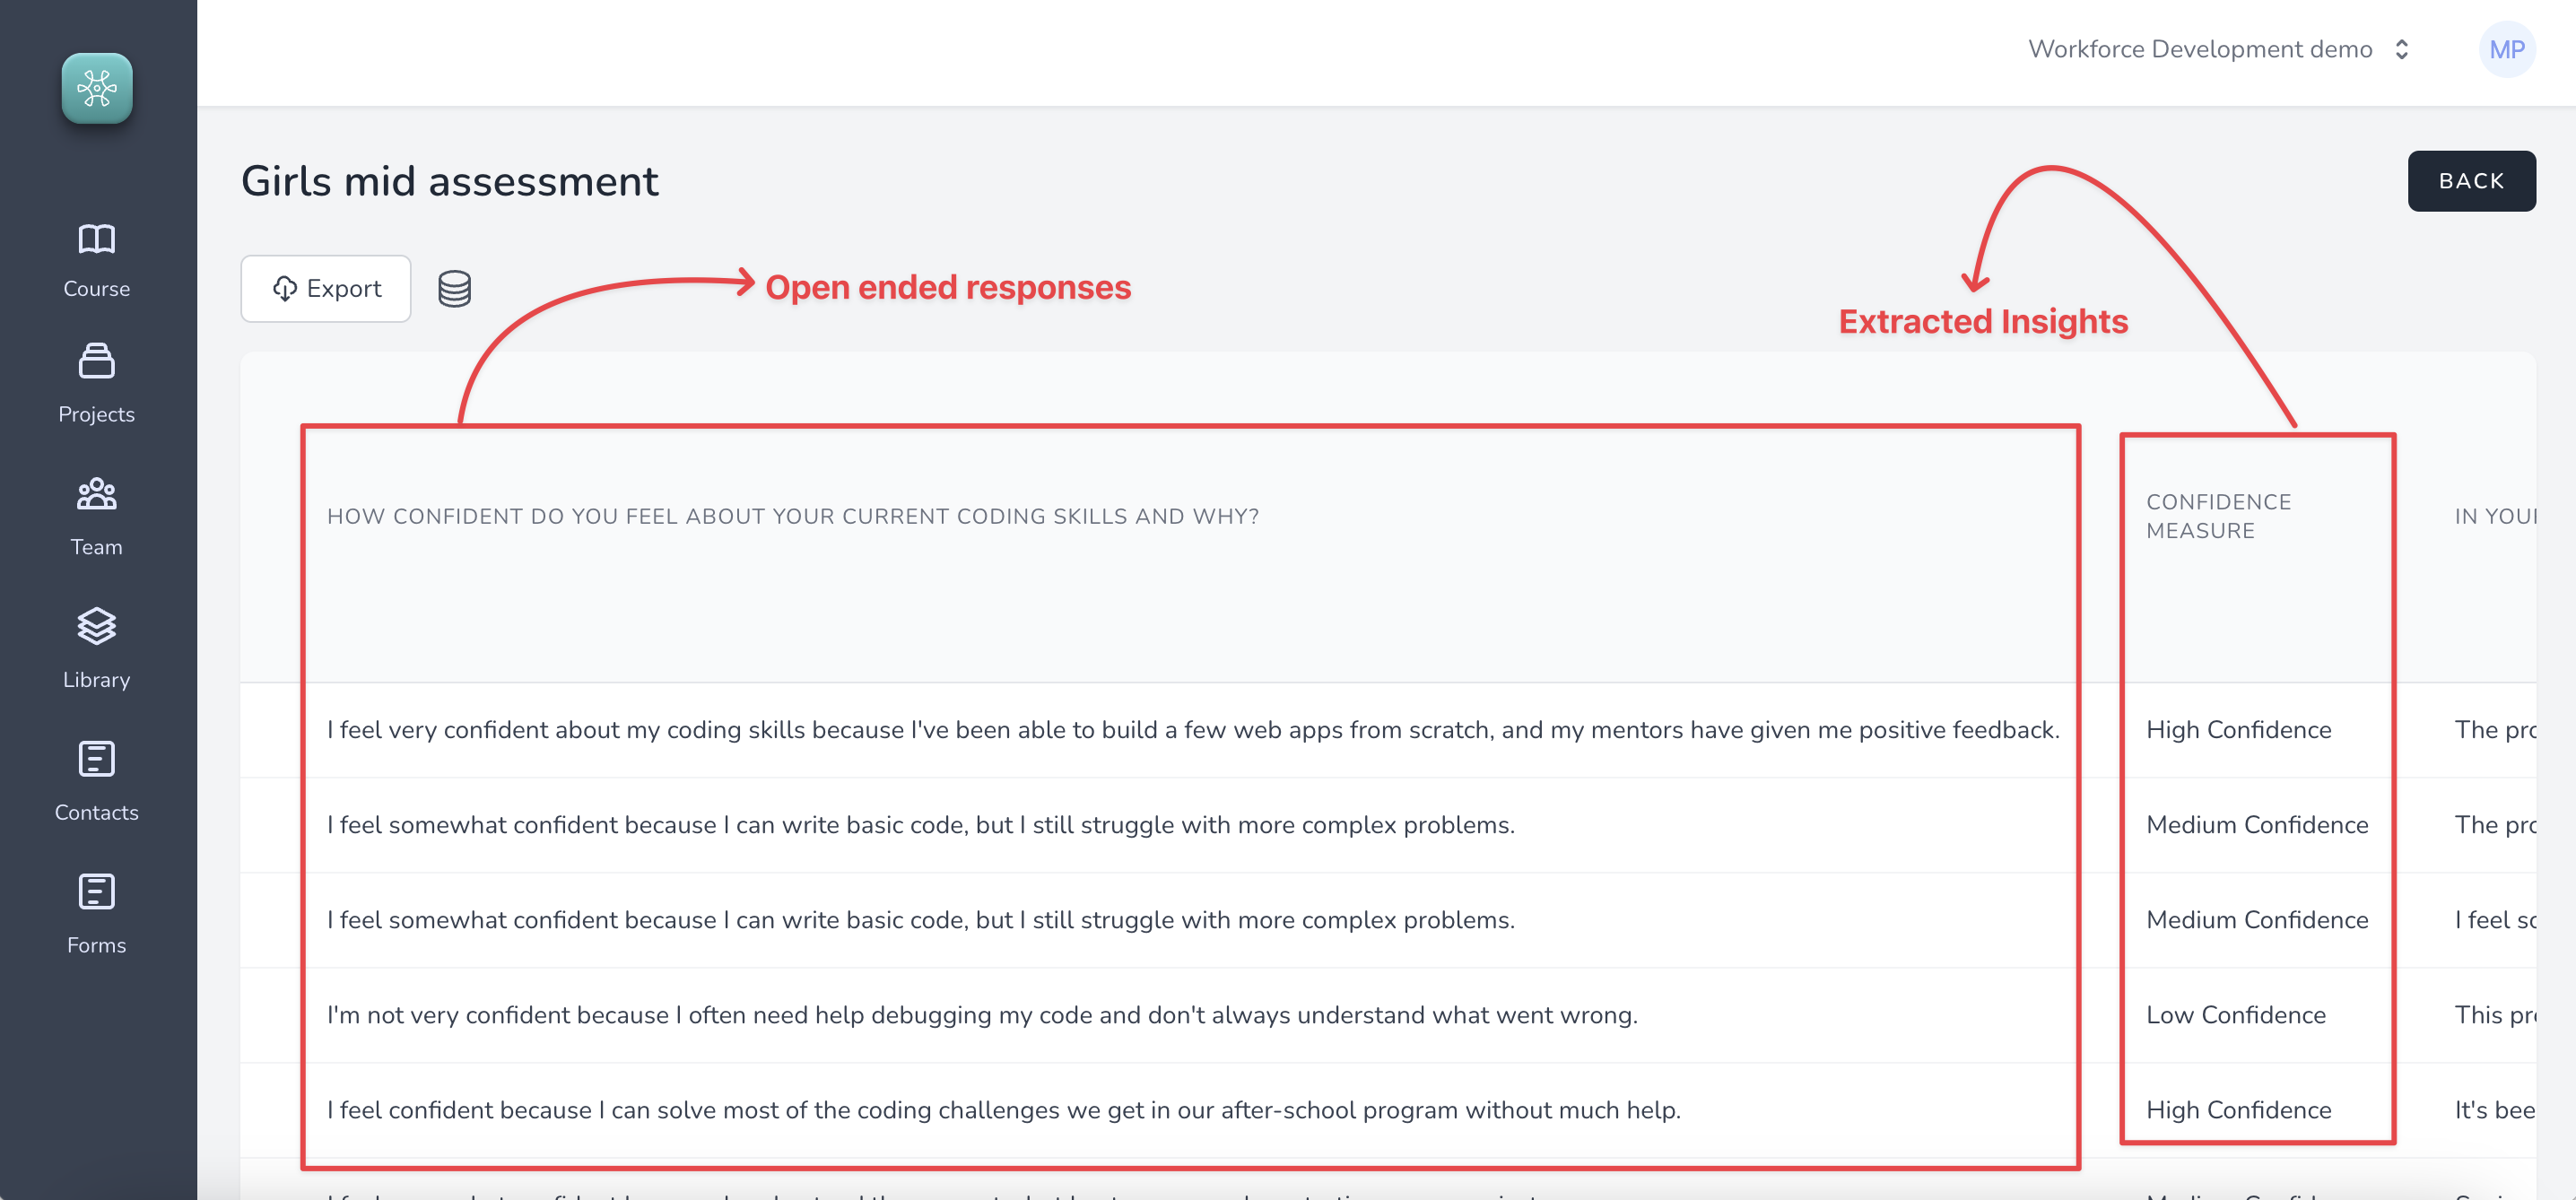
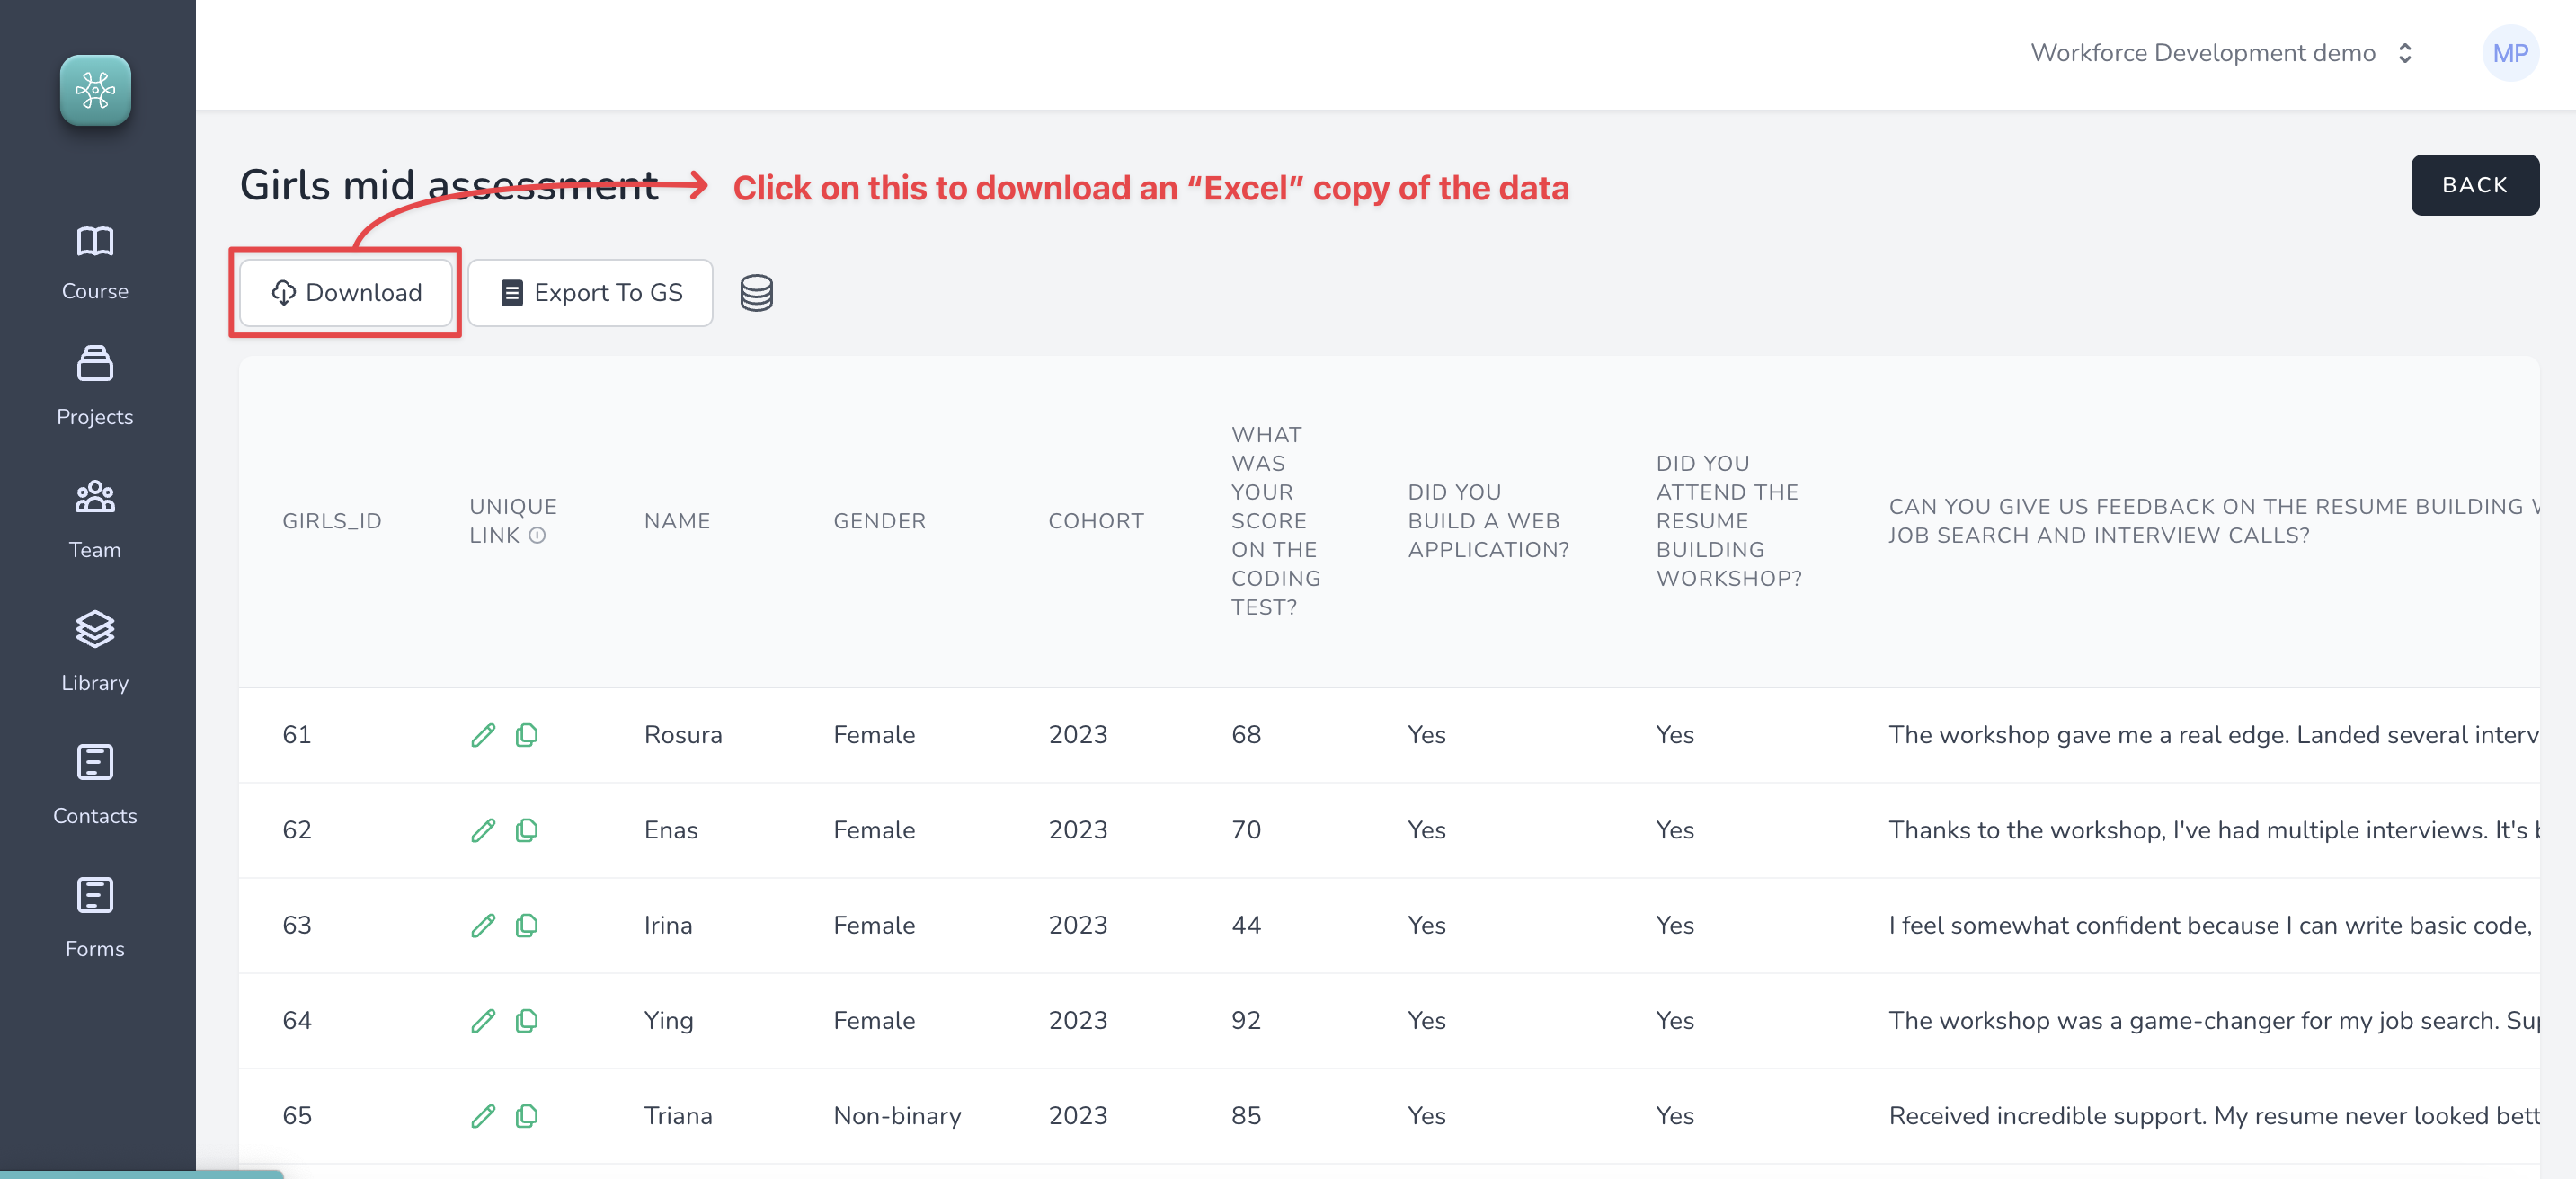
You can download this data directly from the export option (shown in the image above)
#### 2. Insights from documents (PDF attachments)
Application of an Intelligent Cell is the same for attachments as well. The only difference is that PDF content is first extracted and then the criteria is applied on the content.
The result also shows up exactly the way its shown above.
### Creating a good prompt for analysis
Creating good prompts that consistently work is a skill that can be learned. In this chapter we look at some use cases and best practices to construct a good prompt that will help us **extract insights, set a score, implement a custom evaluation methodology, or simply summarize something out of documents and open-ended responses received over surveys**. This will help in creating a continuous and an automated workflow, where the analysis is performed as soon as data is received, saving huge amounts of time. This also helps turn ==unstructured data into something that is more structured== which is human readable and quantifiable.
A good prompt generally has the following four characteristics
1. Constraints - What you don't want the AI model to do
2. Emphasis - What should the AI model particularly pay attention to
3. Task - A very specific ask on what the AI model is supposed to do
4. Context - Providing clear and specific examples on how the AI model should respond
#### Use case 1. Summary
Imagine a situation where, you want to assign a score based on certain content in the PDF attachment or open-ended responses. This often happens where you have a certain custom calculation methodology. For example, may be you are a fund that invest in companies that are predominantly focussed on green practices. Now, when companies apply for funding you need a way to filter the companies out that are not green focussed.
Consider the following prompt that analyzes the sustainability report PDF submitted by an organization.
```
You should BASE YOUR ANSWERS on the CONTENTS of the PDF only.
Summarize any policy on recyclable packing material.
If nothing is mentioned about recyclable packing material, say "There is no such policy".
If you are not able to identify, say "Not able to identify".
```
The result:

The above prompt is good but still not great.
- Constraint exist as it explicitly states that the analysis should be based on attached PDF only and to not dig into AI's own knowledge
- The task is specific and clear in terms of "Summarizing the policy on recyclable materials"
- Emphasis - The words that are capitalized clearly state what the model should focus on.
- Context could've been better by providing some example which this prompt does not.
#### Use case 2. Labelling and Categorization
Intelligent Cell can be used to extract Themes/Labels or Categories from text content.
In the below example we are extracting confidence measure from open-ended response received on the following question
==How confident do you feel about your current coding skills and why?==
The prompt being used is this:
```
You should base your answers on contents on the response only.
Evaluate the response based on the following conditions
If the response sounds confident say "High Confidence"
If the response sounds medium confident say "Medium Confidence"
If the response sounds low confident say "Low Confidence"
If don't know say "Don't know"
```
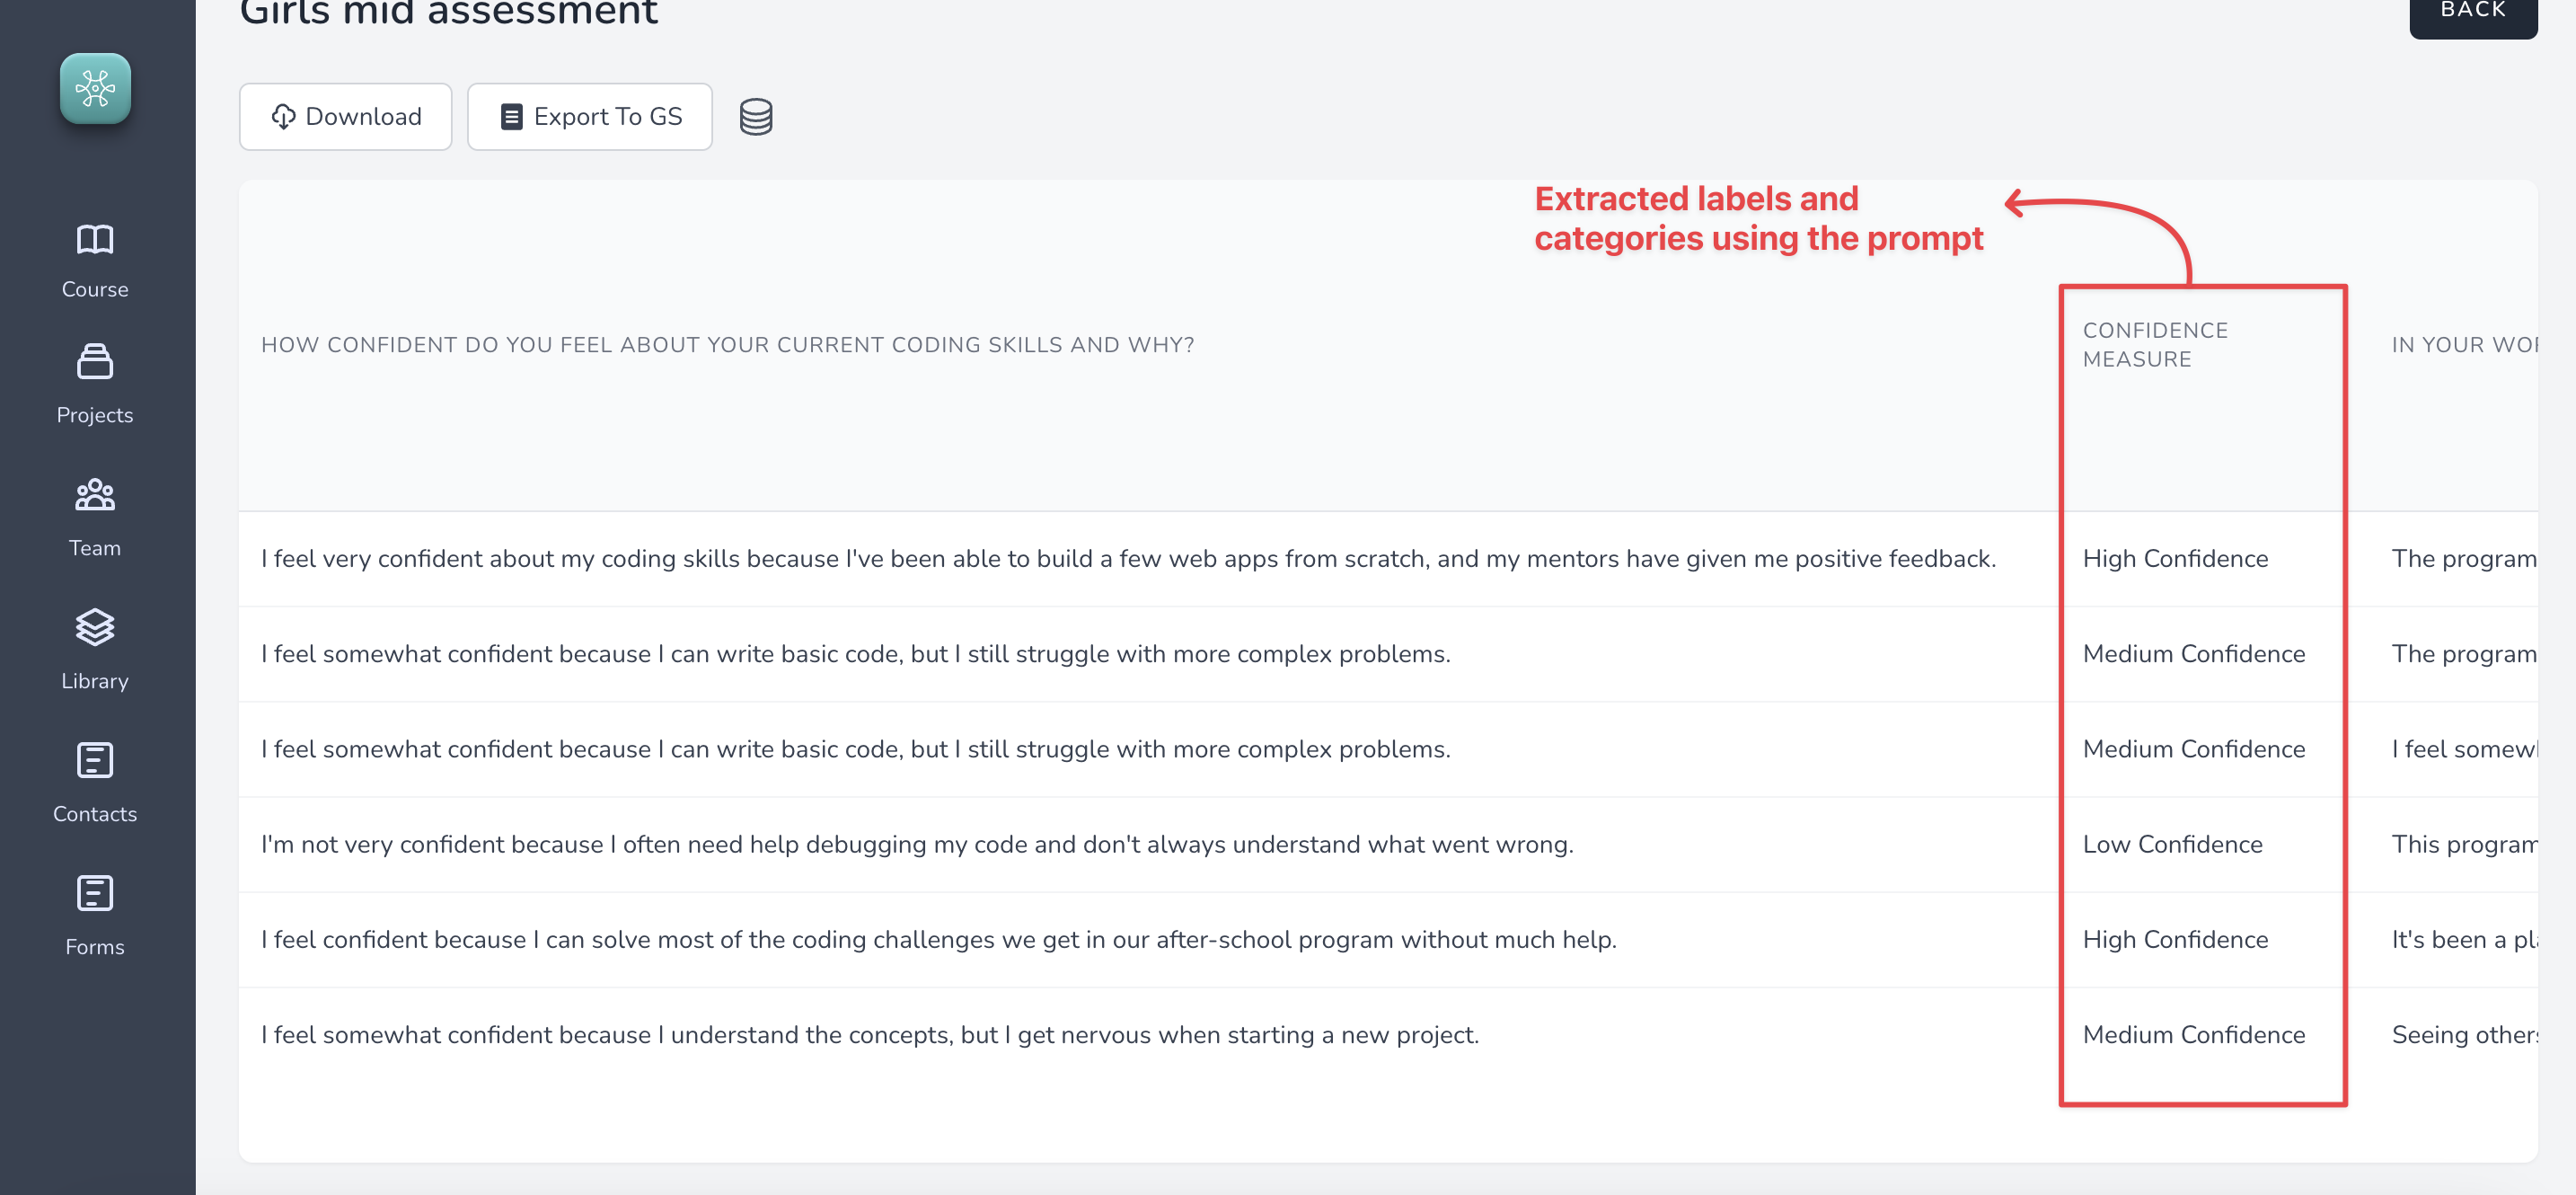
The result:
#### Use case 3. Scoring
Developing a prompt for scoring is very similar to extracting labels.
```
Evaluate the response based on criteria below.
You should only use the response to evaluate.
This is the criteria:
1. The strategy document supports the right to self determination.
2. The strategy document acknowledges first nations people.
3. The strategy document has an active policy to partner with first nations communities.
If all three conditions are satisfied say "All conditions satisfied"
Even if one condition is not satisfied say "Doesn't meet expectations"
If you don't know say "Dont know"
```
#### Use case 4. Evaluation criteria
Implementing a custom evaluation criteria is super easy. An example prompt is provided below.
```
Evaluate the response based on criteria below.
You should only use the response to evaluate.
If the STRATEGY DOCUMENT supports the right to self determination then say "Self determination exists"
If there is no mention of self determination then say "Doesn't exist"
If you don't know say "Dont know"
```
# Prompt templates
#### Prompt for the workshop (Resume comparison)
```
You should base your analysis on provided data only.
- You are an analyst comparing old resume vs new resume.
- You are supposed to clearly show the difference between the two resume based on the following criteria.
1. Is the new resume more outcome oriented and does it quantify the results of the activities.
2. Is the new resume more impactful than the old one.
3. On a scale of 1 to 10 (1 being the worst), rate each of the resumes.
# Formatting
Provide a well formatted HTML report.
Use Tailwindcss 3.1.1.
Each section, card, and stats block should be modular and copyable as its own block.
Each block or card should be one below the other so it looks good even on small screen sizes.
All key ideas, stats, recommendations, and testimonials are styled for clear distractions.
Use semantic HTML structure and Tailwind (or similar) utility classes when outputting code or HTML-like sections.
NO new sections—stick only to the above, and in this order.
Make it mobile responsive so it works on all screen sizes.
Use heroicons svgs for icons.
```
#### Prompt for the workshop (Overall Impact)
```
You should base you analysis on the provided data only.
You are a data analyst who is tasked with analyzing resume building workshop data.
You are measuring the impact of the workshop on young girls and their interview prospects.
# Report Structure (Sections & Instructions)
1. Executive Summary
- Title: "Resume building workshop Impact Report"
- Give me average interview invites that the participants received (source: "If you received interview invites, how many?")
- Give me overall summary of the impact of the workshop based on the data.
```
### Downloading data
To download data, go to the data grid and click on the "Download" button.
#### Step 1. Go to the data grid for a particular survey
#### Step 2. Click on the "Download" button
Advanced concepts
TBD
Onboarding and Support
**Onboarding & Support with Sopact**
Many organizations start with questions about their data strategy. Because Sopact introduces a new approach, we want to give you confidence and clarity from day one. Our promise is simple: we are here to help, and you will never be left alone. Support is always available through our community and, when needed, direct escalation.
1. When to Use the Community
The Sopact Community is the fastest way to get help. It’s where you can:
Ask questions and see answers from both our team and peers.
Browse existing tutorials, walkthroughs, and discussions.
Share your experiences so others can learn and participate by learning from others
2. Response Expectations
Response Time: Most questions receive replies within 24 hours.
How to Check: You’ll get notified when your question has a response.
Escalation: If you don’t hear back in a reasonable time, you can flag it for priority follow-up by the Sopact team.
3. Types of Support
Guidance on forms, applications, and data collection workflows.
Technical tips for Intelligent Cell, Row, Column, and Grid.
Best practices for continuous data collection and reporting.
4. Quick Tutorial (60 Minutes)
Learning Sopact should be fun and simple. Start with our quick tutorial to see the entire process end to end. In about one hour, you’ll walk through:
Workforce training program setup.
Application intake and due diligence.
Pre- and post-data collection flows.
Entry of up to 5 sample records.
Each question is designed to give you rapid understanding of Intelligent Cell, Row, Column, and Grid. You’ll also learn how to add prompts and generate analysis in real time.
5. What’s Next?
Once you complete the quick tutorial, you’ll have a working sense of the Sopact platform and can start adapting it to your own needs.
6. Optional Personalized Walkthrough
For deeper learning, we offer curated walkthroughs on Sopact.com. These are step-by-step video guides covering selected use cases. You can review them at your own pace whenever you need extra clarity.